Introduction to TestApi – Part 3: Visual Verification APIs
Series Index
- Overview of TestApi
- Part 1: Input Injection APIs
- Part 2: Command-Line Parsing APIs
- Part 3: Visual Verification APIs
- Part 4: Combinatorial Variation Generation APIs
- Part 5: Managed Code Fault Injection APIs
- Part 6: Text String Generation APIs
- Part 7: Memory Leak Detection APIs
- Part 8: Object Comparison APIs
+++
Visual Verification (VV) is the act of verifying that your application or component is displayed correctly on screen. The TestApi library provides a set of VV APIs. This post discusses these APIs.
Avoid It If You Can
First and foremost, I want to emphasize that visual verification is a test technique that should be used with caution. It is difficult to do correctly and any extensive use typically results in hard-to-maintain test codebases. Here are a few things to consider before you embark on VV test development:
- The UI of an application tends to change a lot during development. If you use visual verification extensively, you may end up in a situation where you have to update a large number of visual verification tests on a daily basis, which is a waste of effort.
- There are small differences in rendering between different video cards on different versions of the OS and of .NET. These differences are particularly pronounced in font rendering.
- Before employing any form of UI verification, one should always review the underlying application architecture. Extensive need for UI testing is typically indicative of poorly architected systems, lacking proper view-model separation, so it’s almost always better to invest in proper system architecture than in extensive UI testing.
- Whenever possible, attempt to do analytical visual verification i.e. one that does not employ the use of master images.
The WPF test team has gone through several iterations of cleaning up and retiring unnecessary visual verification tests in an attempt to speed up and stabilize our test suite.
General Concepts
The core VV terminology is:
- Snapshot: A pixel buffer used for representing and evaluating screen image data.
- Verifier: An oracle object which determines whether a snapshot passes against specified inputs.
- Actual: The snapshot being evaluated.
- Master: The reference data (image) which is used to evaluate the actual snapshot.
- Tolerance:The accepted bounding range based on which the actual snapshot will be accepted as valid.
The general VV workflow is:
- Capture some screen content.
- Generate an expected snapshot (e.g. load a master image from disk, etc.)
- Compare the actual snapshot to the expected snapshot and generate the difference (diff) snapshot.
- Verify the diff using a verifier.
- Report test result.
TestApi Visual Verification Technology
TestApi provides the following VV technology:
- Snapshot: this class represents image pixels in a two-dimensional array for use in VV. Every element in the array represents a pixel in a given [row, column] of the image. A Snapshot object can be instantiated from a file (Snapshot.FromFile), or captured from screen (Snapshot.FromWindow and Snapshot.FromRectangle). Snapshot also exposes image cropping (Snapshot.Crop), resizing, diff-ing (Snapshot.CompareTo) masking (Snapshot.And) and merging operations (Snapshot.Or) operations.
- Verifiers: the library provides a set of verifiers that can be used to verify a (diff) snapshot. SnapshotColorVerifier reports passing if
- Various utilities: example of these are the Histogram class, providing basic functionality for handling image histograms
Examples
SnapshotColorVerifier
With these prolegomena out of the way, let’s look at some code. The first example below demonstrates master visual verification using a basic color verifier, which ensures that the difference between the master snapshot and the actual snapshot is within a defined tolerance:
 // 1. Capture the actual pixels from a given window
Snapshot actual = Snapshot.FromRectangle(new Rectangle(0, 0, 100, 100));

// 2. Load the reference/master data from a previously saved file
Snapshot expected = Snapshot.FromFile("Expected.png"));

// 3. Compare the actual image with the master image
//    This operation creates a difference image. Any regions which are identical in
//    the actual and master images appear as black. Areas with significant
//    differences are shown in other colors.
Snapshot difference = actual.CompareTo(expected);

// 4. Configure the snapshot verifier - It expects a black image with zero tolerances
SnapshotVerifier v = new SnapshotColorVerifier(Color.Black, new ColorDifference());

// 5. Evaluate the difference image
if (v.Verify(difference) == VerificationResult.Fail)
{
    // Log failure, and save the diff file for investigation
    actual.ToFile("Actual.png", ImageFormat.Png);
    difference.ToFile("Difference.png", ImageFormat.Png);
}
This approach works fine if you are evaluating the correctness of an application logo or some other application art. You may find that you will need to increase the tolerance a bit to accommodate differences in GPU rendering, but in general the SnapshotColorVerifier provides all the functionality you need.
SnapshotHistogramVerifier
A somewhat more sophisticated approach involves using of image histograms (see this link for a good introduction to the subject). An image histogram is a histogram that represents the frequency of pixels with a certain brightness. One can define a histogram that represents his/her expectation of the “proximity of the match” between the actual and expected snapshots.
For example, one can define a histogram semantically equivalent to the following statement:
“When I compare the actual snapshot to the expected snapshot (both of 320 pixels), I expect no more than 30 pixels with color channel difference of 1, no more than 10 pixels with color channel difference of 2, and zero pixels with higher differences.”
This histogram would look as follows:
Figure 1 Image Histogram
Such form of verification is done by using the SnapshotHistogramVerifier and the Histogram classes, as demonstrated in the sample below.
 // Take a snapshot, compare to the master image and generate a diff
Snapshot actual = Snapshot.FromRectangle(new Rectangle(0, 0, 100, 100));
Snapshot expected = Snapshot.FromFile("Expected.png"));
Snapshot difference = actual.CompareTo(expected);

// Load the quality histogram from disk and use it to verify the diff
SnapshotVerifier v = new SnapshotHistogramVerifier(Histogram.FromFile("ToleranceHistogram.xml"));

if (v.Verify(difference) == VerificationResult.Fail)
{
    // Log failure, and save the actual and diff images for investigation
    actual.ToFile("Actual.png", ImageFormat.Png);
    difference.ToFile("Difference.png", ImageFormat.Png);
}
The histogram file is just a XML file with the following schema:
 <histogram>
  <tolerance>
    <point x="0" y="0.87500" />
    <point x="1" y="0.09375" />
    <point x="2" y="0.03125" />
    <point x="3" y="0" />
    <point x="4" y="0" />
    ...
    <point x="254" y="0" />
    <point x="255" y="0" />
  </tolerance>
</histogram>
This visual verification approach was pioneered in the WPF test organization about 6 years ago by Marc Cauchy and Pierre-Jean Reissman.
SnapshotToleranceMapVerifier
However, none of the two approaches above work particularly well for evaluation of a typical application window, containing controls, text, etc. Such windows tend to have regions that need different tolerance settings. For example, consider the application window below:
Figure 2 Sample Application Window
If you try to perform master based visual verification, you will hit 2 issues:
The non-client area of the window (the window frame) will tend to be slightly different between different runs of the application. It will also depend on environment factors such as the desktop wall-paper.
Some regions of the client area of the window will also tend to exhibit significant variance between runs of the application.
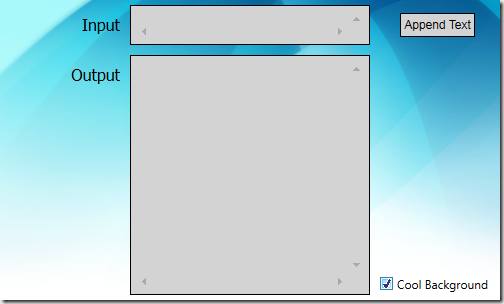
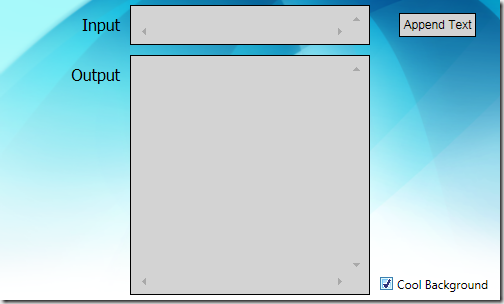
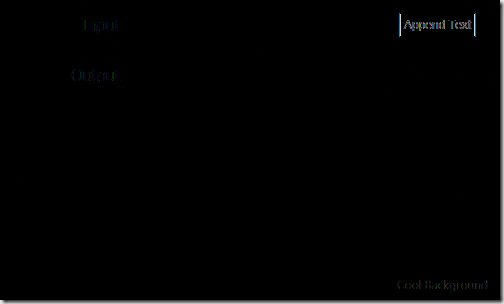
Issue (1) is easy to resolve, using Snapshot.FromWindow(...) and excluding the non-client area from the capture. Issue (2), however, is a bit more involved. Here are the expected, actual and diff snapshots of the client-area of the application.
 Figure 3a Expected Client-Area Snapshot
Figure 3b Actual Client-Area Snapshot
 Figure 3d Difference Snapshot – Completely Black Pixels Are Replaced With Pink
The differences between the expected snapshot and the actual snapshot are difficult to see on Figure 3c, so on Figure 3d I have replaced purely black pixels with pink.
It is not surprising that most of the variation occurs around the text regions in the application window (ClearType renders differently on different machines). So it may make sense to increase the tolerance (or completely mask away) those regions, providing of course we are not specifically interested in their rendering.
In order to achieve that, we use the SnapshotToleranceMapVerifier class. Here’s an example:
 // Take a snapshot, compare to the master image and generate a diff
Snapshot actual = Snapshot.FromWindow(hwndOfYourWindow, );
Snapshot expected = Snapshot.FromFile("Expected.png"));
Snapshot difference = actual.CompareTo(expected);

// Load the tolerance map. Then use it to verify the difference snapshot
Snapshot toleranceMap = Snapshot.FromFile("ExpectedImageToleranceMap.png");
SnapshotVerifier v = new SnapshotToleranceMapVerifier(toleranceMap);

if (v.Verify(difference) == VerificationResult.Fail)
{
    // Log failure, and save the actual and diff images for investigation
    actual.ToFile("Actual.png", ImageFormat.Png);
    difference.ToFile("Difference.png", ImageFormat.Png);
}
The tolerance map that we use looks as follows:
 Figure 4 Tolerance Map in “ExpectedImageToleranceMap.png”
What appears pure black (0x00FFFFFF) is actually an off-black color (0x000A0A0A) to handle the small variations that appear as black dots on Figure 3d. Then we also have 4 regions with significantly higher tolerance to handle the variability of the text rendering.
In Conclusion
The visual verification API in TestApi provides a solid foundation for visual verification tests. As a general best practice, however, avoid visual verification as much as possible.
Comments
Anonymous
April 20, 2009
PingBack from http://asp-net-hosting.simplynetdev.com/introduction-to-testapi-%e2%80%93-part-3-visual-verification-apis/Anonymous
April 20, 2009
PingBack from http://microsoft-sharepoint.simplynetdev.com/introduction-to-testapi-%e2%80%93-part-3-visual-verification-apis/Anonymous
April 20, 2009
Thank you for submitting this cool story - Trackback from DotNetShoutoutAnonymous
April 21, 2009
PingBack from http://www.alvinashcraft.com/2009/04/21/dew-drop-april-21-2009/Anonymous
April 24, 2009
The WPF test team is hard at work to provide value through a simple and componetized library of publicAnonymous
April 24, 2009
PingBack from http://www.codedstyle.com/wpf-testapi-v02-has-released/Anonymous
April 24, 2009
PingBack from http://www.codedstyle.com/wpf-testapi-v02-has-released-2/Anonymous
April 24, 2009
PingBack from http://www.codedstyle.com/wpf-testapi-v02-has-released-3/Anonymous
April 27, 2009
Last week, the WPF test team released a new version of their Test API: 0.2. You can download the newAnonymous
April 27, 2009
PingBack from http://www.codedstyle.com/announcing-wpf-testapi-02-release-12/Anonymous
April 27, 2009
PingBack from http://www.codedstyle.com/announcing-wpf-testapi-02-release-3/Anonymous
May 04, 2009
PingBack from http://www.codedstyle.com/announcing-wpf-testapi-02-release/Anonymous
May 04, 2009
PingBack from http://www.codedstyle.com/announcing-wpf-testapi-02-release-8/Anonymous
May 04, 2009
PingBack from http://www.codedstyle.com/announcing-wpf-testapi-02-release-14/Anonymous
January 27, 2010
Is there any ability to do testing with TestBox or Grid? Could you please explain how could I work with thier items? Thanks.Anonymous
July 20, 2010
Hi Ivo, I would like to adapt your framework guys to work under CLR 2.0 .. could I do that easy? Thanks, GregAnonymous
July 20, 2010
Hi Greg: The library (specifically the variation generation API) has a dependency on LINQ, so you need 3.5. You should however be able to easily recompile the Visual Verification API piece on 2.0 (and mind you, .NET Framework 3.5 uses the 2.0 CLR, so if you really mean 2.0 CLR, you should be fine) Note that .NET 3.5 SP1 already has 70%+ availability on all addressable machines, so your deployment costs would be small. IvoAnonymous
October 07, 2010
Can you provide some examples using ColorDifference? I'd like to understand how it uses these values when comparing two images. Thanks, == slm ==Anonymous
February 23, 2011
Is it possible to ignore certain color pixel on a reference image? Because sometime the surrounding background of a target image may change. Example are transparent window. So as long as the object within the reference image is correct. The matching is true.Anonymous
April 29, 2013
I want to capture ToolTip for a particular control,i'm using Codedui to do automation. As tooltip appears and disappears after few seconds is it fesable to capture tooltip text using this TestAPI, Note:After capturing the image I can see that tooltip is not captured in the master image.Anonymous
April 30, 2013
@Anil: Yes, you can capture the tooltip. You just need to ensure that: 1. You perform the capture while the tooltip is up 2. You capture screen contents, not window contents (i.e. use Snapshot.FromRectangle(new Rectangle(...))) or Snapshot.FromWindow(null, ...) - null is the HWND of the desktop window IvoAnonymous
April 30, 2013
@Peter Yeung: One way to deal with a different background is to have a known 2nd window appear below the window that is being captured -- i.e. use that 2nd window as a predictable background.Anonymous
July 28, 2014
I'm interested if there is a way to detect by % of difference? For example I don't know in what regions the images will be different but I know that if it more than 90% accurate should pass? Thank youAnonymous
November 13, 2014
This is a good API, but as indicated, the general concept has problems. I have another method that this API can be used that works better for me: I never keep master bitmaps around. What I do is I have test code that creates the expected results. It can do this in many ways. It might ask the app to take a very simple path through the app such as "here's some back-end data, just render it!" and then run the app again through the real code paths and compare the two. A few examples:
- Let's say you an application that has themes. When you launch your app and load the blue theme, it should look the same as when you launch the app, load the black theme, then replace it by loading the blue theme. You first created the expected result by loading the blue theme by itself, capture it. Then run your test, which is loading the black theme followed by the blue theme. Take a capture and verify
- Let's say you are testing a browser end-to-end test. You launch your browser, click a few buttons which goes through a bunch of server side code then a bunch of client side javascript to finally render what's on the screen. Ultimately, what's on the screen is a static html file (let's assume there's no ajax timers and nothing time-specific on the screen). You could do that manually, store the master file as the html file. Then when you run your test, load the stored html and take a screenshot. that becomes your expected result. Then run your unit test and compare against that. Yes, when the code changes, the html has to change. This technique also ensures that the same test code can run on different operating systems, with different OS themes, (vista to Windows 10), and the video-card doesn't matter because you're never ever comparing bitmaps generated from two different computers.
- Anonymous
November 13, 2014
@Kenneth: I completely agree with your point! Avoiding storing master images is always a good decision. Obviously in both of your examples, you have the risk of missing serious bugs. For example in (1), you have the risk of missing the bug where blue theme cannot be loaded at all and the system falls back to the black theme. You also miss the bug when the "blue" theme looks "red". :) In (2) you will miss all rendering bugs on your end screen as long as they don't result from the transitions you perform. Your uber point still stands though -- it's a good idea to attempt to always replace master images with dynamically generated "expected" images.


