Filtering and Formatting with Date Values
 Hi, I'm Andy Lewis, and I'm delighted to be joining the fine company of the various folks who have already posted to the SharePoint Designer blog. My current role is to write user assistance content for SharePoint Designer. In past jobs, I've designed and coded web applications, including both server and client code. I tend to get most interested in the user experience part of a software application, but of course the nuts and bolts of creating that experience are what make working in software challenging (and thus fun!). I'm here today to share ideas and some code that can help you work with dates in a Microsoft Office SharePoint Designer application.
Whatever data source you use in your application (SharePoint list, SharePoint library, database connection, etc.), you almost certainly will need to work with date values. For example, a SharePoint library has built-in fields to track when an item was created and when it was modified. And you might create your own date field in a list or table to designate when an item is due to a stakeholder, or when you estimate it will be done, or when it was completed.
Displaying a date value in a Data View is a fairly simple matter; you add it as you would any other column. If SharePoint Designer detects that the column holds date values, it automatically adds extra formatting (which you can customize) to properly display the date, and optionally the time. But filtering or conditionally formatting based on date values is a more complex capability to build.
In this article I'll show you how to build rich date-value capabilities with minimal effort. This article will:
- Walk you through some of the most common date-value scenarios and show you how to use SharePoint Designer to make them work. Specifically, we will:
- Conditionally format items between today's date and a calculated date field value
- Conditionally format items based on a date range
- Filter to show items within a date range
- Hack the CAML query to filter for items within a date range relative to today
- Filter a SQL Server database connection relative to today
- Show you how to Create a blank Data View
- Provide you with a library of date-oriented XSL templates that you can copy and paste directly into your SharePoint solution. This information includes:
Here are some code format conventions you will see in this article:
 <p>This is code you need to add within this code block.</p>

<p>This is code you need to delete within this code block.</p>

<p>The ellipses that follow indicate code that continues after this point
but is truncated ...
Note: Some of the material that explains how to perform the more basic tasks is hidden from view by default if you have JavaScript turned on. If you want to print this article with all the material included, click here: Show All.
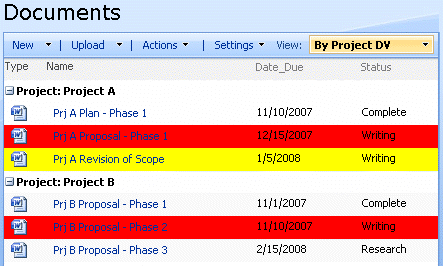
Conditionally format items between today's date and a calculated date field value
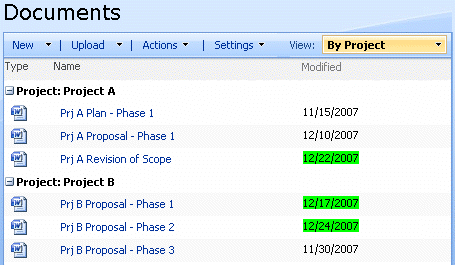
Suppose you have a large document library and want emphasize those items that have been recently modified (within the past 15 days) so that it is easier for your customers to notice and then optionally look at whatever changes were made to those documents. You decide to use conditional formatting rather than a filter because you want to show the documents in the way your customers typically want to see them, with all the documents shown grouped by project.
The final result could look something the following image, in which documents modified in the past 15 days show the Modified date highlighted in green:
A calculated field is one mechanism you can use to determine a date range that is defined on one end by a today's date and on the other end by a date that is n days before or after today's date.
Format of calculated date field is different than standard date field
There is one wrinkle to using a calculated field for this purpose. The actual format of the data returned by a calculated date field is MM/DD/YYYY. The conditional formatting feature of SharePoint Designer expects to get the data in ISO format (YYYY-MM-DDTHH:MM:SSZ). For, example if the date value is 11/30/2007, then the format of the data returned from a SharePoint list would be:
- From a Date and Time field (Date Only) in the Pacific time zone: 2007-11-30T08:00:00Z
- From a Calculated date field (Date Only): 11/30/2007.
To deal with this inconsistency, we will tweak the XSL code generated by the SharePoint Designer conditional formatting feature, and leverage one of the XSL templates in the date template library shown below.
Steps
Create the Modified_Recently calculated field with a formula of [Modified] + 15. How?
- From your document library, click Settings and then choose Document Library Settings.
- Under Columns, click Create column.
- In the Column name field, type Modified_Recently.
- Choose Calculated (calculation based on other columns).
- In the Formula field, type [Modified] + 15.
- Choose Date and Time under The data type returned from this formula is. Also, make sure Date Only is selected under Date and Time Format.
- Click OK.
Create a list view. For example:

Convert the list view to a Data View. How?
- Open the ASPX page that contains the list view in SharePoint Designer.
- In Design view, right-click the ListViewWebPart object and choose Convert to XSLT Data View.
- Click File and choose Save. When the Site Definition Page Warning is displayed, click Yes.
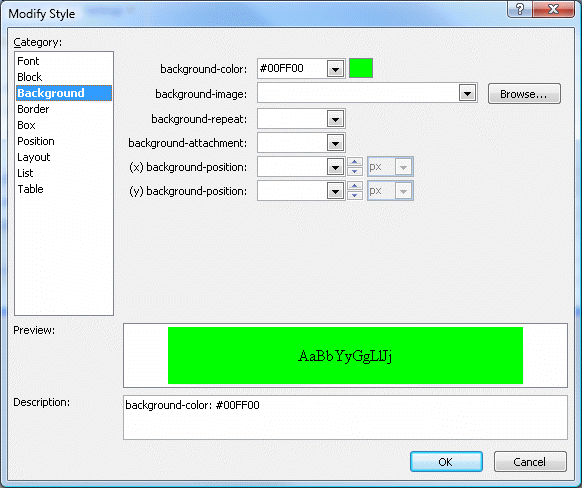
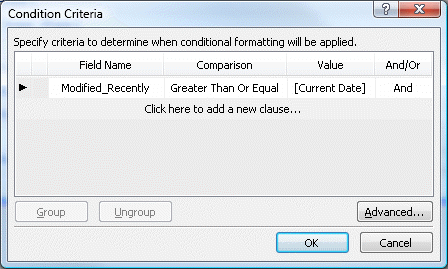
Apply conditional formatting that displays the value in the Modified column with a background color of green (#00FF00) when Modified_Recently Greater Than Or Equal [Current Date]. How?
In Design view, in the Data View, select one of the values in the Modified column.
Click Data View and then choose Conditional Formatting.
In the Conditional Formatting task pane, click Create, and then click Apply Formatting.
In the Condition Criteria dialog box, specify this criterion:

and then click OK.
Make the background green (or whatever formatting you want to use) when a document has been recently modified:
and then click OK.
You observe that the conditional formatting you applied had no effect. This is because of the date format issue discussed earlier. In the next steps we will fix this problem.
Make the convertCalcDateValue template available to the XSL stylesheet in your Data View. See Make the date templates available to your Data View for information on how to do this.
Find the XSL code that displays the Modified field. One way to do this is to switch to Split view and select one of the values in the Modified column.
Create a variable that reformats the Modified Recently value from MM/DD/YYYY format to ISO format (YYYY-MM-DDTHH:MM:SSZ).
<TD Class="{$IDAAOPHB}"> <xsl:variable name="Modified_Recently_ISO"> <xsl:call-template name="convertCalcDateValue"> <xsl:with-param name="paramDate" select="@Modified_Recently"/> </xsl:call-template> </xsl:variable> <NOBR><span> <xsl:attribute name="style"> <xsl:if test=" number(translate(substring-before(@Modified_Recently$Modified_Recently_ISO,'T'), '-','')) >= number(translate(substring-before($Today,'T'),'-',''))"> background-color: #00FF00; </xsl:if> </xsl:attribute> <xsl:value-of select="ddwrt:FormatDate(string(@Modified) ,1033 ,1)" /> </span></NOBR> </TD>


The calculated field method has several limitations:
- This approach works only if your data source is a SharePoint list or library. If your data source is database connection or the Business Data Catalog, then you need another solution (see the following sections).
- You need a field for each date value that needs to be part of a date range. So for example, if you wanted to show different colors depending on how recently a document was modified, you would need a different calculated field for each date range.
- You cannot specify date ranges such as "last quarter" or "next month".
Despite these limitations, the example above illustrates how the convertCalcDateValue template gives you a way to take the value from a calculated date field and work with it in a Data View to do conditional formatting. You can also use this template to do filtering or whatever else you need to do with value from a calculated date field.
Next, I'll describe how to do conditional formatting using a pure XSL solution with no calculated field needed.
Conditionally format items based on date range
Suppose you want to give your customers better visibility of documents that require attention because they are not yet complete and they are either due soon (for example, within 15 days) or overdue. You want to offer a Data View that looks something like this:
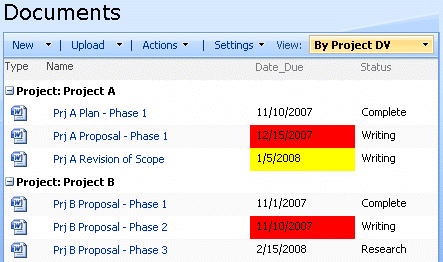
Note: In the above example, assume that today's date is 1/3/2008.
Although our example for this section is a SharePoint document library, the techniques in this section will work for any kind of data source (database connection, Business Data Catalog, and so on). Here is how you build this kind of view:
Create a list view with the fields and grouping as shown in the above screenshot.
Convert the list view to a Data View. How?
- Open the ASPX page that contains the list view in SharePoint Designer.
- In Design view, right-click the ListViewWebPart object and choose Convert to XSLT Data View.
- Click File and choose Save. When the Site Definition Page Warning is displayed, click Yes.
Make the date templates available to your Data View. For information on how to do this, see Make the date templates available to your Data View.
Make sure the ParameterBinding named Today is included in the ParameterBindings tag of the Data View. How?
- In Code view, find the ParameterBindings start-tag.
- Make sure <ParameterBinding Name="Today" Location="CAMLVariable" DefaultValue="CurrentDate"/> is in the contents of the <ParameterBindings> element.
Make sure the Parameter named Today is included in the XSL style sheet of the Data View. How?
- In Code view, find the xsl:stylesheet start-tag.
- Make sure <xsl:param name="Today"/> comes somewhere after the xsl:stylesheet start-tag and before the first xsl:template element within the stylsheet.
Find the XSL code that displays the Date_Due field. One way to do this is to switch to Split view and select one of the values in the Date_Due column.
Use the dueDateDelta template to add conditional formatting to the the Date_Due field by adding the highlighted code:
<!--Date_Due--> <TD Class="{$IDABW30D}"> <!-- if this document is not complete --> <xsl:if test="@Status != 'Complete'"> <!-- get the delta in days between the due date and today --> <xsl:variable name="dueDateDelta"> <xsl:call-template name="getDayDelta"> <xsl:with-param name="paramDateA" select="@Date_Due"/> <xsl:with-param name="paramDateB" select="$Today"/> </xsl:call-template> </xsl:variable> <xsl:choose> <!-- if due date is before today, then document is overdue, so highlight in red --> <xsl:when test="$dueDateDelta < 0"> <xsl:attribute name="style">background-color:#FF0000;</xsl:attribute> </xsl:when> <!-- if due date within 15 days after today, then document is due soon, so highlight in yellow--> <xsl:when test="$dueDateDelta < 15"> <xsl:attribute name="style">background-color:#FFFF00;</xsl:attribute> </xsl:when> </xsl:choose> </xsl:if> <NOBR> <xsl:value-of disable-output-escaping="no" select="ddwrt:FormatDate(string(@Date_Due),number($Language),1)" /> </NOBR> </TD>
Notice that we used a slightly different visual effect in this example than in the prior example. We light up the entire table cell, which may be more noticeable than in the previous example, where we used a span to restrict the conditional formatting to highlight just the text inside the table cell. Suppose you wanted to make the effect even more noticeable by highlighting the entire row:
To do this, you simply need to move the xsl:if block just below the tr tag (How?):
The code would look something like this (new code is highlighted):
<TR style="display:{$dvt_GroupStyle}">
<xsl:if test="position() mod 2 = 0" ddwrt:cf_ignore="1">
<xsl:attribute name="class">ms-alternating</xsl:attribute>
</xsl:if>
<!-- if this document is not complete -->
<xsl:if test="@Status != 'Complete'">
<!-- get the delta in days between the due date and today -->
<xsl:variable name="dueDateDelta">
<xsl:call-template name="getDayDelta">
<xsl:with-param name="paramDateA" select="@Date_Due"/>
<xsl:with-param name="paramDateB" select="$Today"/>
</xsl:call-template>
</xsl:variable>
<xsl:choose>
<!-- if due date is before today, then document is overdue, so highlight in red -->
<xsl:when test="$dueDateDelta < 0">
<xsl:attribute name="style">background-color:#FF0000;</xsl:attribute>
</xsl:when>
<!-- if due date within 15 days after today, then document is
due soon, so highlight in yellow-->
<xsl:when test="$dueDateDelta < 15">
<xsl:attribute name="style">background-color:#FFFF00;</xsl:attribute>
</xsl:when>
</xsl:choose>
</xsl:if>
After you create this Data View, there are a lot of ways you could further enhance it. For example, for overdue items you could offer a link that sends mail to the owner of the document requesting more information.
Filter to show items within a date range
Now for our trickiest and most interesting scenario: filtering a Data View based on a date range. Although you can directly filter a Data View in a number of ways, when it comes to filtering a Data View based on a date, the only option available out of the box is to filter items based on a date value relative to today. So you can quickly create a Data View that answers questions like these:
- Is date_due before today?
- Is date_due equal to or after today?
But typically web applications need to answer date-oriented questions such as these:
- What work is due in the next 60 days?
- What work is due between date A and date B?
- What work did we complete last month?
- What work did we complete last quarter?
In order to answer these kinds of business questions, you need to do some extra work to filter your Data View.
Create a Data View that shows documents due in various date ranges
For this example, we will create a Data View that can show items that are due within a few different ranges:
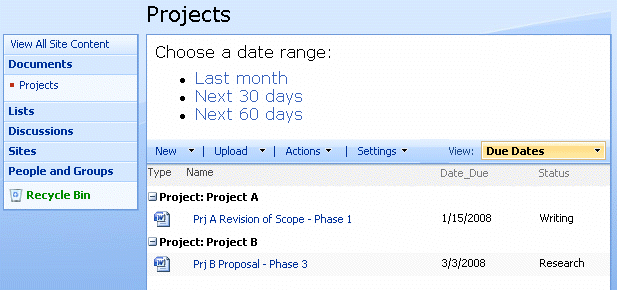
The following steps describe how to create this kind of Data View.
Create a list view with the fields and grouping as shown in the above screenshot.
Convert the list view to a Data View. How?
- Open the ASPX page that contains the list view in SharePoint Designer.
- In Design view, right-click the ListViewWebPart object and choose Convert to XSLT Data View.
- Click File and choose Save. When the Site Definition Page Warning is displayed, click Yes.
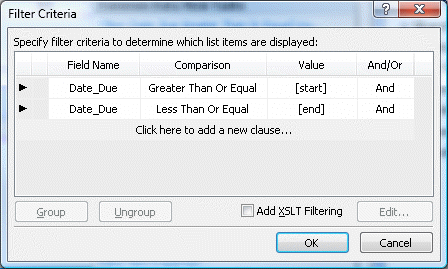
Apply a filter to the Data View so that it shows only items in which Date_Due is greater than or equal to [start] and less than or equal to [end], where [start] and [end] are Query String parameters. How?
Click the Data View, and then click the arrow
 in the upper-right corner.
In the Common Data View Tasks list, click Filter.
In the Filter Criteria dialog box, create the first condition of the filter criteria:
- Click Click here to add a new clause....
- In the Field Name column, select Date_Due.
- In the Comparison column, select Greater Than Or Equal.
- In the Value column, select Select Create a new paramter.
- In the Data View Parameters dialog box, type start.
- From the Parameter Source field, select Query String.
- In the Query String Variable field, type start.
- In the Data View Parameters dialog box, click OK.
In the Filter Criteria dialog box, create the second condition of the filter criteria:
- Click Click here to add a new clause....
- In the Field Name column, select Date_Due.
- In the Comparison column, select Less Than Or Equal.
- In the Value column, select Select Create a new paramter.
- In the Data View Parameters dialog box, type end.
- From the Parameter Source field, select Query String.
- In the Query String Variable field, type end.
- In the Data View Parameters dialog box, click OK.
The final result looks like this:
Add some room above the Projects Data View by inserting a few paragraphs above it.
 <asp:Content ContentPlaceHolderId="PlaceHolderMain" runat="server">

<p></p>
<p></p>
<p></p>

<WebPartPages:DataFormWebPart ...
Create a blank Data View by dragging it above the Projects Data View. For detailed steps, see Create a blank Data View.
Make the supplemental date templates available to your blank Data View. For detailed steps, see Make the supplemental date templates available to your Data View.
Replace the contents of the <xsl:template> tag inside the blank Data View with the following code.
<xsl:template match="/"> <p style="margin:.5em 0 .5em .5em">Choose a date range:</p> <ul style="margin:0 0 1em 3em"> <li> <a> <xsl:attribute name="href"> <xsl:text>Due_Dates.aspx?</xsl:text> <xsl:text>start=</xsl:text> <xsl:call-template name="getDateRange"> <xsl:with-param name="paramBaseDate" select="$Today"/> <xsl:with-param name="paramRangePeriod">LAST</xsl:with-param> <xsl:with-param name="paramRangeType">MONTH</xsl:with-param> <xsl:with-param name="paramRangeBoundary">START</xsl:with-param> </xsl:call-template> <xsl:text>&</xsl:text> <xsl:text>end=</xsl:text> <xsl:call-template name="getDateRange"> <xsl:with-param name="paramBaseDate" select="$Today"/> <xsl:with-param name="paramRangePeriod">LAST</xsl:with-param> <xsl:with-param name="paramRangeType">MONTH</xsl:with-param> <xsl:with-param name="paramRangeBoundary">END</xsl:with-param> </xsl:call-template> </xsl:attribute> <xsl:text>Last month</xsl:text> </a> </li> <li> <a> <xsl:attribute name="href"> <xsl:text>Due_Dates.aspx?</xsl:text> <xsl:text>start=</xsl:text> <xsl:value-of select="substring-before($Today,'T')"/> <xsl:text>&</xsl:text> <xsl:text>end=</xsl:text> <xsl:call-template name="getDateFromDays"> <xsl:with-param name="paramBaseDate" select="$Today "></xsl:with-param> <xsl:with-param name="paramDelta">30</xsl:with-param> </xsl:call-template> </xsl:attribute> <xsl:text>Next 30 days</xsl:text> </a> </li> <li> <a> <xsl:attribute name="href"> <xsl:text>Due_Dates.aspx?</xsl:text> <xsl:text>start=</xsl:text> <xsl:value-of select="substring-before($Today,'T')"/> <xsl:text>&</xsl:text> <xsl:text>end=</xsl:text> <xsl:call-template name="getDateFromDays"> <xsl:with-param name="paramBaseDate" select="$Today "></xsl:with-param> <xsl:with-param name="paramDelta">60</xsl:with-param> </xsl:call-template> </xsl:attribute> <xsl:text>Next 60 days</xsl:text> </a> </li> </ul> </xsl:template>


Move filter links to left nav area
It is not a great use of page real estate to have the links appear over the Data View. A better UI design would be to have the links appear in the left navigation area, highlighted in red below:

The following steps describe how to put these links in the left navigation bar.
Create a new master page by copying and modifying default.master. Add a new content placeholder called PlaceHolderDataViewParameters.
 ...

<td valign="top" width="100%">
   <asp:ContentPlaceHolder id="PlaceHolderLeftNavBarDataSource" runat="server" />
   <asp:ContentPlaceHolder id="PlaceHolderCalendarNavigator" runat="server" />
   <asp:ContentPlaceHolder id="PlaceHolderLeftNavBarTop" runat="server"/>
   <asp:ContentPlaceHolder id="PlaceHolderDataViewParameters" runat="server" />
   <asp:ContentPlaceHolder id="PlaceHolderLeftNavBar" runat="server">

...
(For a detailed explanation of how to copy and modify the default master page, see Modify the default master page.)
Edit the content page you created in the previous section in Code view and add the PlaceHolderDataViewParameters content placeholder to the content page.
 <asp:Content ContentPlaceHolderId="PlaceHolderDataViewParameters" runat="server">
<div class="ms-quicklaunchouter">
<div class="ms-quickLaunch" style="width:100%;">

<WebPartPages:DataFormWebPart ... />

...

</WebPartPages:DataFormWebPart>
</div>
</div>
</asp:Content>
Note that to make the presentation nicer and consistent with the default SharePoint site look and feel, we use a few nested div tags.
Move the Data View you created into the new content placeholder.
Final comments on date range filtering
One advantage of the approach described above is that it filters the data at the database layer of the application. You could use the Add XSLT Filtering checkbox in the Filter Criteria dialog box to accomplish a similar result, but you would have several potential issues if you use that model. For large sets of data, performance would suffer and the load on the database server would be higher. You would also need to create multiple pages, one for each filter you want to use, rather than being able to leverage a single page for all of the filters you need to offer your users.
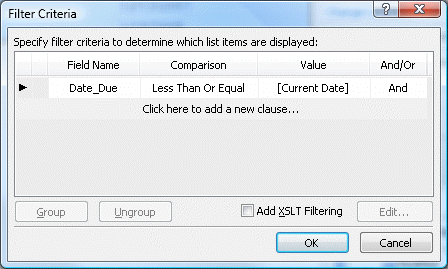
Hack the CAML query to filter for items within a date range relative to today
I know this sounds violent, but I promise this procedure does not involve harming animals. As discussed above, you can use the Filter Criteria dialog box to restrict a Data View to showing only list items with date values before, on, or after today. But it does not let you filter to show list items with a due date that is either due soon (say within 15 days from today) or overdue (in the past). There is a fairly simple workaround for this limitation.
Create a Data View and apply the following filter in the Field Criteria dialog box: Date_Due Less Than Or Equal [Current Date].

In Code view, find the SharePoint:SPDataSource tag. Within that tag, find the selectcommand attribute. It should look something like this:
<SharePoint:SPDataSource ... selectcommand="<View><Query><OrderBy><FieldRef Name="Date_Due" Ascending="TRUE"/></OrderBy><Where><Leq><FieldRef Name=" Date_Due"/><Value Type=" DateTime"><Today/></Value></Leq></Where></Query></View>" ... >Let's make a few harmless text replacements to the selectcommand attribute to make it more readable:
 <SharePoint:SPDataSource
   ...
   selectcommand="<View><Query>
   <OrderBy><FieldRef Name='Date_Due' Ascending='TRUE'/></OrderBy>
   <Where><Leq><FieldRef Name='Date_Due'/><Value Type='DateTime'><Today/></Value>
   </Leq></Where></Query></View>"
   ...
>
Add the OffsetDays attribute to the Today element and set its value to a negative integer to yield a date n days before today or a positive integer to yield a value n days after today. For this example, we want to show items due before 15 days after today.
 <SharePoint:SPDataSource
   ...
   selectcommand="<View><Query>
   <OrderBy><FieldRef Name='Date_Due' Ascending='TRUE'/></OrderBy>
   <Where><Leq><FieldRef Name='Date_Due'/><Value Type='DateTime'><Today OffsetDays='15'/></Value>
   </Leq></Where></Query></View>"
   ...
>
For more information on CAML syntax, see Collaborative Application Markup Language (CAML).
Filter a SQL Server Database Connection relative to today
I recently created a Data View of a SQL Server database connection and tried to filter the records relative to today's date. For example, to show all records where Date_Due is equal or greater than today's date. There is an issue with the Filter Criteria dialog box so that when you try to set this up, the Data View fails, showing this message in Design view: The server returned a non-specific error when trying to get data from the data source. Check the format and content of your query and try again. If the problem persists, contact the server administrator.
I found a workaround by looking up the literal that SQL Server uses to represent today's date. So after you create a Data View and apply the filter using the Filter Criteria dialog box, go into Code view and in the SelectCommand attribute, replace @Today with CURRENT_TIMESTAMP. For example:
<asp:SqlDataSource
...
SelectCommand="SELECT * FROM [vw_ProjectDocs] WHERE [Date_Due] >= @Today CURRENT_TIMESTAMP"
>
Create a blank Data View
Sometimes it's handy to be able to dynamically render HTML at runtime. For example, you might need to create a hyperlink that includes today's date as a query string argument. You can use a Data View to obtain data such as today's date or arguments from the page's query string. You can use its XSL parser to then render HTML using XSL's various capabilities (string manipulation, math functions, conditional logic, etc.)
Following are the steps to create a blank Data View.
Copy the the following text into a blank text file and save it as blankdv.xml.
 <?xml version="1.0" encoding="utf-8" ?>
<item></item>
Edit the .aspx page where you need the dynamic HTML generation and switch to Design view.
From the Data Source Library task pane, drag blankdv.xml onto the place in the page where you need the dynamically-rendered HTML.
Because we don't plan to show any data, we want to make the code of the Data View as small and simple as possible to make adding our custom XSL as simple as possible. One way to do this follows.
Click the Data View, and then click the arrow
in the upper-right corner to show the Common Data View Tasks list.On the Common Data View Tasks list, choose Change Layout. Then, in the Data View Properties dialog box, choose the plain list layout.
Click OK.
In Code view, make the following modifications to the XSL block in the Data View.
 <XSL>
<xsl:stylesheet version="1.0" exclude-result-prefixes="xsl msxsl ddwrt"
   xmlns:ddwrt="https://schemas.microsoft.com/WebParts/v2/DataView/runtime"
   xmlns:asp="https://schemas.microsoft.com/ASPNET/20"
   xmlns:__designer="https://schemas.microsoft.com/WebParts/v2/DataView/designer"
   xmlns:xsl="https://www.w3.org/1999/XSL/Transform"
   xmlns:msxsl="urn:schemas-microsoft-com:xslt"
   xmlns:SharePoint="Microsoft.SharePoint.WebControls"
   xmlns:ddwrt2="urn:frontpage:internal">
<xsl:output method="html" indent="no"/>
<xsl:decimal-format NaN=""/>
<xsl:param name="FileName" />
<xsl:param name="dvt_apos">'</xsl:param>
<xsl:param name="Today"/>

<xsl:variable name="dvt_1_automode">0</xsl:variable>
<xsl:template match="/">
   <xsl:call-template name="dvt_1"/>
   Hello World!<br/>
   Today is <xsl:value-of select="$Today"/>. <br/>
   Put your content here.

</xsl:template>

<xsl:template name="dvt_1">
<xsl:variable name="dvt_StyleName">NumTitl</xsl:variable>
<xsl:variable name="Rows" select="/item" />
<ol>
<xsl:call-template name="dvt_1.body">
<xsl:with-param name="Rows" select="$Rows" />
</xsl:call-template>
</ol>
</xsl:template>
<xsl:template name="dvt_1.body">
<xsl:param name="Rows" />
<xsl:for-each select="$Rows">
<xsl:call-template name="dvt_1.rowview" />
</xsl:for-each>
</xsl:template>
<xsl:template name="dvt_1.rowview">
<li class="ms-vb">
<xsl:value-of select="text()" />
<xsl:if test="$dvt_1_automode = '1'" ddwrt:cf_ignore="1">
<br /><span ddwrt:amkeyfield="" ddwrt:amkeyvalue="string($XPath)" ddwrt:ammode="view" />
</xsl:if>
</li>
</xsl:template>

</xsl:stylesheet>
</XSL>
</WebPartPages:DataFormWebPart>
Replace the content of the <xsl:template> tag with your content.
SharePoint Designer Supplemental Date Templates
This section provides the date templates you need to build date filtering and date-driven conditional formatting features into your Data Views. You might reasonably ask whether it makes sense to use XSL this way; why not just use ASP.NET code, where a rich API provides a wealth of calendar-oriented functionality. And if you can put code on a server, then that option could make sense.
But for those of us who don't have our own server, or who don't have the permissions to put code on a server, then the date templates in this section provide a way for you to expand the kind of applications you can build with nothing more than the Full Control permission level in a SharePoint site plus SharePoint Designer. Furthermore, it is generally expensive to create and maintain custom ASP.NET code, and there is additional security risk as well. If you can stretch a Data View to do what you need, then you can save yourself a lot of trouble.
Capabilities provided by these templates
By copying these templates into your SharePoint site, you get the benefit of these capabilities:
Convert a calculated field value into ISO format (convertCalcDateValue)
Get number of days between two dates (getDayDelta)
Get start and end dates for various date ranges relative to today such as last month, next month (getDateRange)
Get date that is n days before or after a date (getDateFromDays)
Various utility templates
Note: getDateFromDays is not leap-year accurate. So while I have not yet solved this problem, if you can think of a good solution, I encourage you to post it as a comment to this article.
Make the date templates available to your Data View
There are two ways to make the date templates available to your Data View:
- Copy the templates into a separate .xsl template file and add an xsl:import tag to your Data View.
- Copy the individual templates you need into the XSL block of the Data View.
Copy the date templates into the Data View
If you want to quickly and simply pull the templates into a Data View, perhaps to try them out, you can simply copy them into your Data View directly.
- Select the templates you want to use (including any templates that they call) in the Template Code section of this article and copy them to the clipboard.
- In SharePoint Designer, edit the page that contains your Data View in Code view, put the cursor before the first xsl:template start-tag in the Data View, and then paste the templates into the Data View.
Create and use date templates by importing from a separate file
This method is efficient and has the advantage of letting you use the same set of templates from multiple Data Views in multiple pages in your site. If you need to enhance or add to the templates for your own needs, having them in a single file means you have to modify them in only one place.
Important: There seems to be a problem with using this method if you created your Data View by converting a list view to the Data View. The page renders OK in the web browser, but fails to render visually in Design or Split view in SharePoint Designer. So one way to work around this issue is to copy the templates into your Data View until you are done designing it, and then as a last step, switch to using the import method described below.
First create the file:
- In SharePoint Designer, click File, and then click New.
- Click General, and then click Text File.
- Switch to this browser window, select the templates in the Template Code section of this article and copy them to the clipboard.
- Switch to SharePoint Designer and paste the templates into the new text file.
- Click File, and then click Save.
- Save the file to the directory where you want it to be stored, with the name you want to give it (for example https://mysite/shared_templates/date_templates.xsl.
Next import the date templates into your Data View so that you can use them in your XSL code:
Edit the page that contains your Data View in Code view and find the xsl:stylesheet start-tag.
Insert a new xsl:import tag immediately after the xsl:stylesheet start-tag. For example, if the page that contains your Data View is https://mysite/reports/due_dates.aspx, and the date templates are stored in https://mysite/shared_templates/date_templates.xsl, then you would modify your Data View as follows:
 <xsl:stylesheet ...
   <xsl:import href="../shared_templates/date_templates.xsl"/>
   <xsl:output method="html" indent="no"/>
   ...
Template Code
Attached to the bottom of this article is the XSL code for the date templates. I recommend you download it rather than view it in your web browser. In Internet Explorer, you can download it by right-clicking the date_templates.xsl link and choosing Save Target As.
Conclusion
I hope you find the material in this article useful. I want to give special thanks to John Jansen, Rob Howard, Eray Chou, and Les Smith for their contributions, suggestions, and tips for this article. I look forward to hearing your feedback and questions, and especially to seeing your solution to make the getDateFromDays template leap-year accurate!
Comments
Anonymous
February 29, 2008
Very good post! You might want to correct relative links inside of your document thouth. (http://blogs.msdn.com/controlpanel/blogs/posteditor.aspx?SelectedNavItem=Posts§ionid=6702&postid=7897370#get_date_templates)Anonymous
March 01, 2008
Proprio di recente ho visto fare a Barbara e Betta dei lavori incredibili a colpi di Data Views ed XSLTAnonymous
March 01, 2008
Boris: thanks for the heads up about the problem with the links. I repaired them and they should be working now. AndyAnonymous
March 02, 2008
Great post, thanks! Any suggestions how to include the time part in the filter? My app requires a more fine-grained filtering on time, e.g. show the red highlight if the due date&time was earlier today, but not if it is later in the afternoon. AlexAnonymous
March 03, 2008
The comment has been removedAnonymous
March 03, 2008
OK. Any thoughts then how to filter on date & time? Say I want to set up a number of filter links like this: "Overdue", "Due within 3 hours", "Due within 24 hours", "Due within 3 days"? My findings are that the SharePoint object model (WSS2 at least) strips out the time part in a query, but I hope I'm wrong. I also suspect that there is a real bug, because I think converts the datetime (with time set to 0:00) to UTC, and then strips again the hour bit. So if you feed in a datetime like 2008-03-04 0:45+0200 in a "GT" CAML query, datetimes from yesterday (2008-03-03) also match. Thanks, AlexAnonymous
March 04, 2008
Wow, that really is a hideous ordeal to go through just to use the current date in a usable filter. Not having [DATE] available in calculated cells either makes Sharepoint pretty much useless for date-sensitive purposes. Looking at your "simple" fixes, I think installing any other CMS in existence and then configuring it would be much more "simple".Anonymous
March 04, 2008
Thank you very much for this post It has been a huge help. DAnonymous
March 05, 2008
I want to connect to Database form MOSS designer probably to A SQL server 2005 when i tried to connect to database using the server name, username and paasword it gave me an error saying "Server error: error while connecting to database". mentioning the server name please help me this is critical..Anonymous
March 09, 2008
i want to configure e mail in my sharepoint.how i do that? i.e i have buttons named inbox sent itens etc, on clicking on that appropriate button the appropriate links has to open in the same aspx page. how do i do thatAnonymous
March 12, 2008
We do a lot of work based on week number. how would you go about figuring out the week number and filter for the current week number?Anonymous
March 17, 2008
Hi.. Can someone tell me if this method works on a DataFormWebPart? I have been trying (unsuccessfully) to apply this to the above DataFormWebPart. If this does not work with this type, is there another method? I have been pulling my hair out because of this.. Thanks, GusAnonymous
March 18, 2008
Well, I've tried following your instructions, but in SharePoint Designer, when trying to set up the dataview web part's filter, I can only choose 'string' type comparison operations. 'Greater Than' and 'Less Than' are unavailable, but 'Contains' and 'Begins With' are. Yet a different user on a different client PC does have the 'Greater Than', etc. options. What gives, any ideas? I don't think I'm the first person to see this problem either...Anonymous
March 19, 2008
Hi I'm getting wrong dates when I try to use your "getDateFromDays" function having a negative number as days... Everything works just fine when I use positive numbers, as soon as I use a negative one it get's weird results... Example Today (March 18, 2008) I put "-30" as paramDelta value it outputs 2007-12-80 as date... Is it just me, my configuration or does anybody else have the same problem?? Thank you for any information to solve thisAnonymous
March 19, 2008
oops... just to be exact: the "Today" Date is/was March 20, 2008 not the 18th...Anonymous
March 20, 2008
Hi Again, I managed to get the functionality to work in a standard DFWP. However, once I apply the "EDIT" functionality it errors with the following message: Failed Setting processor stylesheet : 0x80004005 : Required attribute '{http://www.w3.org/1999/xsl/Transform}version' is missing. Error occurred during compilation of included or imported stylesheet "../Shared Documents/VFlow/Date_templates.xsl'. Has anyone else come across this? And, is there any solution? ThanksAnonymous
March 21, 2008
The comment has been removedAnonymous
March 22, 2008
Cool Thanks Andy, that fix it right away :) CheersAnonymous
March 26, 2008
The comment has been removedAnonymous
March 31, 2008
Hi Martin, My experience to filtering a DFWP for date values is limited to using a query string parameter. Perhaps you could use a GET form so that the argument is passed via the query string. AndyAnonymous
April 02, 2008
I was trying your post, when I made the date templates availables to my Data View got the following error: "This web element doesn't have a valid stylesheet XSLT ERROR: XML declaration not valid" I'm working with MOSS 2007 in spanish Thanks a lotAnonymous
April 10, 2008
Martin - After looking into your question about using a Calendar control for filtering, there seems to be two issues going on.
- As noted in the comments of http://blogs.msdn.com/sharepointdesigner/archive/2007/03/05/asp-net-controls-filter-the-data-view.aspx, there are situations where the Text property is not the one we want to get the value from. For the calendar control you need to make sure to use the SelectedDate property. <ParameterBinding Name="Param1" Location="Control(Calendar1,SelectedDate)" DefaultValue="4/10/2008 12:00 AM"/>
- The date that is output by the control does not match the format expected by the SharePoint List datasource. Because of that, source level filtering won't work. One way to work around this would be to create a custom control that wrapped the calendar control, but made sure to format the SelectedDate as UTC. The other option is to use XSLT filtering combined with the ddwrt:FormatDateTime runtime function: ddwrt:FormatDateTime(string(@Modified), 1033, 's') = ddwrt:FormatDateTime(string($Calendar), 1033, 's')
Anonymous
April 11, 2008
Mario: I suggest you try making the templates available inline rather than importing them. Edit the page that contains your Data View in Code view, put the cursor before the first xsl:template start-tag in the Data View, and then paste the templates into the Data View. AndyAnonymous
April 16, 2008
The comment has been removedAnonymous
May 07, 2008
Hi I would like to implement this however i get an eror xsl:import may not be used here when i try and import your stylesheet as described Cheers craigAnonymous
May 08, 2008
Hi, craig. Please make sure that you inserted the xsl:import tag immediately after the xsl:stylesheet start-tag, as described above.Anonymous
May 21, 2008
The comment has been removedAnonymous
July 06, 2008
Hi All, We are now facing a problem with the calculated datetime field in WSS. The regional setup is GMT+8. The time displayed in the WSS list form webpart is correct. But when it comes to the Dataview webpart, the calculated date time is 8 hours faster than it should be. Pls kindly advise. Thanks. BenAnonymous
July 15, 2008
Hi Ben, Unfortunately, you have run into a known issue with regard to Calculated date fields. We have the issue logged in our database for consideration in the next Service Pack, and we are tracking it for the next version of Office as well. AndyAnonymous
July 29, 2008
Hi, I'm trying to filter a DataView in SharePoint Designer by a date range. But I want the user can enter the dates (From - To), and display the items that where Created after "From date" and before "To date". Is it possible? I'm new with SharePoint Designer and I don't know how to accomplish it. Thanks,Anonymous
August 06, 2008
Thanks Andy Lewis, I really appreciate for this post specially when I am looking for a small solution for one of my SharePoint list. Basically, the list contains employee name along with BirthDate and Date of Joining and I would like to view only those names who are celebrating their birthday in current month. As describe in the Blog http://www.sharepointblogs.com/mkruger/archive/2007/06/26/using-today-in-a-calculated-formula-birthday-lists.aspx I have tried, but it is limited to the fact that it doesnt update automatically on first day of next month ! ie, the filter gives you correct result at the time of creating it only and it doesn't update automatically. I believe that you probably let us know how to accomplish the desire results. Thanks, HitendraAnonymous
August 11, 2008
The comment has been removedAnonymous
September 16, 2008
Hi, I'm Andy Lewis. Welcome to my blog on MSDN, which is also my first blog. Even as I type this sentence,Anonymous
September 30, 2008
Is it possible to apply filters/columns for links in a document library? I've set up the library, but when I add new links, it shows the default filter value, and I can't figure out how to edit the tags. Thanks!Anonymous
October 07, 2008
I've answered my own question.Anonymous
October 17, 2008
Every time i insert <xsl:import href="../../../documents/dueDate.xsl"/> i am gettting an error that XSL could not be loaded. Note: to add ../../../ to get it to point to the right locationAnonymous
October 17, 2008
Sorry the error that it is putting out is "Failed setting processor stylesheet:0x8004005:The download of the specified resource has failed. Error occured during compilation of included or imported stylesheet"../../../documents/duedate.xsl""Anonymous
October 20, 2008
i was not able to get your code on "Conditionally format items based on date range " to work so i rewrote it a bit different and it works great now. <!--Date_Due--> <TD Class="{$IDAUWKUC}"> <NOBR> <span> <xsl:attribute name="style"> <!-- if this document is not complete --> <xsl:if test="@Status != 'Complete'"> <!-- get the delta in days between the due date and today --> <xsl:variable name="dueDateDelta"> <xsl:call-template name="getDayDelta"> <xsl:with-param name="paramDateA" select="@DueDate"/> <xsl:with-param name="paramDateB" select="$Today"/> </xsl:call-template> </xsl:variable> <xsl:choose> <!-- if due date is before today, then document is overdue, so highlight in red --> <xsl:when test="$dueDateDelta < 0"> background-color:#FF0000; </xsl:when> <!-- if due date within 15 days after today, then document is due soon, so highlight in yellow--> <xsl:when test="$dueDateDelta < 15"> background-color:#FFFF00; </xsl:when> </xsl:choose> </xsl:if> </xsl:attribute> <xsl:value-of disable-output-escaping="no" select="ddwrt:FormatDate(string(@DueDate),number($Language),1)" /> </span> </NOBR> </TD> I dont know if it is our version of sharepoint server we are running but the Date_due column is called dueDate? Even if i changed the posted code Date_Due to dueDate it would not work so that is when i came up with the above codeAnonymous
November 12, 2008
Hi! The post is very helpful. Thank you very much for your effort. But I am facing a problem here withe the calculated field column.It is not giving me the current modified date, insted it is giving me an absurd date as "12/31/1899 12:00 AM". How to solve this. Thanx Regards MohanAnonymous
December 11, 2008
Hi Iam having a problem with date field in the custom NewForma.aspx, we have formatted almost 12 columns on the same row and the start date and end date at the end..so when i click on the date picker and try to select the date by going next or previous months(using arrows on the top) the calender the pop up is moving along the page to the left.......... Can any one know how to make the calendar popup to be stick to a place...... ThanksAnonymous
December 26, 2008
Thanks, this is helpful. However, It seems that once you do this, you can no longer use the list view as a filter for a KPI. I have a list of tasks, and want to have a KPI to track if we are on target with completing our tasks (100% of the items that are for the current cycle and have passed the due time are marked complete). Is there a way to do this so that we can use this list view as a source for data?Anonymous
January 05, 2009
Can I have a column that will contain choices based on the value in another column? Essentially, if col 1 has value A, then col 2 will show 1,2,3 and if col 1 has value B, then col 2 shows 4, 5, 6. Will this require custom code?Anonymous
January 21, 2009
I tried applying this on my site, but unfortuatnely something isn't working. I did change a few variables to match my site, (Due_Date was changed to ResolutionDate). but I cannot get it to work. I have included all of the template information inline to prevent any conflicts or errors. Everything seems to be working ok, but for some reason the filtered webpart is not receiving the dates that are input. (Last Month and Last Quarter.) I'm not sure what else to do. Has anyone else run into this?Anonymous
February 25, 2009
thank you.. your article is cool. but there is an issue that you dont explain it yet. it is about email. after we give color to date field you said that we can send email too. could you explain this part? thank youAnonymous
April 01, 2009
Thanks! very very very helpful!Anonymous
April 02, 2009
Really good and useful article.. Thanks a lot to authorAnonymous
April 23, 2009
The comment has been removedAnonymous
June 03, 2009
I was trying to utilize some params from ddwrt and ran into a problem. Specifically, I was trying to use PageUrl in my Data View and show it along with a date value. It will resolve correctly in SPD, but the PageUrl param shows up as blank when I look at it through the browser. I have the proper xmnls reference and added the global xsl:param statement. Any ideas?Anonymous
June 11, 2009
I am using your solution and it works great. I am having an issue thought that I don't quite know how to figure out. Your solution works with Months and Quarters at a time, but it doesn't deal with years at a time. I need to be able to use a Year to Date function and don't know where and what to add to the date_template.xsl in order to accomodate that. Any thoughts?Anonymous
June 18, 2009
The comment has been removedAnonymous
July 16, 2009
Thanks for the great article. I'll be digesting it for some time to come! I am filtering a dataview with a form web part on the same aspx page that has 2 provider fields. I would like to clear one parameter without clearing the other. Is there any way to accomplish this in SharePoint Designre. It seems the filter query string is created at runtime and i don't understand how to manipulate it. I'd really appreciate any help you could offer. Thanks again.Anonymous
August 21, 2009
The comment has been removedAnonymous
November 09, 2009
how would I get a count of items based on status within a list based on a date range? Example I want to know how may tasks are in new status today, or how many were created in the last week or 30 days. thanks.Anonymous
November 20, 2009
I have completed the Create a Data View that shows documents due in various date ranges section and it works very nicely. However, the export to spreadsheet functionality seems to be broken, when exporting I only get two columns Item Type and Path. It seems like since the filter is only applied based on the query string, the export doesn't know how to build the query properly...is there a work around so that my users can still export the dataview after doing the filtering? Thanks, JustinAnonymous
November 25, 2009
Thank you very much for your information.. Im a infrastructure fellow at heart but your easy to follow instructions led me to doing something.. CheersAnonymous
December 01, 2009
i have ID in the Task edit page, i want to pass DocID to DVWP. DocID has many ID. i want to list all of them... how shall i go about.. can i search based on ID=3 & fecth DocID=4 Then Filter based for DocID=4 in DVWP any ideas flowing guys..?Anonymous
May 03, 2010
Andy: It's been a while since you wrote this post, but I still refer people to it all the time. I was wondering if you would be OK with my including these date templates on a Codeplex site that I'm putting together for useful Data View Web Part XSL templates: http://spxslt.codeplex.com/ Date arithmetic is one of the biggest troublemakers for people, so I'd really like to include the good work your posted here, but only with your permission, of course. M.Anonymous
May 11, 2011
This solution could help on conditional formating spconditionalfield.codeplex.comAnonymous
January 26, 2012
Culd you possibly post a solution that would allow me to select Monday's date from the prior week?Anonymous
February 29, 2012
Interesting...but is there a shorter step to do this in SPD 10? My conditional-formatting fields are referencing a field where the 'd' (number of days) from a date-field is a rendered amount. My conditions are; d <= 365 is green, d > 365 <1065 is yellow, d > 1065 is red. Green and yellow are working, but not the red condition. I simply cannot figure out what is wrong. The 'd' field is a numerical field, and the conditional formatting field (Status) is a numerical. What could be the solution?Anonymous
May 13, 2012
This is a great post and the Offsetdays='15' woks fine although it's showing me tasks in 15 days. If I add '+15' it seems to be the same. what I would like to do is to see my tasks today and the next 7 days... Any Ideas ?Anonymous
August 21, 2012
Hello all i hope this place is still active and that someone can finally help me, if been on google far to long now... What i need is just a column that will show me todays date, and obviously auto update itself each day, is something like this even possible in Sharepoint 2010? Please help a newbie...