Azure Load Balancer portal settings
As you create Azure Load Balancer, information in this article helps you learn more about the individual settings and what the right configuration is for you.
Azure Load Balancer is a network load balancer that distributes traffic across VM instances in the backend pool. To create a load balancer in the portal, at the top of the page select the search box. Enter Load balancer. Select Load balancers in the search results. Select + Create in the Load balancers page.
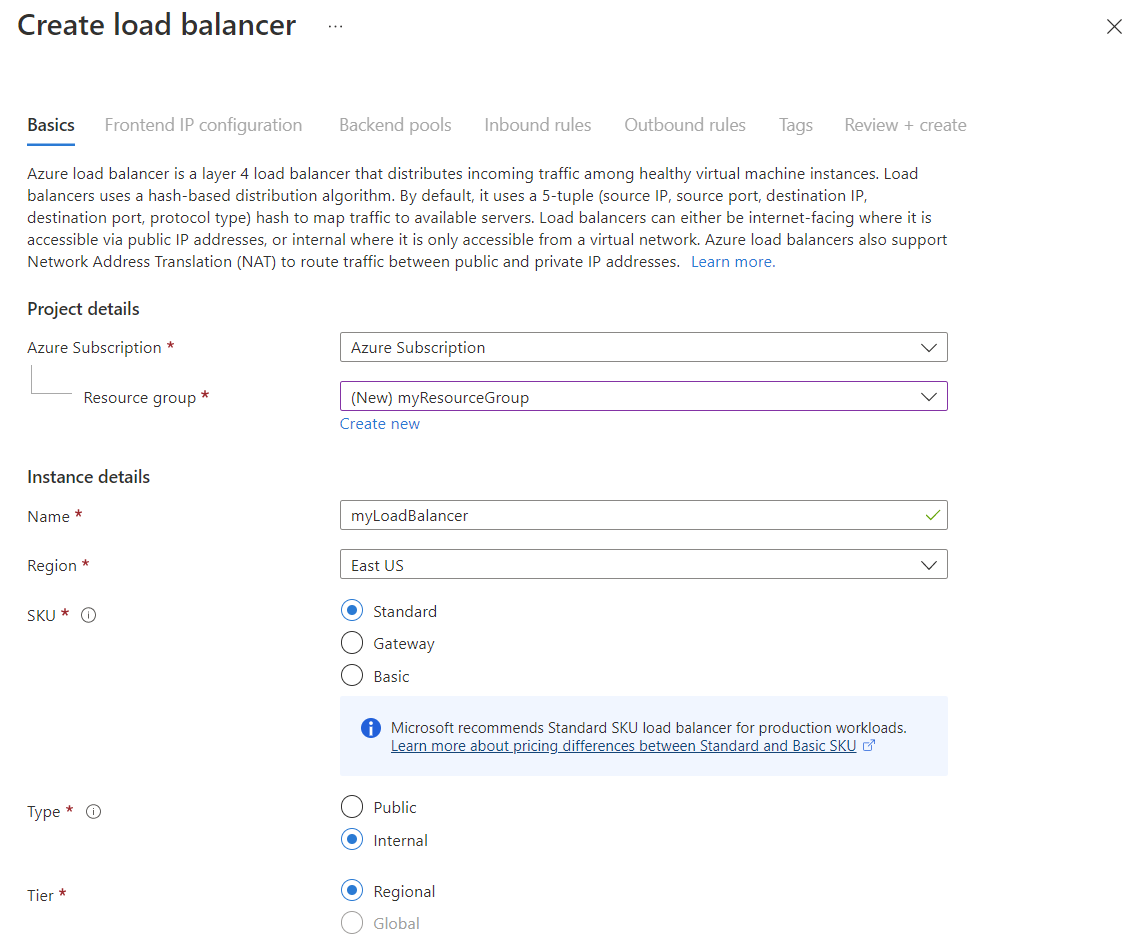
In the Basics tab of the create load balancer portal page, you see the following information:
| Setting | Details |
|---|---|
| Subscription | Select your subscription. This selection is the subscription you want your load balancer to be deployed in. |
| Resource group | Select Create new and type in the name for your resource group in the text box. If you have an existing resource group created, select it. |
| Name | This setting is the name for your Azure Load Balancer. |
| Region | Select an Azure region you'd like to deploy your load balancer in. |
| SKU | Select Standard. Load balancer has three SKUs: Basic Standard Gateway. Basic has limited functionality. Standard is recommended for production workloads. Gateway caters to non-Microsoft network virtual appliances (NVAs) Learn more about SKUs. |
| Type | Load balancer has two types: Internal (Private) Public (External). An internal load balancer (ILB) routes traffic to backend pool members via a private IP address. A public load balancer directs requests from clients over the internet to the backend pool. Learn more about load balancer types. |
| Tier | Load balancer has two tiers: Regional Global A regional load balancer is constrained to load balancing within a region. Global refers to a cross-region load balancer that load-balances across regions. For more information on the Global tier, see Cross-region load balancer (preview) |
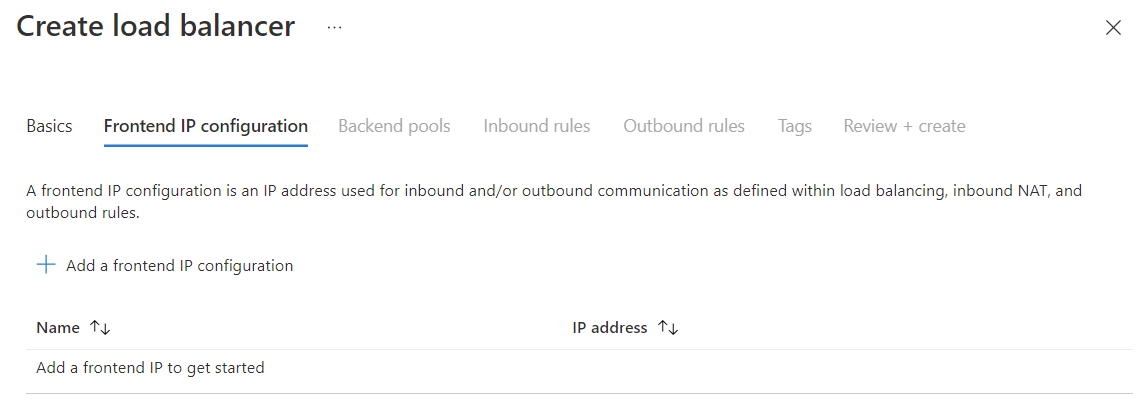
In the Frontend IP configuration tab of the create load balancer portal page, select + Add a frontend IP configuration to open the creation page.
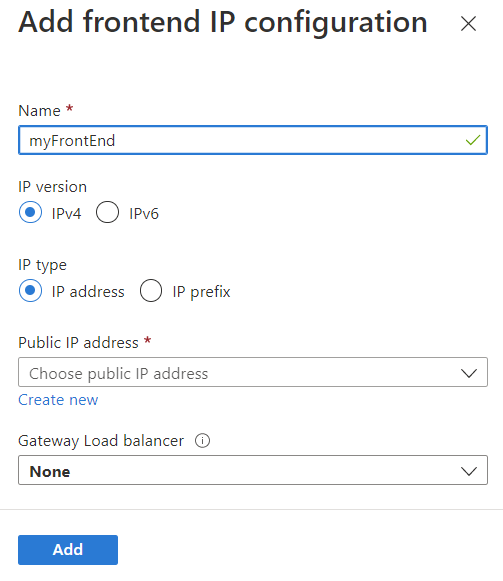
If you select Public as your load balancer type in the Basics tab, you see the following information:
| Setting | Details |
|---|---|
| Name | The name of the frontend added to the load balancer. |
| IP version | IPv4 IPv6 Load balancer supports IPv4 and IPv6 frontends. Learn more about load Balancer and IPv6. |
| IP type | IP address IP prefix Load balancer supports an IP address or an IP prefix for the frontend IP address. For more information, see Azure Public IP address prefix. |
| Gateway Load Balancer | If you're using a Gateway Load Balancer, choose the Azure Resource Manager ID of the Gateway Load Balancer you want to chain to your frontend IP Configuration. |
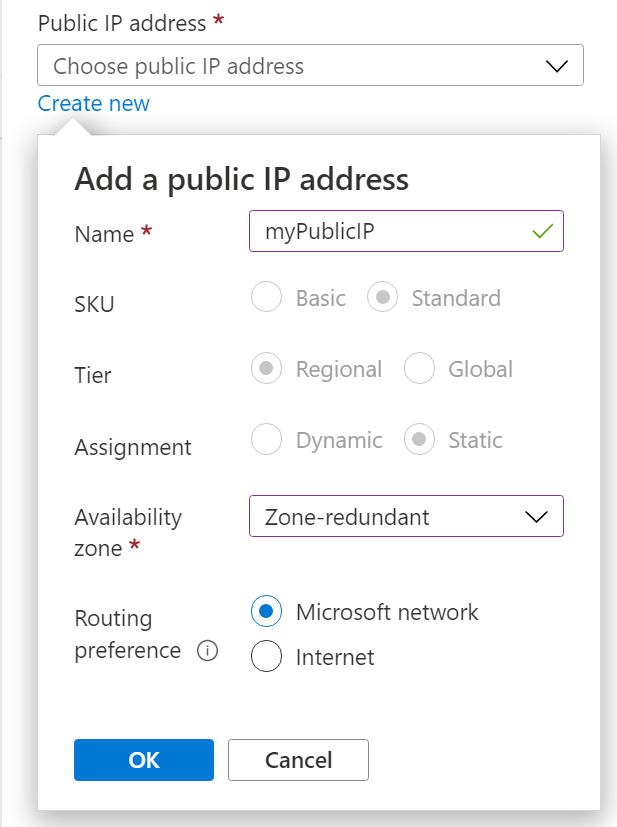
If you select IP address for IP type, you see the following information:
| Setting | Details |
|---|---|
| Public IP address | Select Create new to create a public IP address for your public load balancer. If you have an existing public IP, select it in the pull-down box. |
| Name | The name of the public IP address resource. |
| SKU | Public IP addresses have two SKUs: Basic and Standard. Basic doesn't support zone-resiliency and zonal attributes. Standard is recommended for production workloads. Load balancer and public IP address SKUs must match. |
| Tier | Regional Global Depending on type of load balancer tier determines what is selected. Regional for traditional load balancer, global for cross-region. |
| Assignment | Static is auto selected for standard. Basic public IPs have two types: Dynamic and Static. Dynamic public IP addresses aren't assigned until creation. IPs can be lost if the resource is deleted. Static IP addresses are recommended. |
| Availability zone | Select Zone-redundant to create a resilient load balancer. To create a zonal load balancer, select a specific zone from 1, 2, or 3. Standard load balancer and public IPs support zones. Learn more about load balancer and availability zones. You won't see zone selection for basic. Basic load balancer doesn't support zones. |
| Routing preference | Select Microsoft Network. Microsoft Network means that traffic is routed via the Microsoft global network. Internet means that traffic is routed through the internet service provider network. Learn more about Routing Preferences |
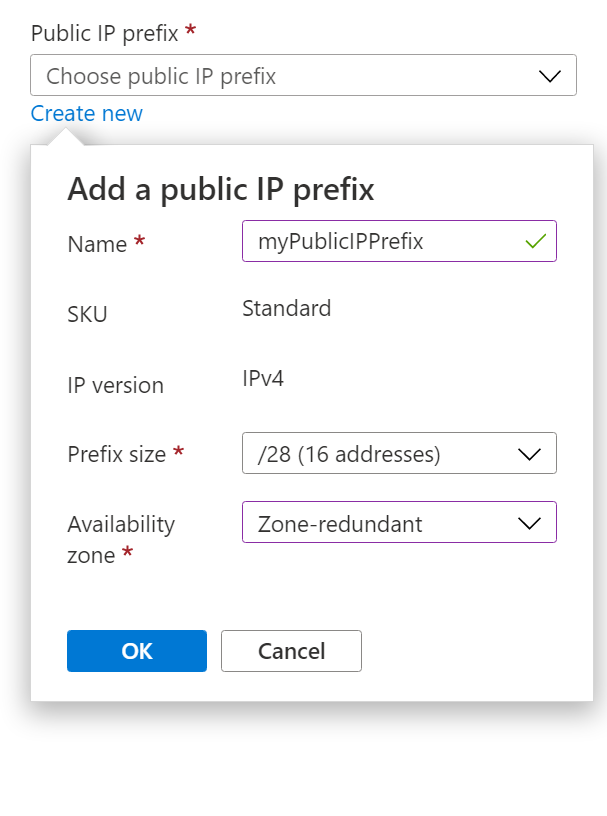
If you select IP prefix for IP type, you see the following information:
| Setting | Details |
|---|---|
| Public IP prefix | Select Create new to create a public IP prefix for your public load balancer. If you have an existing public prefix, select it in the pull-down box. |
| Name | The name of the public IP prefix resource. |
| SKU | Public IP prefixes have one SKU, Standard. |
| IP version | IPv4 or IPv6. The version displayed corresponds to the version chosen. |
| Prefix size | IPv4 or IPv6 prefixes are displayed depending on the selection above. IPv4 /24 (256 addresses) /25 (128 addresses) /26 (64 addresses) /27 (32 addresses) /28 (16 addresses) /29 (8 addresses) /30 (4 addresses) /31 (2 addresses) IPv6 /124 (16 addresses) /125 (8 addresses) 126 (4 addresses) 127 (2 addresses) |
| Availability zone | Select Zone-redundant to create a resilient load balancer. To create a zonal load balancer, select a specific zone from 1, 2, or 3. Standard load balancer and public IP prefixes support zones. Learn more about load balancer and availability zones. |
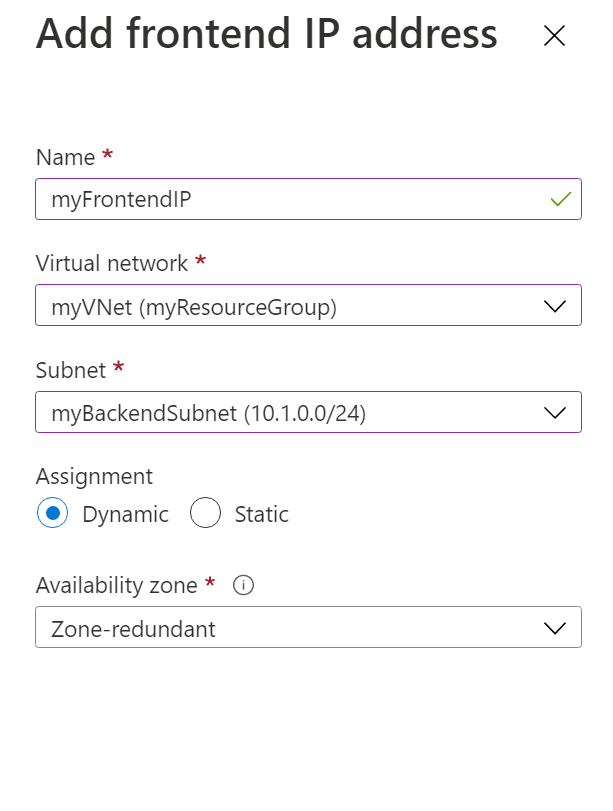
If you select Internal as your load balancer type in the Basics tab, you see the following information:
| Setting | Details |
|---|---|
| Virtual network | The virtual network your internal load balancer will connect to. The private frontend IP address you select for your internal load balancer is from this virtual network. |
| Subnet | The subnets available for the IP address of the frontend IP are displayed here. |
| Assignment | Your options are Static or Dynamic. Static ensures the IP doesn't change. A dynamic IP could change. |
| Availability zone | Your options are: Zone redundant Zone 1 Zone 2 Zone 3 To create a load balancer that is highly available and resilient to availability zone failures, select a zone-redundant IP. |
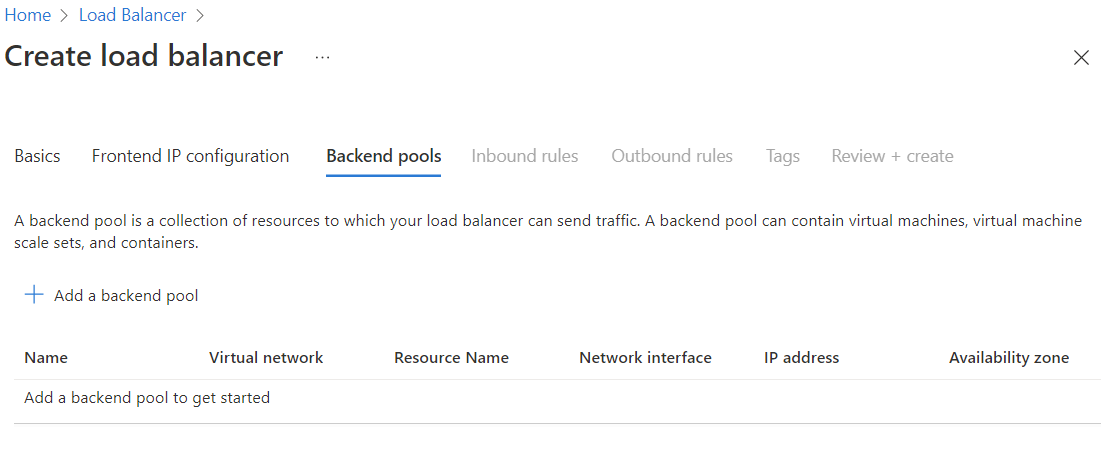
In the Backend pools tab of the create load balancer portal page, select + Add a backend pool to open the creation page.
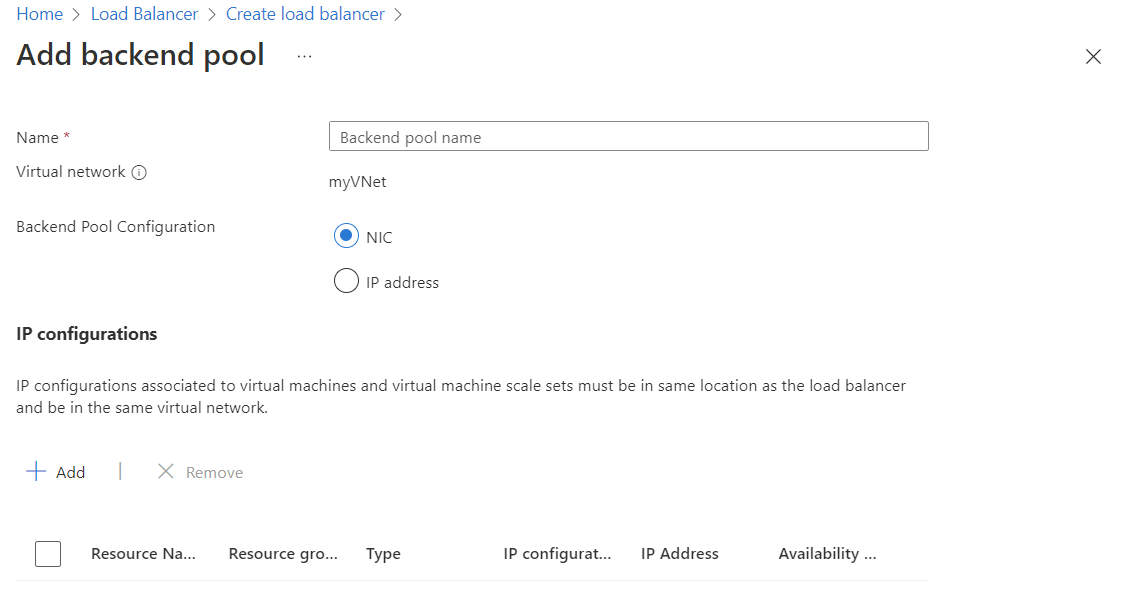
The following is displayed in the Add backend pool creation page:
| Setting | Details |
|---|---|
| Name | The name of your backend pool. |
| Virtual network | The virtual network your backend instances are. |
| Backend pool configuration | Your options are: NIC IP address NIC configures the backend pool to use the network interface card of the virtual machines. IP address configures the backend pool to use the IP address of the virtual machines. For more information on backend pool configuration, see Backend pool management. |
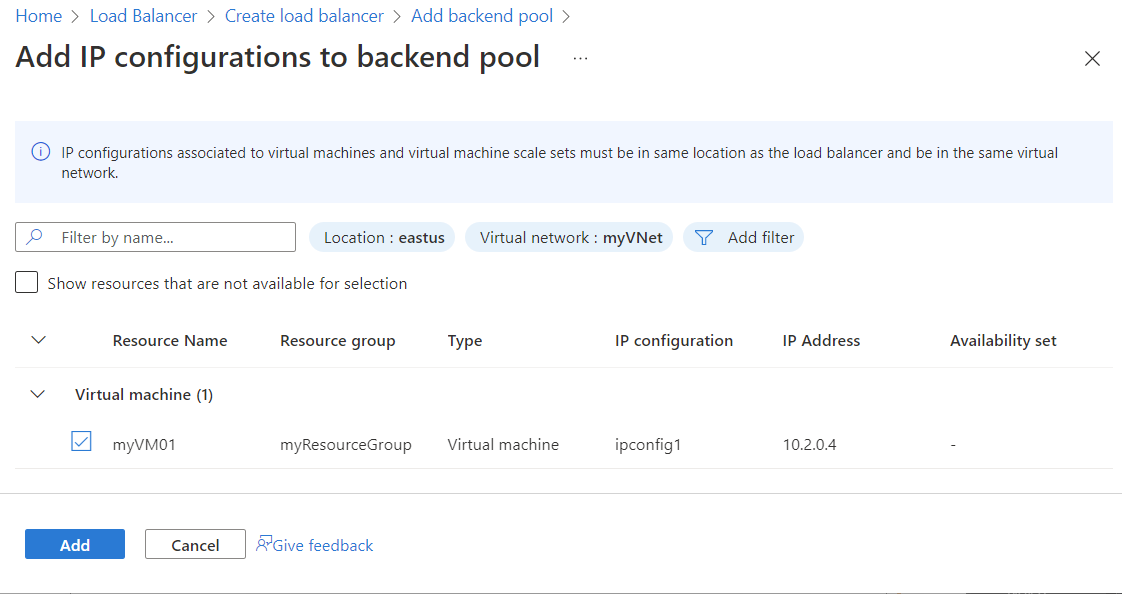
You can add virtual machines or Virtual Machine Scale Sets to the backend pool of your Azure Load Balancer. Create the virtual machines or Virtual Machine Scale Sets first.
Under IP configurations, select + Add to choose your IP configurations.
In Add IP configuration to backend pool page, select the virtual machine or Virtual Machine Scale Set resources, and select Add and Save.
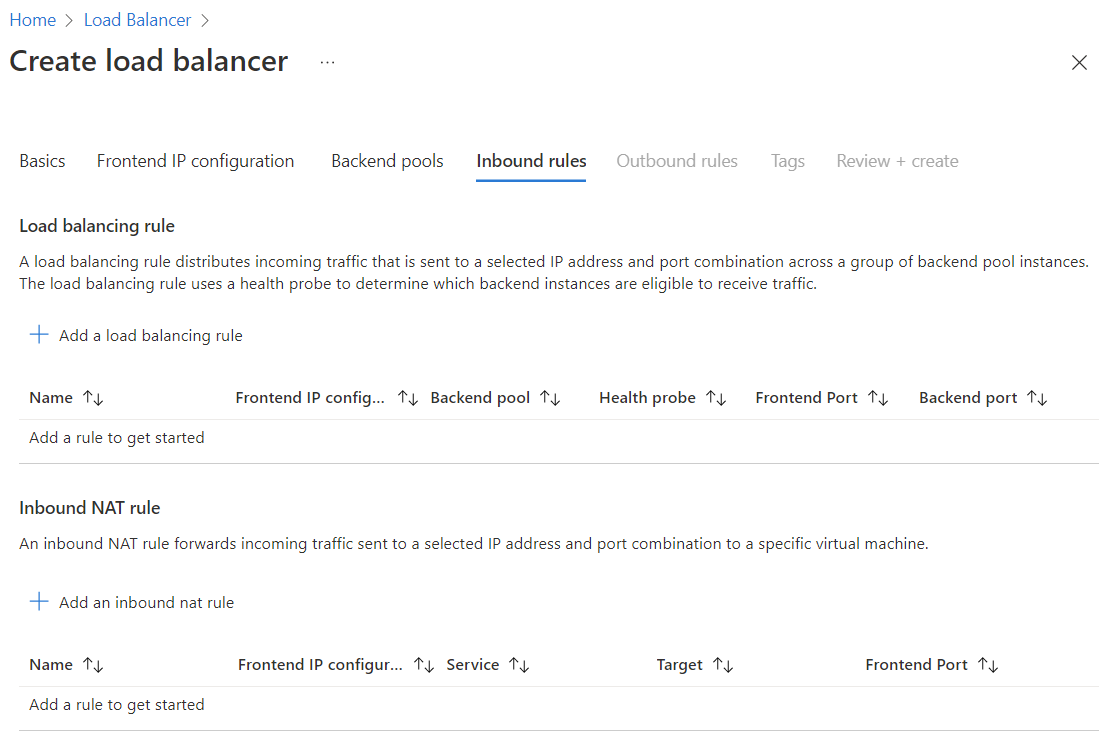
There are two sections in the Inbound rules tab, Load balancing rule and Inbound NAT rule.
In the Inbound rules tab of the create load balancer portal page, select + Add a load balancing rule to open the creation page.
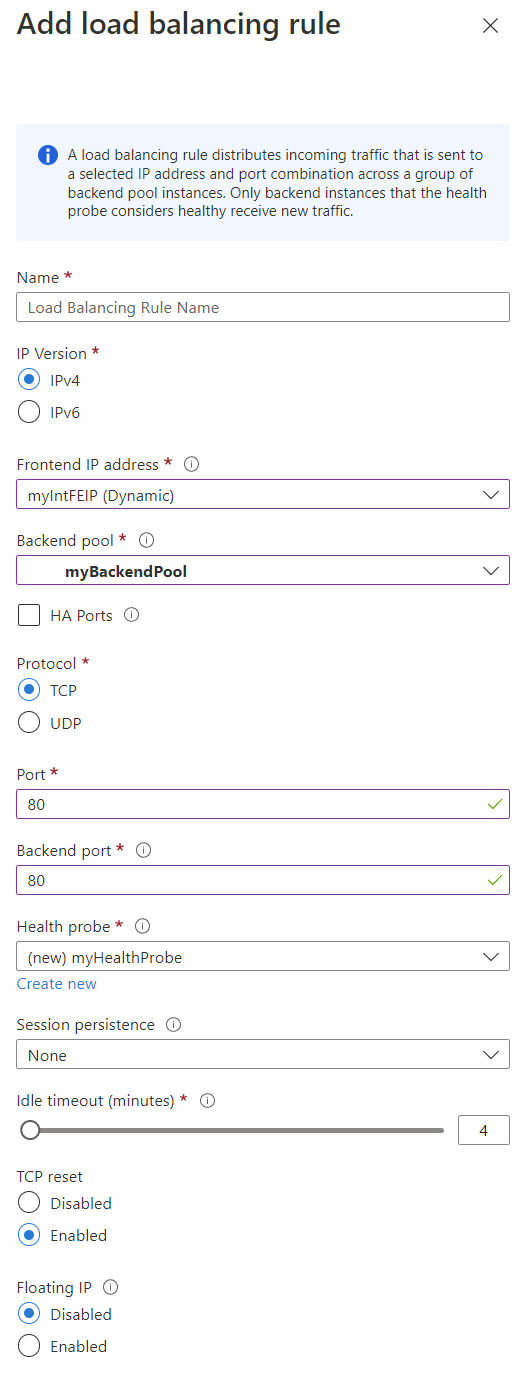
The following is displayed in the Add load balancing rule creation page:
| Setting | Details |
|---|---|
| Name | The name of the load balancer rule. |
| IP Version | Your options are IPv4 or IPv6. |
| Frontend IP address | Select the frontend IP address. The frontend IP address of your load balancer you want the load balancer rule associated to. |
| Backend pool | The backend pool you would like this load balancer rule to be applied on. |
| HA Ports | This setting enables load balancing on all TCP and UDP ports. |
| Protocol | Azure Load Balancer is a layer 4 network load balancer. Your options are: TCP or UDP. |
| Port | This setting is the port associated with the frontend IP that you want traffic to be distributed based on this load-balancing rule. |
| Backend port | This setting is the port on the instances in the backend pool you would like the load balancer to send traffic to. This setting can be the same as the frontend port or different if you need the flexibility for your application. |
| Health probe | Select Create new, to create a new probe. Only healthy instances receive new traffic. |
| Session persistence | Your options are: None Client IP Client IP and protocol Maintain traffic from a client to the same virtual machine in the backend pool. This traffic is maintained during the session. None specifies that successive requests from the same client can be handled by any virtual machine. Client IP specifies that successive requests from the same client IP address are handled by the same virtual machine. Client IP and protocol ensure that successive requests from the same client IP address and protocol are handled by the same virtual machine. Learn more about distribution modes. |
| Idle timeout (minutes) | Keep a TCP or HTTP connection open without relying on clients to send keep-alive messages |
| TCP reset | Load balancer can send TCP resets to help create a more predictable application behavior on when the connection is idle. Learn more about TCP reset |
| Floating IP | Floating IP is Azure's terminology for a portion of what is known as Direct Server Return (DSR). DSR consists of two parts: 1. Flow topology 2. An IP address-mapping scheme at a platform level. Azure Load Balancer always operates in a DSR flow topology whether floating IP is enabled or not. This operation means that the outbound part of a flow is always correctly rewritten to flow directly back to the origin. Without floating IP, Azure exposes a traditional load-balancing IP address-mapping scheme, the VM instances' IP. Enabling floating IP changes the IP address mapping to the frontend IP of the load Balancer to allow for more flexibility. For more information, see Multiple frontends for Azure Load Balancer. |
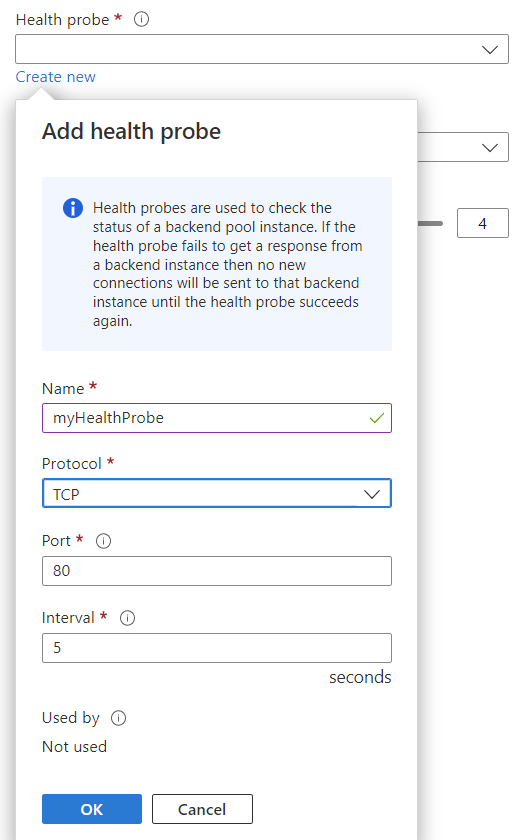
If you selected Create new in the health probe configuration of the load-balancing rule above, the following options are displayed:
| Setting | Details |
|---|---|
| Name | The name of your health probe. |
| Protocol | The protocol you select determines the type of check used to determine if the backend instance(s) are healthy. Your options are: TCP HTTPS HTTP Ensure you're using the right protocol. This selection depends on the nature of your application. The configuration of the health probe and probe responses determines which backend pool instances receive new flows. You can use health probes to detect the failure of an application on a backend endpoint. Learn more about health probes. |
| Port | The destination port for the health probe. This setting is the port on the backend instance the health probe uses to determine the instance's health. |
| Interval | The number of seconds in between probe attempts. The interval determines how frequently the health probe attempts to reach the backend instance. If you select 5, the second probe attempt is made after 5 seconds and so on. |
In the Inbound rules tab of the create load balancer portal page, select + Add an inbound NAT rule to open the creation page.
Inbound NAT rules can be configured for traffic sent to an individual virtual machines or a set of machines in a backend pool. Each destination resource has specific creation settings on the creation page
The following is displayed in the Add an inbound NAT rule creation page for an Azure virtual machine:
| Setting | Details |
|---|---|
| Name | The name of your inbound NAT rule |
| Type | Select Azure virtual machine or Backend pool. Inbound NAT rules can be configured by sending traffic to an individual VM or a set of machines in a backend pool. |
| Target virtual machine | Select the name of the Azure Virtual Machine this rule applies to from the available VMs in the dropdown list. |
| Frontend IP address | Select the frontend IP address. The frontend IP address of your load balancer you want the inbound NAT rule associated to. |
| Frontend Port | This setting is the port associated with the frontend IP that you want traffic to be distributed based on this inbound NAT rule. |
| Service Tag | Enter a service tag to use for your rule. The frontend port value is populated based on Service Tag chosen. |
| Backend port | Enter a port for traffic sent to the backend virtual machine. |
| Protocol | Azure Load Balancer is a layer 4 network load balancer. Your options are: TCP or UDP. |
| Enable TCP Reset | Load Balancer can send TCP resets to help create a more predictable application behavior on when the connection is idle. Learn more about TCP reset |
| Idle timeout (minutes) | Keep a TCP or HTTP connection open without relying on clients to send keep-alive messages. |
| Enable Floating IP | Some application scenarios prefer or require the same port to be used by multiple application instances on a single VM in the backend pool. If you want to reuse the backend port across multiple rules, you must enable Floating IP in the rule definition. |
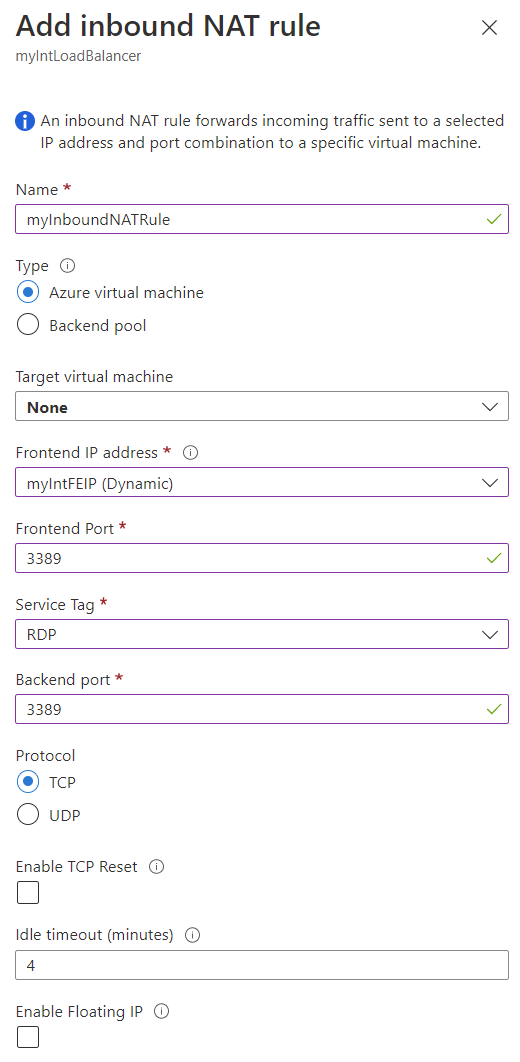
The following is displayed in the Add an inbound NAT rule creation page for a Backend pool:
| Setting | Details |
|---|---|
| Name | The name of your inbound NAT rule |
| Type | Select Azure virtual machine or Backend pool. Inbound NAT rules can be configured by sending traffic to an individual VM or a set of machines in a backend pool. |
| Target backend pool | Select the backend pool this rule applies to from the dropdown menu. |
| Frontend IP address | Select the frontend IP address. The frontend IP address of your load balancer you want the inbound NAT rule associated to. |
| Frontend port range start | Enter the starting port of a range of frontend ports pre-allocated for the specific backend pool. |
| Current number of machines in backend pool | The displayed value is the number of machines in the selected backend pool, and for information only; you can't modify this value. |
| Maximum number of machines in backend pool | Enter the maximum number of instances in the backend pool when scaling out. |
| Backend port | Enter a port for traffic sent to on backend pool. |
| Protocol | Azure Load Balancer is a layer 4 network lod balancer. Your options are: TCP or UDP. |
| Enable TCP Reset | Load Balancer can send TCP resets to help create a more predictable application behavior on when the connection is idle. Learn more about TCP reset |
| Idle timeout (minutes) | Keep a TCP or HTTP connection open without relying on clients to send keep-alive messages. |
| Enable Floating IP | Some application scenarios prefer or require the same port to be used by multiple application instances on a single VM in the backend pool. If you want to reuse the backend port across multiple rules, you must enable Floating IP in the rule definition. |

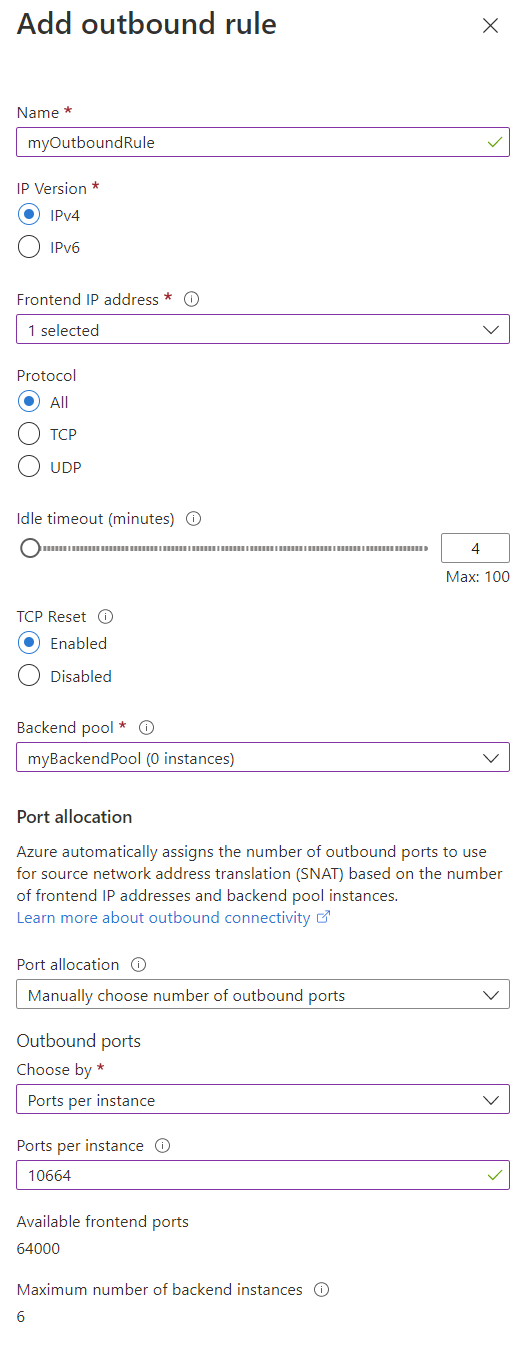
In the Outbound rules tab of the create load balancer portal page, select + Add an outbound rule to open the creation page.
Note
The outbound rules tab is only valid for a public standard load balancer. Outbound rules are not supported on an internal or basic load balancer. Azure Virtual Network NAT is the recommended way to provide outbound internet access for the backend pool. For more information on Azure Virtual Network NAT and the NAT gateway resource, see What is Azure Virtual Network NAT?.
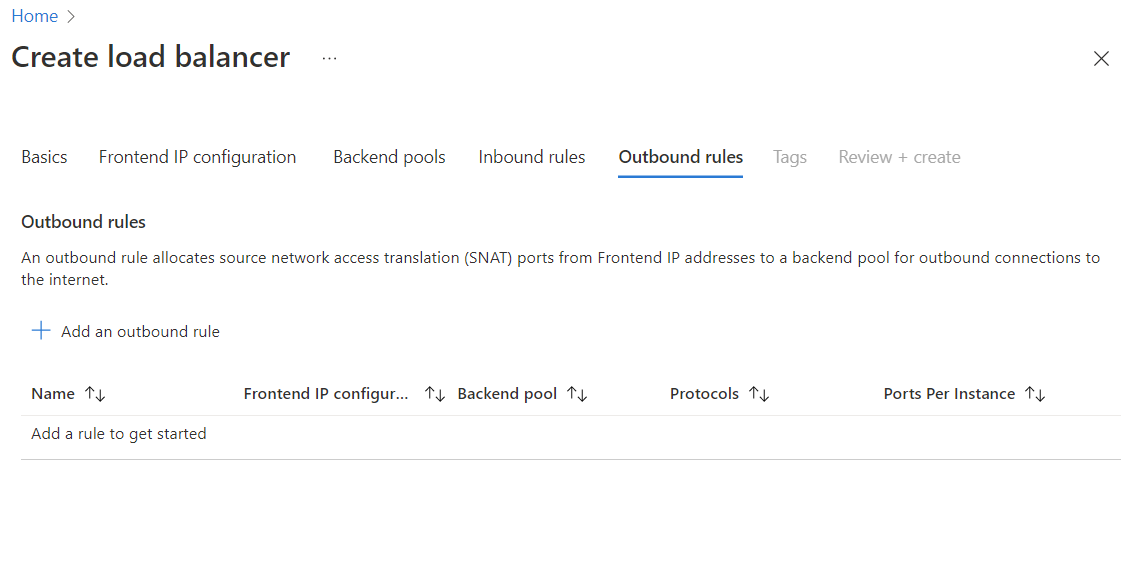
The following is displayed in the Add outbound rule creation page:
| Setting | Details |
|---|---|
| Name | The name of your outbound rule. |
| IP Version | Your options are IPv4 or IPv6. |
| Frontend IP address | Select the frontend IP address. The frontend IP address of your load balancer you want the outbound rule to be associated to. |
| Protocol | Azure Load Balancer is a layer 4 network load balancer. Your options are: All, TCP, or UDP. |
| Idle timeout (minutes) | Keep a TCP or HTTP connection open without relying on clients to send keep-alive messages. |
| TCP Reset | Load balancer can send TCP resets to help create a more predictable application behavior on when the connection is idle. Learn more about TCP reset |
| Backend pool | The backend pool you would like this outbound rule to be applied on. |
| Port allocation | |
| Port allocation | Your choices are: Manually choose number of outbound ports Use the default number of outbound ports The recommended selection is the default of Manually choose number of outbound ports to prevent SNAT port exhaustion. If Use the default number of outbound ports is chosen, the Outbound ports selection is disabled. |
| Outbound ports | Your choices are: Ports per instance Maximum number of backend instances. The recommended selections are select Ports per instance and enter 10,000. |
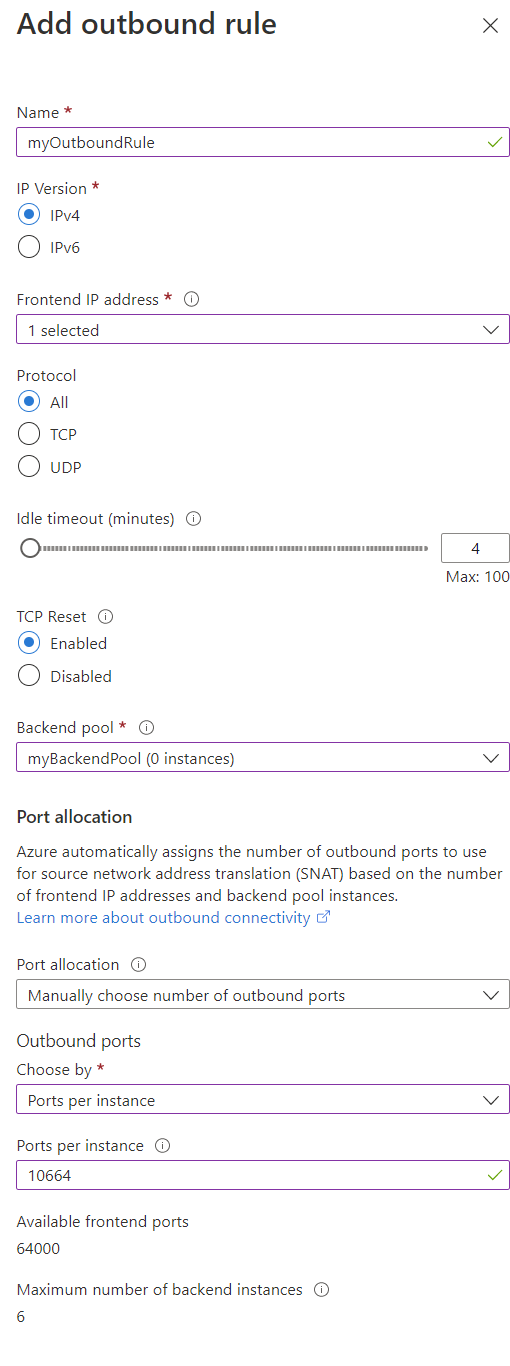
The IP address of your Azure Load Balancer. It's the point of contact for clients.
You can have one or many frontend IP configurations. If you went through the create section in this article, you created a frontend for your load balancer.
If you want to add a frontend IP configuration to your load balancer, go to your load balancer in the Azure portal, select Frontend IP configuration, and then select +Add.
| Setting | Details |
|---|---|
| Name | The name of your frontend IP configuration. |
| IP version | Your options are IPv4 and IPv6. Load balancer supports both IPv4 and IPv6 frontend IP configurations. |
| IP type | IP type determines if a single IP address is associated with your frontend or a range of IP addresses using an IP Prefix. A public IP prefix assists when you need to connect to the same endpoint repeatedly. The prefix ensures enough ports are given to assist with SNAT port issues. |
| Public IP address (or Prefix if you selected prefix above) | Select or create a new public IP (or prefix) for your load balancer frontend. |
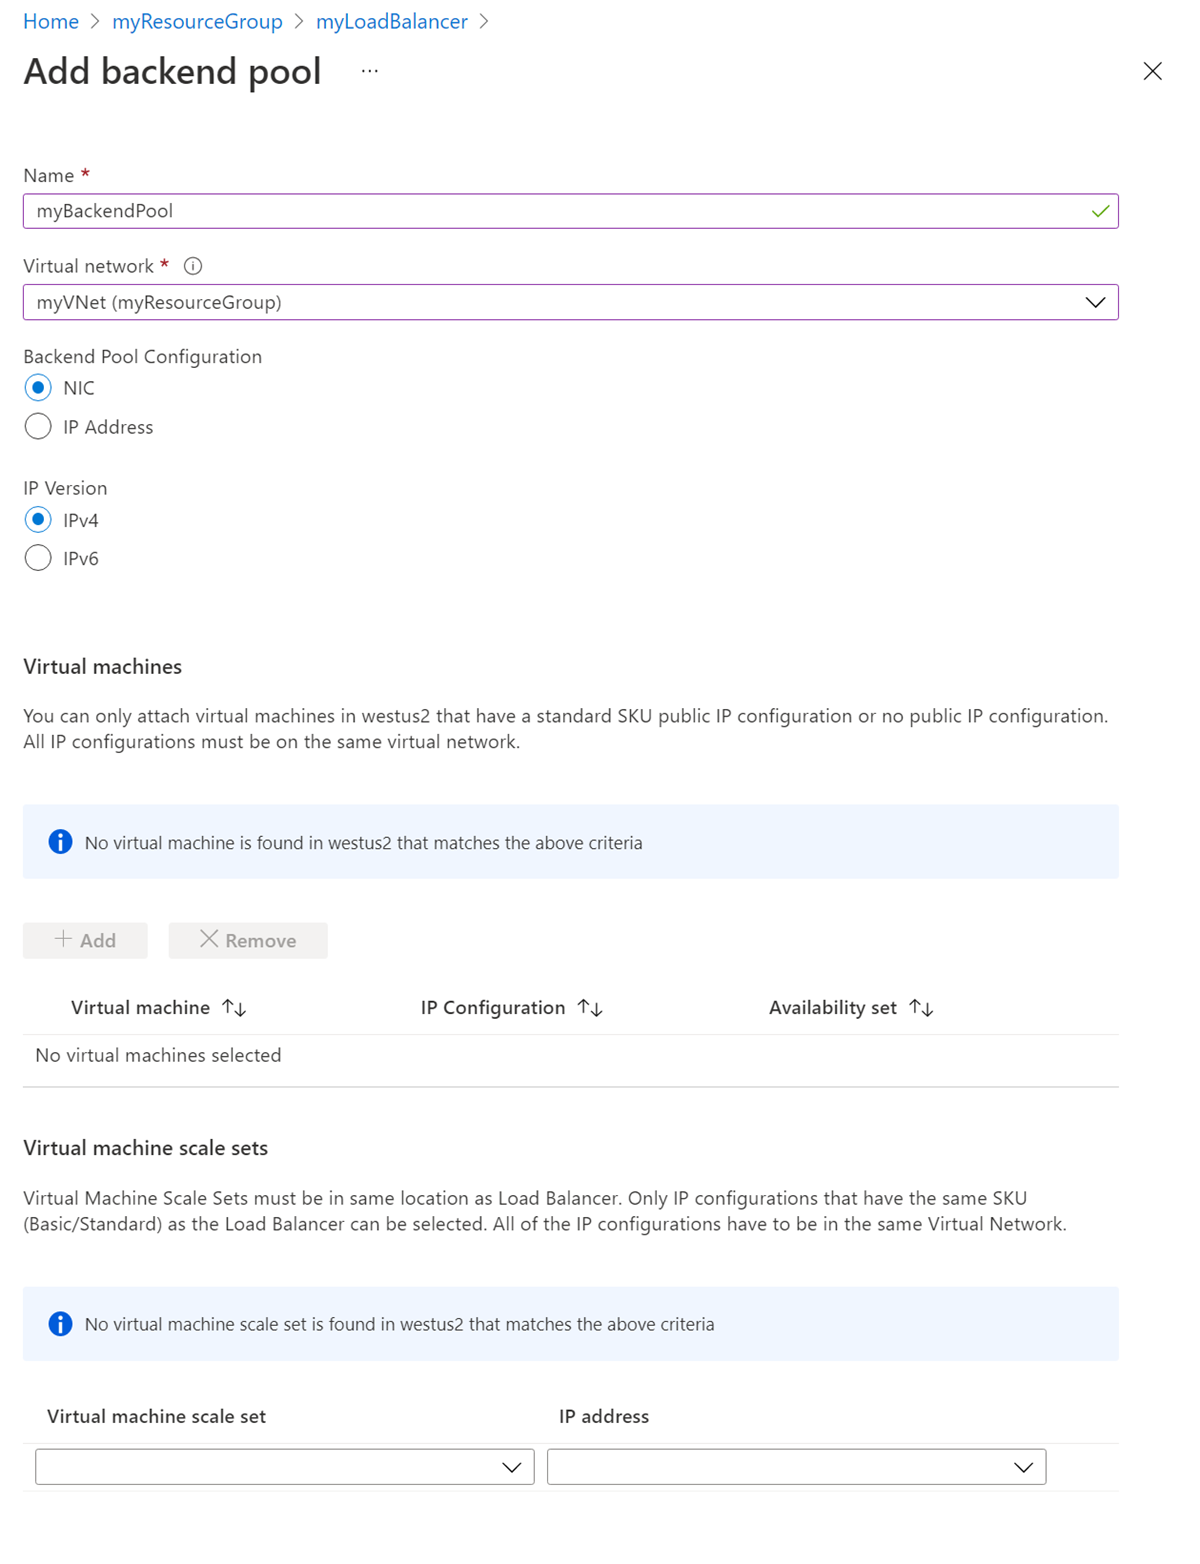
A backend address pool contains the IP addresses of the virtual network interfaces in the backend pool.
If you want to add a backend pool to your load balancer, go to your load balancer in the Azure portal, select Backend pools, and then select +Add.
| Setting | Details |
|---|---|
| Name | The name of your backend pool. |
| Virtual network | The virtual network your backend instances are. |
| Backend Pool Configuration | Your options are: NIC IP address NIC configures the backend pool to use the network interface card of the virtual machines. IP address configures the backend pool to use the IP address of the virtual machines. Learn more about Backend pool management. |
| IP version | Your options are IPv4 or IPv6. |
You can add virtual machines or Virtual Machine Scale Sets to the backend pool of your Azure Load Balancer. Create the virtual machines or Virtual Machine Scale Sets first. Next, add them to the load balancer in the portal.
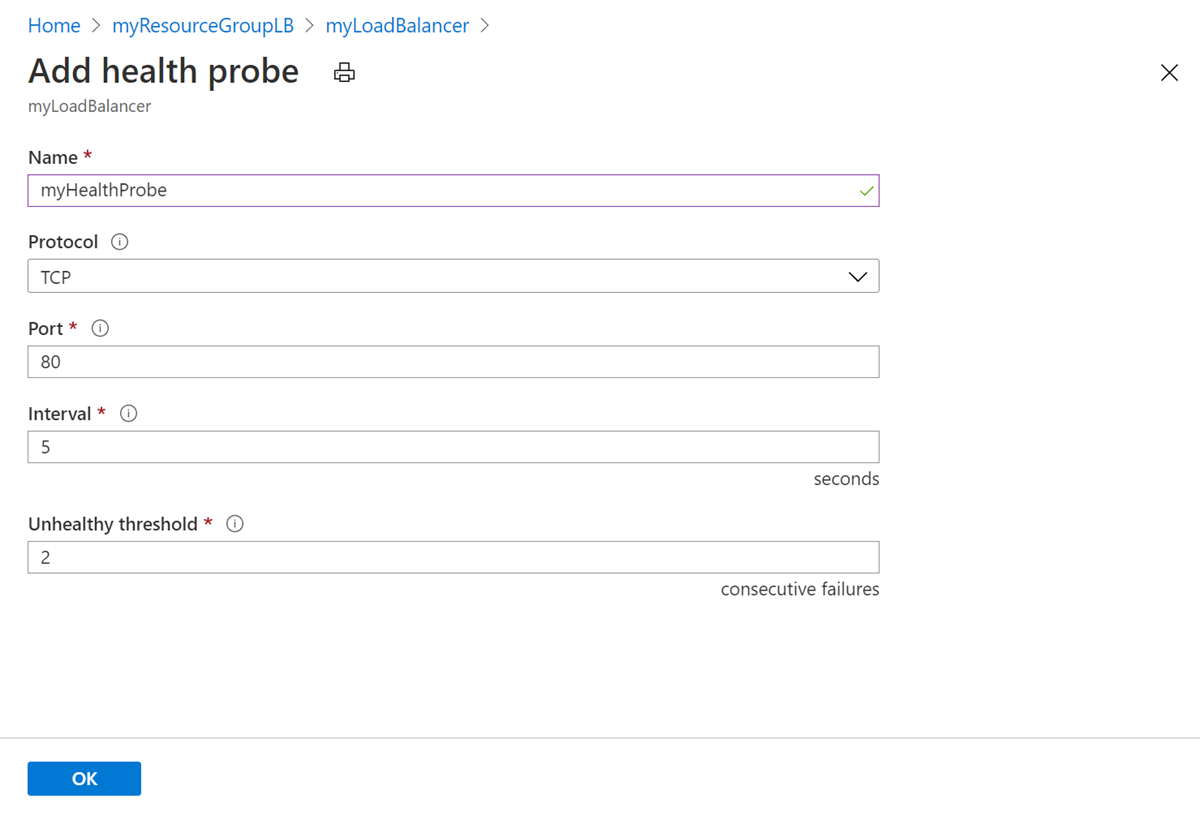
A health probe is used to monitor the status of your backend VMs or instances. The health probe status determines when new connections are sent to an instance based on health checks.
If you want to add a health probe to your load balancer, go to your load balancer in the Azure portal, select Health probes, then select +Add.
| Setting | Details |
|---|---|
| Name | The name of your health probe. |
| Protocol | The protocol you select determines the type of check used to determine if the backend instance(s) are healthy. Your options are: TCP HTTPS HTTP Ensure you're using the right protocol. This selection depends on the nature of your application. The configuration of the health probe and probe responses determines which backend pool instances receive new flows. You can use health probes to detect the failure of an application on a backend endpoint. Learn more about health probes. |
| Port | The destination port for the health probe. This setting is the port on the backend instance the health probe uses to determine the instance's health. |
| Interval | The number of seconds in between probe attempts. The interval determines how frequently the health probe attempts to reach the backend instance. If you select 5, the second probe attempt is made after 5 seconds and so on. |
| Unhealthy threshold | The number of consecutive probe failures that must occur before a VM is considered unhealthy. If you select 2, no new flows are sent to this backend instance after two consecutive failures. |
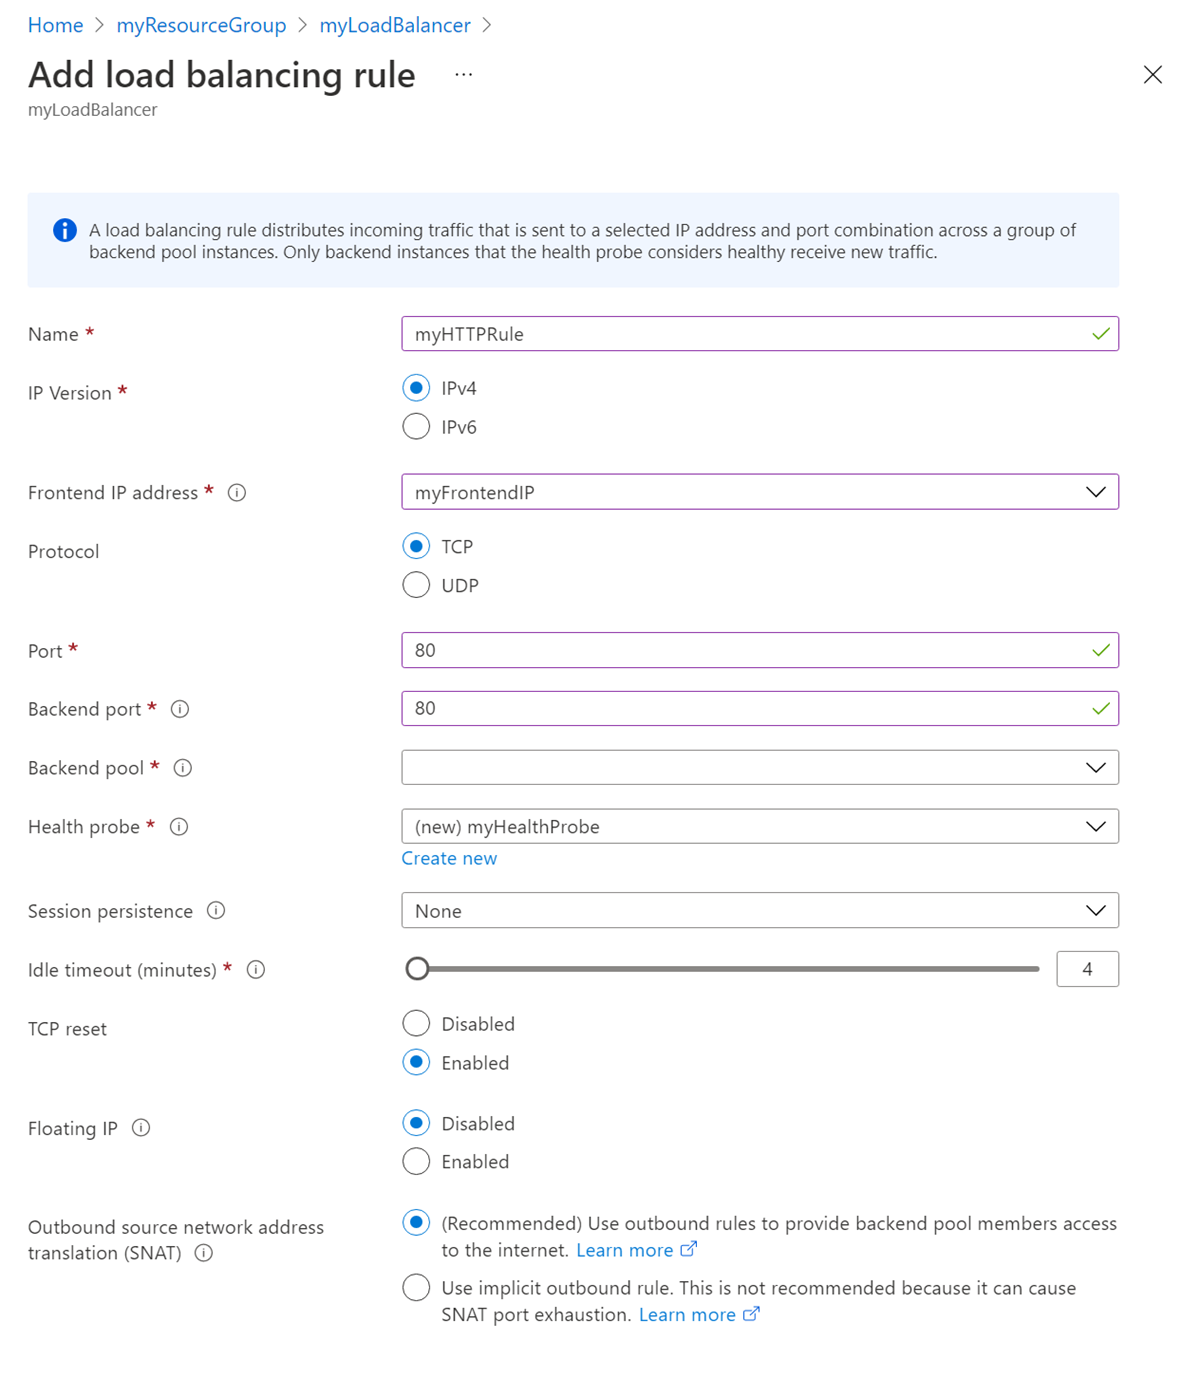
Defines how incoming traffic is distributed to all the instances within the backend pool. A load-balancing rule maps a given frontend IP configuration and port to multiple backend IP addresses and ports.
If you want to add a load balancer rule to your load balancer, go to your load balancer in the Azure portal, select Load-balancing rules, and then select +Add.
| Setting | Details |
|---|---|
| Name | The name of the load balancer rule. |
| IP Version | Your options are IPv4 or IPv6. |
| Frontend IP address | Select the frontend IP address. The frontend IP address of your load balancer you want the load balancer rule associated to. |
| Protocol | Azure Load Balancer is a layer 4 network load balancer. Your options are: TCP or UDP. |
| Port | This setting is the port associated with the frontend IP that you want traffic to be distributed based on this load-balancing rule. |
| Backend port | This setting is the port on the instances in the backend pool you would like the load balancer to send traffic to. This setting can be the same as the frontend port or different if you need the flexibility for your application. |
| Backend pool | The backend pool you would like this load balancer rule to be applied on. |
| Health probe | The health probe you created to check the status of the instances in the backend pool. Only healthy instances receive new traffic. |
| Session persistence | Your options are: None Client IP Client IP and protocol Maintain traffic from a client to the same virtual machine in the backend pool. This traffic is maintained during the session. None specifies that successive requests from the same client can be handled by any virtual machine. Client IP specifies that successive requests from the same client IP address are handled by the same virtual machine. Client IP and protocol ensure that successive requests from the same client IP address and protocol are handled by the same virtual machine. Learn more about distribution modes. |
| Idle timeout (minutes) | Keep a TCP or HTTP connection open without relying on clients to send keep-alive messages |
| TCP reset | Load balancer can send TCP resets to help create a more predictable application behavior on when the connection is idle. Learn more about TCP reset |
| Floating IP | Floating IP is Azure's terminology for a portion of what is known as Direct Server Return (DSR). DSR consists of two parts: 1. Flow topology 2. An IP address-mapping scheme at a platform level. Azure Load Balancer always operates in a DSR flow topology whether floating IP is enabled or not. This operation means that the outbound part of a flow is always correctly rewritten to flow directly back to the origin. Without floating IP, Azure exposes a traditional load-balancing IP address-mapping scheme, the VM instances' IP. Enabling floating IP changes the IP address mapping to the frontend IP of the load Balancer to allow for more flexibility. For more information, see Multiple frontends for Azure Load Balancer. |
| Outbound source network address translation (SNAT) | Your options are: (Recommended) Use outbound rules to provide backend pool members access to the internet. Use implicit outbound rule. This is not recommended because it can cause SNAT port exhaustion. Select the Recommended option to prevent SNAT port exhaustion. A NAT gateway or Outbound rules are required to provide SNAT for the backend pool members. For more information on NAT gateway, see What is Virtual Network NAT?. For more information on outbound connections in Azure, see Using Source Network Address Translation (SNAT) for outbound connections. |
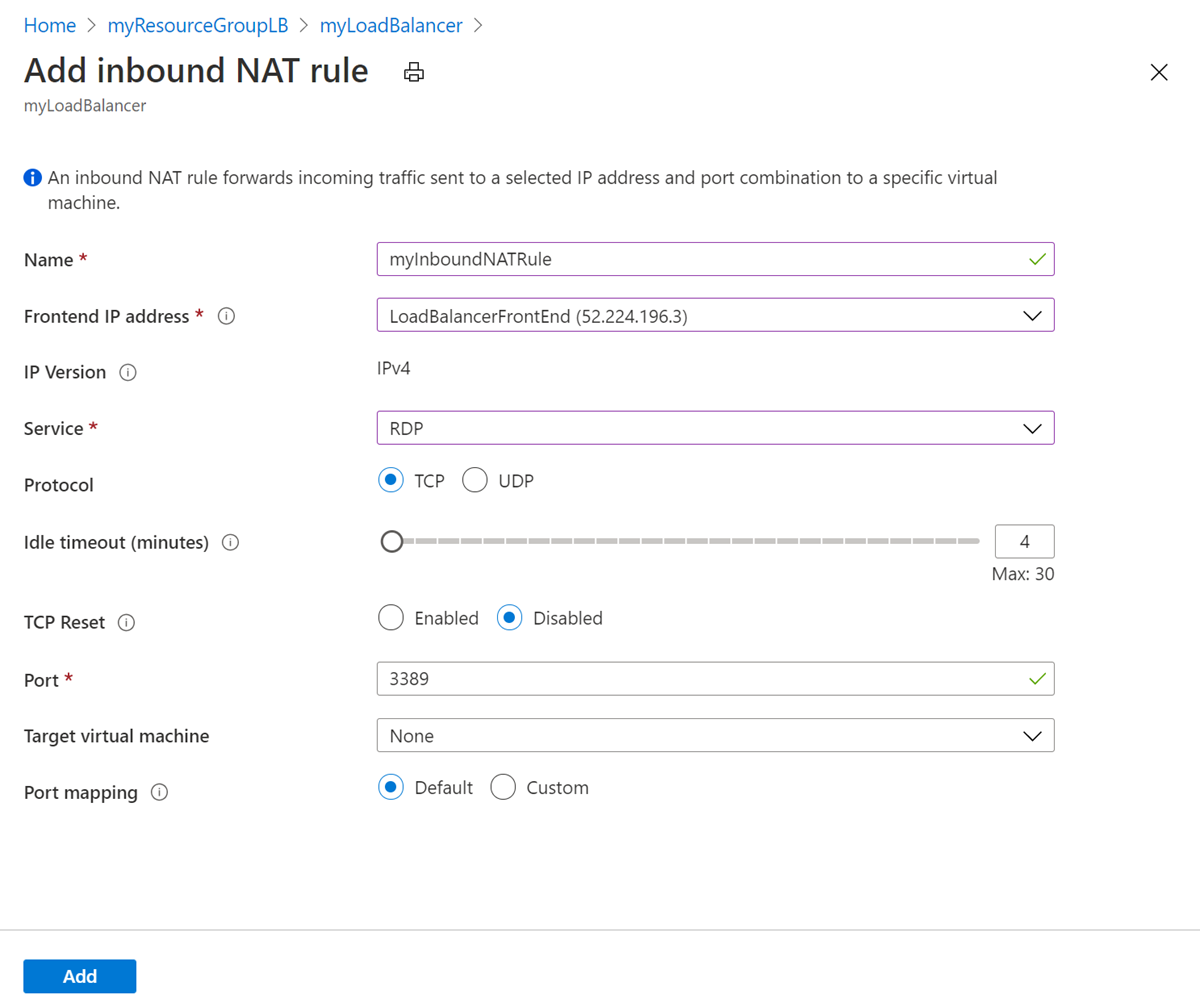
An inbound NAT rule forwards incoming traffic sent to frontend IP address and port combination.
The traffic is sent to a specific virtual machine or instance in the backend pool. Port forwarding is done by the same hash-based distribution as load balancing.
If your scenario requires Remote Desktop Protocol (RDP) or Secure Shell (SSH) sessions to separate VM instances in a backend pool. Multiple internal endpoints can be mapped to ports on the same frontend IP address.
The frontend IP addresses can be used to remotely administer your VMs without an extra jump box.
If you want to add an inbound nat rule to your load balancer, go to your load balancer in the Azure portal, select Inbound NAT rules, and then select +Add.
| Setting | Details |
|---|---|
| Name | The name of your inbound NAT rule |
| Frontend IP address | Select the frontend IP address. The frontend IP address of your load balancer you want the inbound NAT rule associated to. |
| IP Version | Your options are IPv4 and IPv6. |
| Service | The type of service you're running on Azure Load Balancer. A selection here updates the port information appropriately. |
| Protocol | Azure Load Balancer is a layer 4 network load balancer. Your options are: TCP or UDP. |
| Idle timeout (minutes) | Keep a TCP or HTTP connection open without relying on clients to send keep-alive messages. |
| TCP Reset | Load Balancer can send TCP resets to help create a more predictable application behavior on when the connection is idle. Learn more about TCP reset |
| Port | This setting is the port associated with the frontend IP that you want traffic to be distributed based on this inbound NAT rule. |
| Target virtual machine | The virtual machine part of the backend pool you would like this rule to be associated to. |
| Port mapping | This setting can be default or custom based on your application preference. |
Load balancer outbound rules configure outbound SNAT for VMs in the backend pool.
If you want to add an outbound rule to your load balancer, go to your load balancer in the Azure portal, select Outbound rules, and then select +Add.
| Setting | Details |
|---|---|
| Name | The name of your outbound rule. |
| Frontend IP address | Select the frontend IP address. The frontend IP address of your load balancer you want the outbound rule to be associated to. |
| Protocol | Azure Load Balancer is a layer 4 network load balancer. Your options are: All, TCP, or UDP. |
| Idle timeout (minutes) | Keep a TCP or HTTP connection open without relying on clients to send keep-alive messages. |
| TCP Reset | Load balancer can send TCP resets to create a more predictable application behavior when the connection is idle. Learn more about TCP reset |
| Backend pool | The backend pool you would like this outbound rule to be applied on. |
| Port allocation | Your options are Manually choose number of outbound ports or Use the default number of outbound ports. When you use default port allocation, Azure can drop existing connections when you scale out. Manually allocate ports to avoid dropped connections. |
| Outbound Ports | |
| Choose by | Your options are Ports per instance or Maximum number of backend instances. When you use default port allocation, Azure can drop existing connections when you scale out. Manually allocate ports to avoid dropped connections. |
| Ports per instance | Enter number of ports to be used per instance. This entry is only available when choosing Ports per instance for outbound ports above. |
| Available Frontend ports | Displayed value of total available frontend ports based on selected port allocation. |
| Maximum number of backend instances | Enter the maximum number of back end instances. This entry is only available when choosing Maximum number of backend instances for outbound ports above. You can't scale your backend pool above this number of instances. Increasing the number of instances decreases the number of ports per instance unless you also add more frontend IP addresses. |
In this article, you learned about the different terms and settings in the Azure portal for Azure Load Balancer.