Manage Administrative (Admin) State in Azure Load Balancer
Article
Administrative State (Admin State) is a feature of Azure Load Balancer that allows you to override the Load Balancer’s health probe behavior on a per backend pool instance basis. There are three types of admin state values: Up, Down, None.
You can use the Azure portal, Azure PowerShell, or Azure CLI to manage the admin state for a backend pool instance. Each section provides instructions for each method with examples for setting, updating, or removing an admin state configuration.
Important
Administrative State (Admin State) is in preview for Azure Load Balancer.
This preview version is provided without a service-level agreement, and we don't recommend it for production workloads. Certain features might not be supported or might have constrained capabilities. For more information, see Supplemental Terms of Use for Microsoft Azure Previews.
Self-registration of the feature name SLBAllowAdminStateChangeForConnectionDraining in your subscription. For information on registering the feature in your subscription, see Register preview feature doc.
An existing standard load balancer in the same subscription and virtual network as the virtual machines.
The load balancer should have a backend pool with health probes and load balancing rules attached.
Important
This feature is supported via Azure Portal Preview. To use this feature in Azure Portal, make sure you are using [Azure Portal Preview link] (https://preview.portal.azure.com)
Self-registration of the feature name SLBAllowAdminStateChangeForConnectionDraining in your subscription. For information on registering the feature in your subscription, see Register preview feature doc.
Self-registration of the feature name SLBAllowAdminStateChangeForConnectionDraining in your subscription. For information on registering the feature in your subscription, see Register preview feature doc.
If you prefer to run CLI reference commands locally, install the Azure CLI. If you're running on Windows or macOS, consider running Azure CLI in a Docker container. For more information, see How to run the Azure CLI in a Docker container.
If you're using a local installation, sign in to the Azure CLI by using the az login command. To finish the authentication process, follow the steps displayed in your terminal. For other sign-in options, see Sign in with the Azure CLI.
When you're prompted, install the Azure CLI extension on first use. For more information about extensions, see Use extensions with the Azure CLI.
Run az version to find the version and dependent libraries that are installed. To upgrade to the latest version, run az upgrade.
Set admin state on a new backend pool instance
In this section, you learn how to set an admin state to Up or Down as part of a new backend pool create.
In the search box at the top of the portal, enter Load balancer. Select Load balancers in the search results.
Select your load balancer from the list.
In your load balancer's page, select Backend pools under Settings.
Select + Add in Backend pools to add a new backend pool.
In the Add backend pool window, enter or select the following information:
Setting
Value
Name
Enter myBackendpool.
Backend Pool Configuration
Select IP Address.
IP addresses
Backend Address Name
Enter the name of your backend address.
IP Address
Select the IP address to be added to the backend pool.
Select Save.
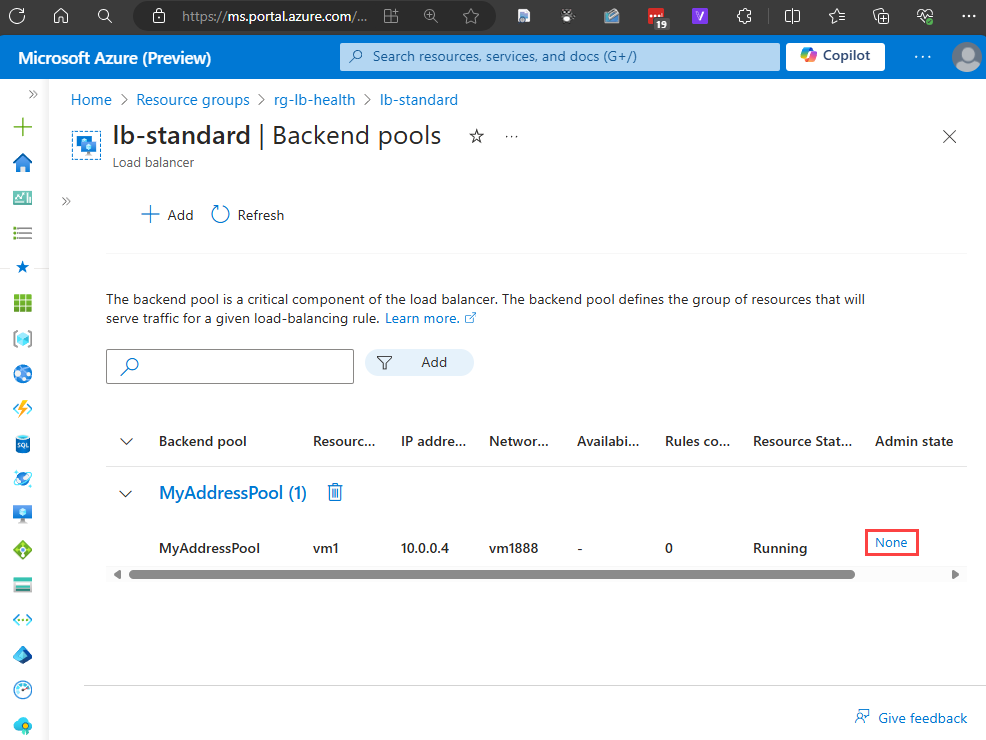
In your Backend pools page, select the corresponding Admin State value of your recently added backend pool instance.
In your Admin state details window, select Down from the dropdown menu.
Select Save.
Connect to your Azure subscription with Azure PowerShell.
Create a new backend pool with a backend pool instance while setting the admin state value to UP or DOWN with New-AzLoadBalancerBackendAddressConfig. Replace the values in brackets with the names of the resources in your configuration.
Connect to your Azure subscription with Azure CLI.
Create a new backend pool with a backend pool instance while setting admin state value to UP or DOWN with az network lb address-pool create. Replace the values in brackets with the names of the resources in your configuration.
In the search box at the top of the portal, enter Load balancer and select Load balancers in the search results.
On the load balancer's Overview page, select your load balancer from the list.
In your load balancer's page, select Backend pools under Settings.
Select your backend pool.
In your backend pool's page, select + Add under IP configurations.
Note
This step is assuming your backend pool is NIC-based.
Select the virtual machine you want to add to the backend pool.
Select Add and Save.
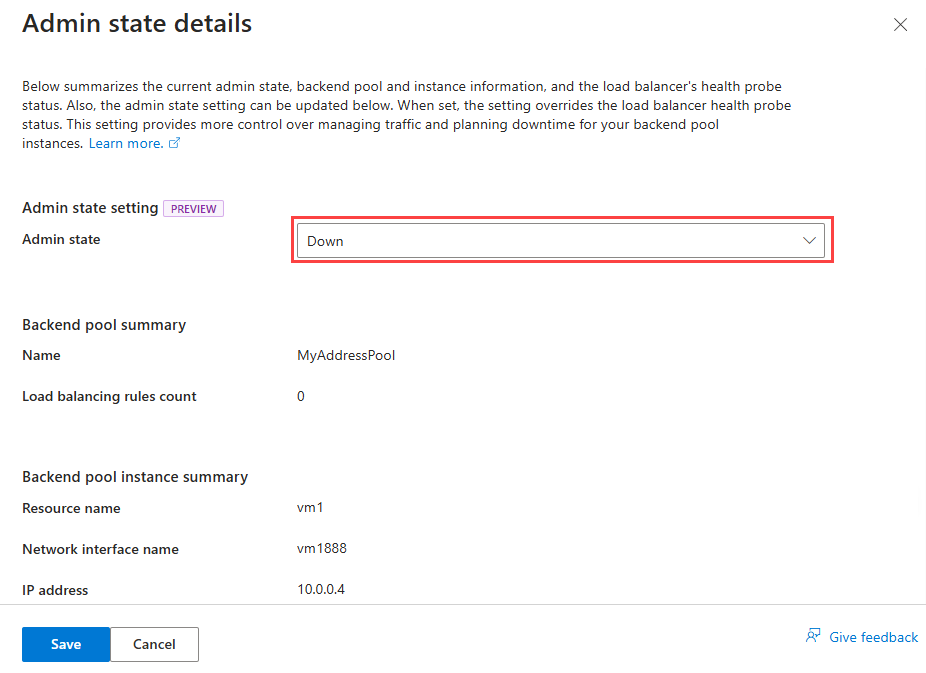
In your Backend pools page, select the corresponding Admin State value of your recently added backend pool instance.
In your Admin state details window, select Up from the dropdown menu.
Select Save.
Connect to your Azure subscription with Azure PowerShell.
Add a new backend pool instance with the admin state value configured to UP or DOWN with New-AzLoadBalancerBackendAddressConfig. Replace the values in brackets with the names of the resources in your configuration.
Connect to your Azure subscription with Azure CLI.
Add a new backend pool instance with the admin state value is configured. The value can be set to UP or DOWN with az network lb address-pool update . Replace the values in brackets with the names of the resources in your configuration.
In the search box at the top of the portal, enter Load balancer and select Load balancers in the search results.
Select your load balancer from the list.
In your load balancer's page, select Backend pools under Settings.
In your Backend pools page, select the corresponding Admin State value of your recently added backend pool instance.
In your Admin state details window, select Up from the dropdown menu.
Select Save.
Connect to your Azure subscription with Azure PowerShell.
Update an existing backend pool instance with the admin state value configured to UP or DOWN with New-AzLoadBalancerBackendAddressConfig.. Replace the values in brackets with the names of the resources in your configuration.
Connect to your Azure subscription with Azure CLI.
Update an existing backend pool instance, and configure the admin state value to UP or DOWN with az network lb address-pool update. Replace the values in brackets with the names of the resources in your configuration.
Removing admin state from existing backend pool instance
In this section, you learn how to remove an existing admin state from an existing backend pool instance. This is done by setting the admin state value to None.
In the search box at the top of the portal, enter Load balancer and select Load balancers in the search results.
Select your load balancer from the list.
In your load balancer's page, select Backend pools under Settings.
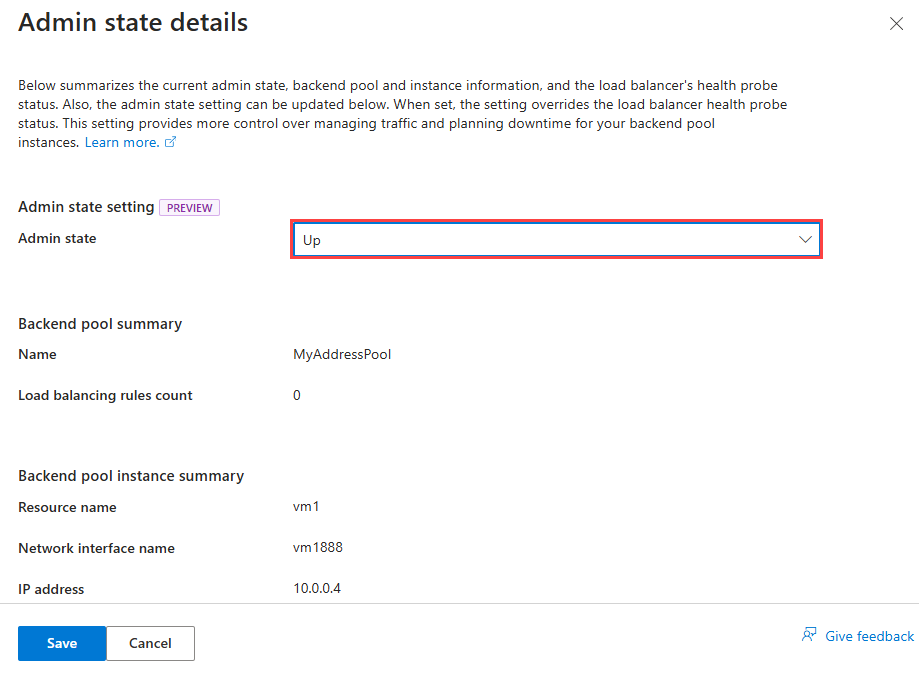
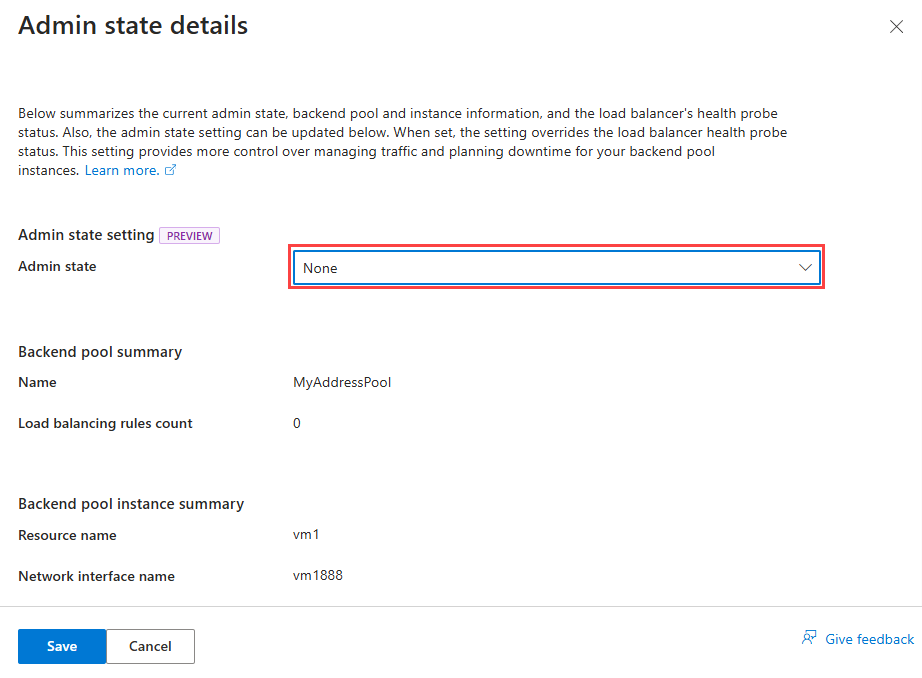
Select the corresponding Admin State value of your backend pool instance that you would like to remove.
In your admin state’s window, select None from the dropdown menu.
Select Save.
Connect to your Azure subscription with Azure PowerShell.
Remove an existing backend pool instance. This is done by setting the admin state value to NONE with New-AzLoadBlancerBackendAddressConfig. Replace the values in brackets with the names of the resources in your configuration.
# Set the values for the variables
$rsg = <resource-group>
$vnt = <virtual-network-name>
$lbn = <load-balancer-name>
$bep = <backend-pool-name>
$ip = <ip-address>
$ben = <backend-address-name>
# Remove the admin state from the backend pool instance
$vnet = Get-AzVirtualNetwork -Name $vnt -ResourceGroupName $rsg
$lb = Get-AzLoadBalancer -ResourceGroupName $rsg -Name $lbn
$ip1 = New-AzLoadBalancerBackendAddressConfig -IpAddress $ip -Name $ben -VirtualNetworkId $vnet.Id -AdminState “NONE”
$lb | Set-AzLoadBalancerBackendAddressPool -LoadBalancerBackendAddress $ip1 -Name $bep
This example removes an existing backend pool instance admin state with the following defined values:
Setting
Placeholder Value
Example Value
Resource group
<resource-group>
MyResourceGroup
Virtual network
<virtual-network-name>
MyVnet
Load balancer
<load-balancer-name>
MyLb
Backend pool name
<backend-pool-name>
MyAddressPool
Backend pool instance IP address
<ip-address>
10.0.2.4
Backend pool instance name
<backend-address-name>
mybackend
# Set the values for the variables
$rsg = "MyResourceGroup"
$vnt = "MyVnet"
$lbn = "MyLB"
$bep = "MyAddressPool"
$ip = “10.0.2.4"
# Remove the admin state from the backend pool instance
$vnet = Get-AzVirtualNetwork -Name $vnt -ResourceGroupName $rsg
$lb = Get-AzLoadBalancer -ResourceGroupName $rsg -Name $lbn
$ip1 = New-AzLoadBalancerBackendAddressConfig -IpAddress $ip -Name $ben -VirtualNetworkId $vnet.Id -AdminState “NONE”
$lb | Set-AzLoadBalancerBackendAddressPool -LoadBalancerBackendAddress $ip1 -Name $bep
Connect to your Azure subscription with Azure CLI.
Remove an existing backend pool instance by setting the admin state value to None with az network lb address-pool update. Replace the values in brackets with the names of the resources in your configuration.
# Remove the admin state from the backend pool instance
az network lb address-pool update \
    -g <resource-group> \
    --lb-name <lb-name> \
    -n <lb-backend-pool-name> \
    --backend-address “{name: <lb-backend-pool-address-name>,ip-address:<lb-backend-pool-address>}” |
    --admin-state <admin-state-value>
This example removes an existing backend pool instance admin state with the following defined values:
Coming soon: Throughout 2024 we will be phasing out GitHub Issues as the feedback mechanism for content and replacing it with a new feedback system. For more information see: https://aka.ms/ContentUserFeedback.