Configure service-level agreements
Tip
If you’d like to try Dynamics 365 Customer Service for free, you can sign up for a 30-day trial.
With service-level agreements (SLAs) configured in Customer Service Hub, you can:
- Use out-of-the-box actions in Microsoft Power Automate.
- Define work hours, and pause and resume SLAs at the SLA KPI level and SLA item level, which helps you track SLA items for different work hours based on priority and criteria. The pause settings at SLA KPI level or SLA item level give you added flexibility to define pause conditions at a more granular level.
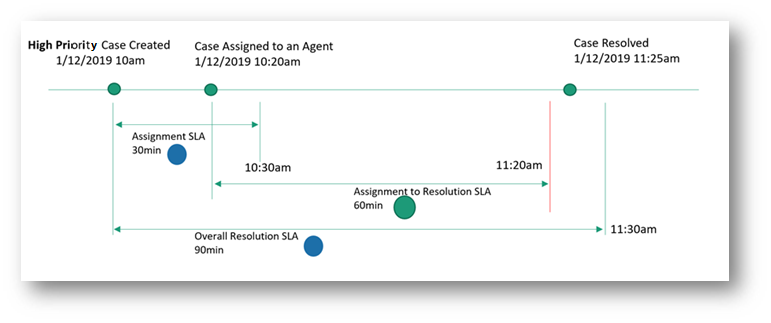
- In a case lifecycle, multiple SLA KPIs can be triggered at different start points. The following illustration depicts how you can define an overall resolution time, and also specify SLA KPIs at different start points.

To configure SLAs in Customer Service Hub:
Note
You can create SLAs only in environments that have customer engagement apps such as Customer Service, as SLAs are available by default in these apps.
Prerequisites
Administrators and customer service representatives must have specific roles and privileges to work with the various entities related to SLA, for example, SLA, SLA KPI, and SLA KPI instances. Review the following requirements before configuring SLAs for your organization.
For administrators:
- CSR Manager role or its equivalent roles and privileges.
- Connector: All permissions at the business-unit level.
- ProcessStageParameter: All permissions at the business-unit level.
- SLA, SLA KPI, SLA KPI instances: Create permission at the business-unit level, delete permission at the parent-child level, and other permissions at the organization level.
- Power Automate License is available for the user creating actions on SLA KPI instance statuses.
For customer service representatives:
- Customer Service Representative role or its equivalent roles and privileges.
- Read privileges at the organization level for SLA, SLA KPI, SLA KPI instances.
Users who activate or manage SLAInstanceMonitoringWarningAndExpiryFlow and SLA action flows must have SLA KPI privileges at a global level for prvReadSLAKPIInstance and prvWriteSLAKPIInstance.
Identify target entities and add customizations. To add customizations in target entities to track SLAs, complete these steps:
Create a lookup field on the entity for which an SLA has to be configured, and relate it to an SLA KPI instance. Lookup fields are created so that you can view the SLA in the timer on the entity form and track your SLAs. To learn more, see Create and edit fields. For example, to track an SLA on a case for "escalated by KPI", you need to create a field as EscalatedByKPI on the Case entity, and provide the Data Type as Lookup and Target Record Type as SLA KPI Instance.
Use the lookup field to configure a timer to help users estimate the amount of time they have to complete a task—typically as specified in an SLA.
To configure a timer, add the timer control to an entity form. The timer control initially displays a countdown timer to show the time remaining to complete the task. To learn more, see Add a timer control to the Case form to track time against an SLA.
Note
- In Unified Interface, the Elapsed Time and Paused On attributes of an SLA KPI Instance contain values that are equivalent to the Onhold Time and Last Onhold Time attributes respectively, of the target record, such as case and account in the web client.
- When the SLA KPI Instance reaches the terminal state (Succeeded or Noncompliant), the Paused on and Elapsed Time are no longer calculated.
Create SLA KPIs
SLA KPIs are performance indicators, such as First Response or Resolve by, that you want to track.
In the site map of Customer Service admin center, select Service Terms in Operations. The Service Terms page appears.
In the SLA KPIs section, select Manage. The Active SLAKPIs view is displayed.
Select the SLA for which you want to add an SLA item.
Select New. The New SLA KPI page appears.
Enter the following details on the General tab:
Name: The name of the SLA KPI.
Owner: The user creating the SLA is populated by default. You can specify a different owner.
Entity Name: Select the entity for which the KPI must be measured.
KPI Field: Select the respective KPI field. For example, if you're creating an SLA KPI to define the time within which a first response should be sent to the customer, select FirstResponseByKPI in the list.
Applicable From: Select a value based on which the warning and failure time are measured. For example, if you select Created On, the warning and failure start time for an SLA are calculated from the date and time when the entity was created.
Select Save.
To define the pause criteria at the KPI level, in the Pause Conditions section that appears, do the following:
- Set the toggle to Yes for Override Criteria. If any pause settings are applied at the entity level for your org, the criteria defined at the KPI level override them. For the other KPIs, the entity level pause settings continue to function if no pause criteria are defined at the KPI level.
- Select Add to define the conditions in which the SLA KPI can be paused.
Note
At runtime, when you pause an SLA KPI instance and resume it, the SLA KPI instance is canceled and a new SLA KPI instance is created.
Select Activate. The SLA KPI is saved and activated.
When customer service representatives (service representatives) create an SLA KPI instance for an entity other than the case entity, the Regarding column appears as blank on Unified Interface, and as (No name) on the web client. This functionality is a by-design behavior, and is also applicable to custom entities.
If you choose to show the entity name for your service representatives, perform the steps provided.
Configure SLA KPI instance entity name through Advanced Find
To add a new column called Name (Regarding) that displays the name of the target entity of the SLA KPI Instance, complete the following steps.
- Go to Power Apps, and then go to Settings > Advanced Find.
- In the Look For list, select SLA KPI Instances.
- Select the Field as Regarding ID, and then select Contains Data.
- Go to Edit Columns > Add columns, and then select Record Type as Regarding (Entity).
- Select Name, and then select OK.
- Select Results. You see the Name (regarding) column displaying the name of the entity.
You can also use the following query to add a new column called Name (Regarding).
- From Advanced Find, select Download Fetch XML.
- Paste the following query on the URL to see the full name of the target entity for the SLA KPI instance record. For more information on the format of the API call, see: Request. Here's an example: https:// your org link/api/data/v9.2/slakpiinstances?fetchXml=enter the following query. [URL encode the fetchxml]
<fetch version="1.0" output-format="xml-platform" mapping="logical" distinct="false">

  <entity name="slakpiinstance">
    <attribute name="name" />
    <attribute name="status" />
    <attribute name="regarding" />
    <attribute name="failuretime" />
    <attribute name="warningtime" />
    <attribute name="succeededon" />
    <attribute name="slakpiinstanceid" />
    <order attribute="name" descending="false" />
    <link-entity name="lead" from="leadid" to="regarding" link-type="inner" alias="ai">
      <attribute name="fullname" />
    </link-entity>
  </entity>
</fetch>
Create SLAs
Create SLAs to define conditions and actions that are applicable when an SLA is applied to an entity. The following steps are involved in creating the SLA:
- Create an SLA.
- Create an SLA item.
- Configure actions for the SLA item.
- Activate the SLA.
Note
SLAs that are created in either the web client or Unified Interface can be viewed in both the web client and Unified Interface, but can be edited only where they were created.
Create an SLA
In the site map of Customer Service admin center, select Service Terms in Operations. The Service Terms page appears.
In the Service Level Agreements (SLAs) section, select Manage. The All Service Level Agreements view is displayed. You can switch between various system views using the dropdown list.
Select New. The New SLA page appears.
Enter the following details on the General tab:
- Name: Enter a name for the SLA.
- Primary Entity: Select a value in the box.
- Description: Enter a description for the SLA.
Select Save. The SLA Items section appears on the page, and the SLA is saved. You can perform the steps to create SLA items as described in the following section.
Create an SLA item
In the site map of Customer Service admin center, select Service Terms in Operations. The Service Terms page appears.
In the Service Level Agreements (SLAs) section, select Manage. The All Service Level Agreements view is displayed. Select the SLA for which you want to add an SLA item.
On the page that appears, select New SLA Item. The New SLA Item dialog box appears.
Enter the following details on the General tab:
- Name: Enter a name.
- KPI: Select an SLA KPI.
- Allow Pause and Resume: (Optional.) Enable this option if you want the SLA to be paused during the time the record is on hold. For each enabled entity for the SLA, you can set each status considered "on hold" in the Other SLA Settings > Manage > Service Configuration Settings page.
- Business Hours: (Optional.) To assign business hours, select a value. The SLA is calculated based on the business hours and business closure that you define. More information: Create customer service schedule and define the work hours.
In the Applicable When section, define the conditions for when the SLA can be applied for the entity.
The SLA is triggered when the applicable when condition is met throughout. If the applicable when condition isn't met after an SLA is triggered, the SLA KPI instance gets canceled. We recommend that you don't use case fields that are updated frequently because any change to the field value might lead to cancelation of the SLA item.
In the Success Conditions section, define the conditions that specify the success criteria of the SLA.
Important
If you specify the success condition on the same entity on which applicable when is defined, a recommendation message is displayed with the suggestion that you don't use the same entity. You can choose to select OK if your organization needs the conditions to be configured on the same entity.
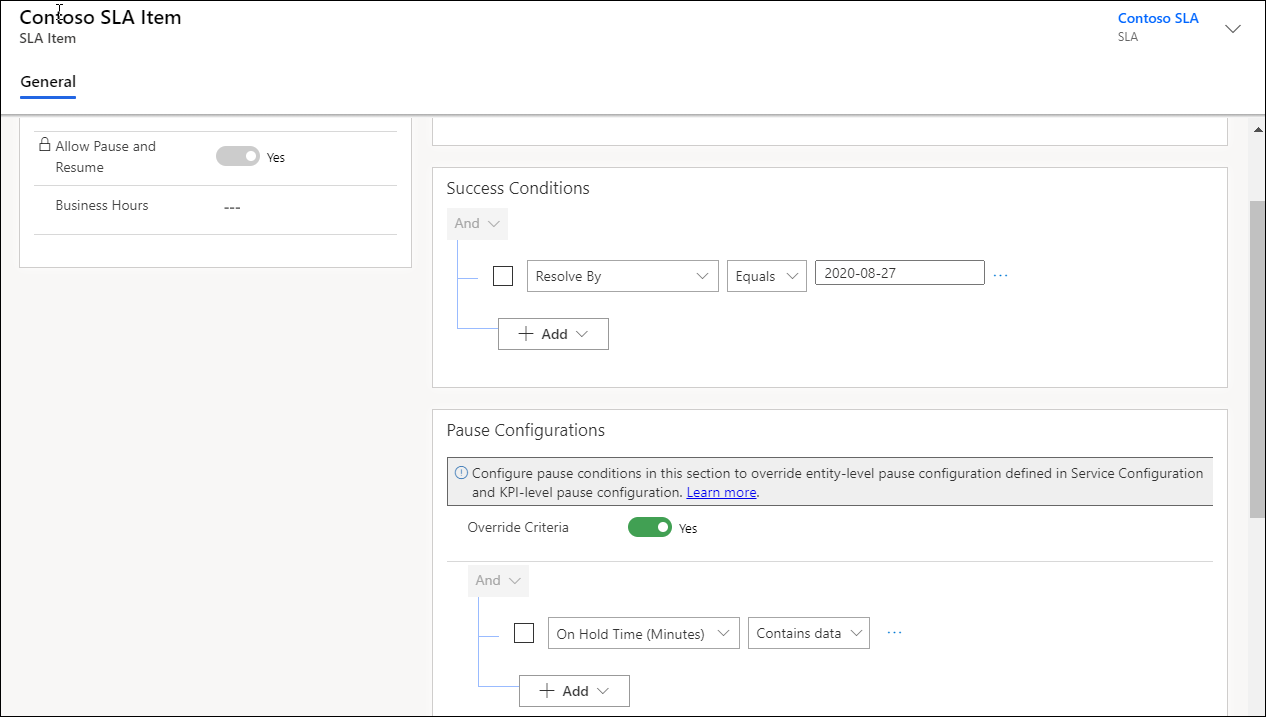
In the Pause Configurations section that appears only when Allow Pause and Resume is enabled, do the following:
- Set the toggle to Yes for Override Criteria to pause the SLA item. This setting overrides the pause settings defined at the entity level, if any, in Service Configuration or at the SLA KPI level.
- Select Add to define the conditions for pausing the SLA item.

In the Warn and Fail Duration section, specify the values to trigger notifications when an SLA is missed. If you don't need Warning Duration, you can set it to null so that SLAs don't reach the Nearing noncompliance status.
Note
The failure and warning time is calculated after considering the business hours selected in the SLA record. If you don't set the business hours record (customer service schedule), the work hours are considered to be all day, every day.
- Select Save.
Configure actions for the SLA item
On the SLA page, select the SLA item, and then select Edit SLA Item. The SLA item page appears.
In the Actions area, select Configure Actions. The Power Automate application opens on a new tab where you can configure actions and reminders for service representatives to keep track of their SLAs.
Perform the following steps in Power Automate:
a. Accept the default settings or select the ellipsis to configure a connection.
b. Select Continue. The predefined flow that's specific to the SLA appears.
Note
We recommend that you don't edit the predefined flow, which can cause breaks in the flow, and the SLA might not work as defined.
c. Select Switch. The following condition steps are displayed for each of which you can configure a required action:
- Is Nearing Non-Compliance: Runs when the warning time is reached for the SLA.
- Is Succeeded: Runs when the SLA succeeds.
- Is Non-compliant: Runs when the SLA fails.
d. Select [Do not delete or update] Is Nearing Non-Compliance > Add an action. The Choose an action area appears, which lets you configure the action that must be performed when the SLA warning time is reached.
e. In Choose an operation, search for an action, such as Perform an unbound action, and select it.
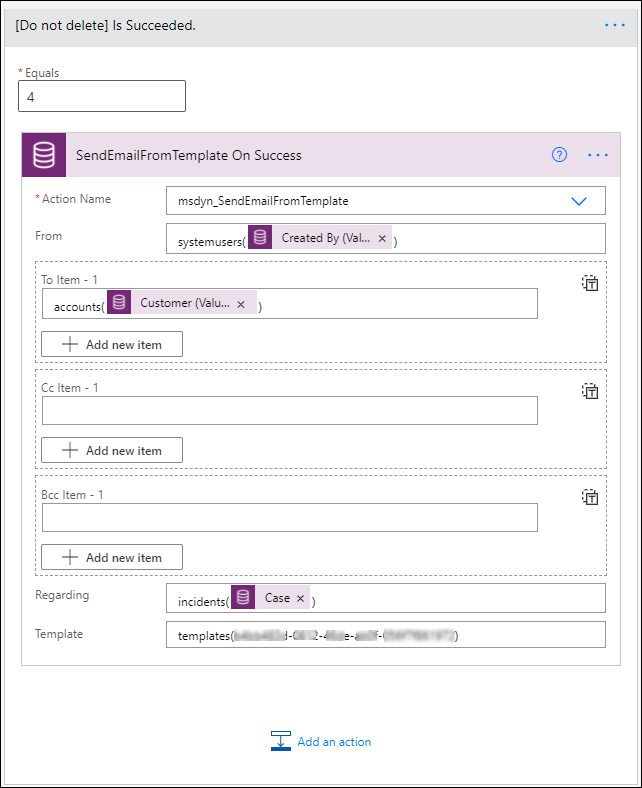
f. In Action Name, select msdyn_SendEmailFromTemplate, and configure the following options that are displayed for the action:
- From
- To Item
- Cc Item
- Regarding
- Template
Note
To obtain the value for the Template field, see Open Data Protocol.
g. Repeat the steps to configure the actions for Is Succeeded and Is Non-compliant.
A sample screenshot of the configured action is as follows.

h. Save and exit Power Automate.
Note
More information: Configure connectors in Power Automate
Select Save & Close on the SLA item dialog box.
Define as many SLA items as you need.
Select Activate. The SLA is activated.
Apply SLAs
To understand how you can apply SLAs, see Apply service-level agreements
Related information
Enable entities for service-level agreements
Troubleshoot issues in SLAs
Add a timer control for SLA-enabled entities