Add the Up next widget to a custom form
Display the Up next widget on your customized forms through sales accelerator configuration in Dynamics 365 Sales.
What is the Up next widget?
The Up next widget helps sellers to view and perform actions on activities on a record by not losing context or need to switch among multiple applications. The activities include phone call, email, or Teams meeting. The widget displays the current activity, upcoming activity, and completed activities. The activities are added to a record manually or by using a sequence:
- In a sequence, a sales manager creates activities and applies them to the record according to business requirements. The activities in the sequence are displayed in the Up next widget.
- For manual activities, you or a sales manager can create an activity on the timeline. The activity is displayed in the Up next widget as a current, upcoming, or completed activity, depending on its due date. This activity is available to you and other sellers who have access to the record.
Add the Up next widget
By default, the Up next widget is available only in the out-of-the-box Sales Insights, lead, and opportunity forms. If you're using customized forms, you can display the Up next widget on your custom forms by following these steps.
Note
- You can add the Up next widget only to managed forms.
- Adding the Up next widget is supported only in Unified Interface apps.
Sign in to the Sales Hub app.
Go to Change area in the lower-left corner of the page, and select Sales Insights settings.
Under Sales accelerator, select Set up.
In the Choose content and layout section, select the custom form for which you want to add the Up next widget.
Note
Here we're using the custom lead form as an example to add the Up next widget for leads. For other record types, you can perform the steps described in the procedure with the custom form selector.
Select the open in new tab icon (
 ) and the form designer tab opens.
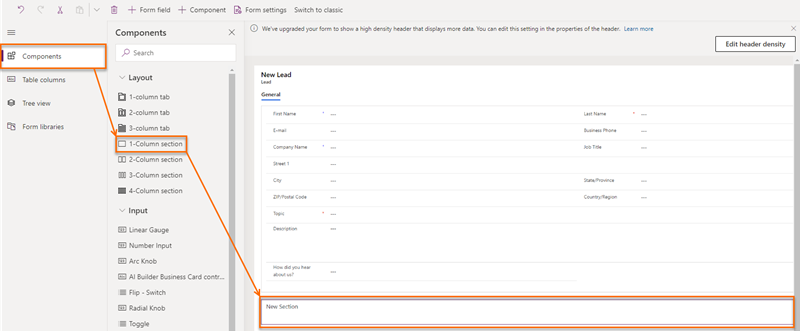
In the form designer, select Component, and then from Layout, add a column to the form as a placeholder to add the widget.

From the site map, select Display > Sequence (Up next).
Note
Ensure that the added placeholder column is selected. If it isn't, the widget will be added at a random place in the form.
In the Edit sequence (Up next) pop-up window, select Done.
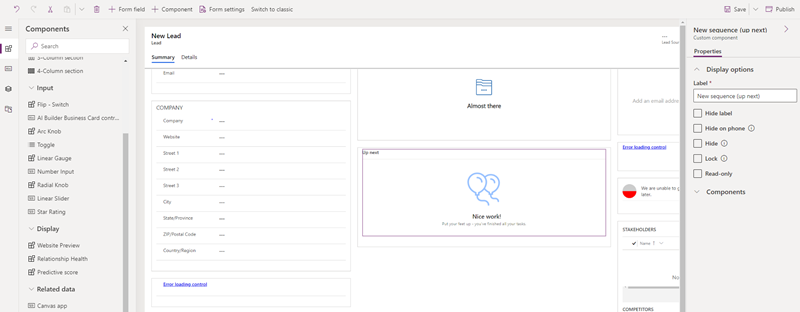
The Up next widget is added to the form, as shown in the following image.
Note
To hide the New section label, go to the Properties tab of the New Section settings pane, and then select Hide label.
Save and publish the form.
Can't find the feature in your app?
There are a few possibilities:
- You don't have the necessary license to use this feature. Check out the comparison table and the licensing guide to see which features are available with your license.
- You don't have the necessary security role to use this feature.
- To configure or setup a feature, you need to have the Administration and customization roles
- To use sales-related features, you need to have the Primary sales roles
- Some tasks require specific Functional roles.
- Your administrator hasn't turned on the feature.
- Your organization is using a custom app. Check with your administrator for exact steps. The steps described in this article are specific to the out-of-the-box Sales Hub and Sales Professional apps.
Related information
Enable and configure sales accelerator
Connect with customers through a record or the Up next widget
Understand the Up next widget