Integrate your existing Network Policy Server (NPS) infrastructure with Microsoft Entra multifactor authentication
The Network Policy Server (NPS) extension for Microsoft Entra multifactor authentication adds cloud-based MFA capabilities to your authentication infrastructure using your existing servers. With the NPS extension, you can add phone call, text message, or phone app verification to your existing authentication flow without having to install, configure, and maintain new servers.
The NPS extension acts as an adapter between RADIUS and cloud-based Microsoft Entra multifactor authentication to provide a second factor of authentication for federated or synced users.
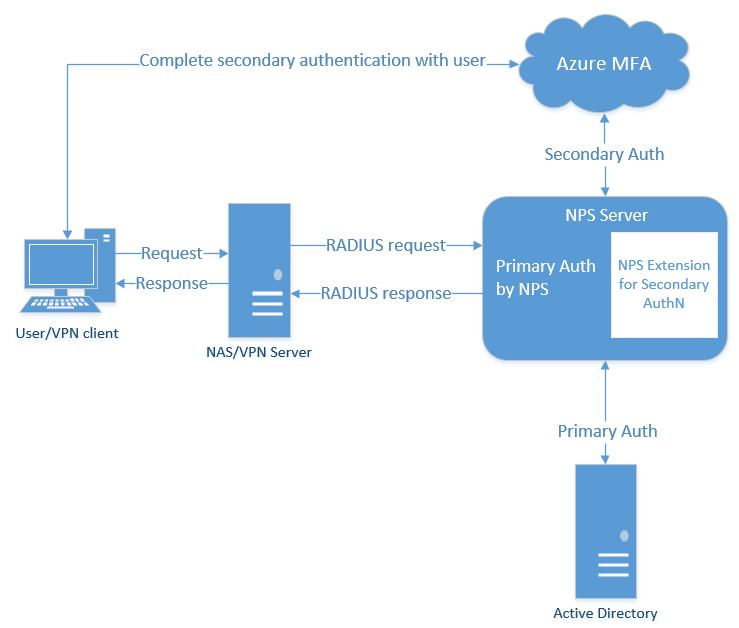
When you use the NPS extension for Microsoft Entra multifactor authentication, the authentication flow includes the following components:
NAS/VPN Server receives requests from VPN clients and converts them into RADIUS requests to NPS servers.
NPS Server connects to Active Directory Domain Services (AD DS) to perform the primary authentication for the RADIUS requests and, upon success, passes the request to any installed extensions.
NPS Extension triggers a request to Microsoft Entra multifactor authentication for the secondary authentication. Once the extension receives the response, and if the MFA challenge succeeds, it completes the authentication request by providing the NPS server with security tokens that include an MFA claim, issued by Azure STS.
Note
Although NPS doesn't support number matching, the latest NPS extension does support time-based one-time password (TOTP) methods, such as the TOTP available in Microsoft Authenticator. TOTP sign-in provides better security than the alternative Approve/Deny experience.
After May 8, 2023, when number matching is enabled for all users, anyone who performs a RADIUS connection with NPS extension version 1.2.2216.1 or later will be prompted to sign in with a TOTP method instead. Users must have a TOTP authentication method registered to see this behavior. Without a TOTP method registered, users continue to see Approve/Deny.
Microsoft Entra multifactor authentication communicates with Microsoft Entra ID to retrieve the user's details and performs the secondary authentication using a verification method configured to the user.
The following diagram illustrates this high-level authentication request flow:
As RADIUS is a UDP protocol, the sender assumes packet loss and awaits a response. After a period of time, the connection may time out. If so, the packet is resent as the sender assumes the packet didn't reach the destination. In the authentication scenario in this article, VPN servers send the request and wait for a response. If the connection times out, the VPN server sends the request again.
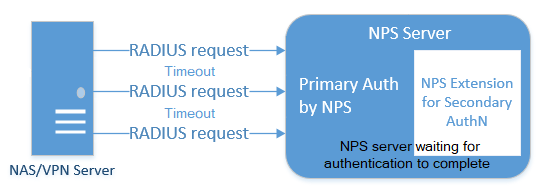
The NPS server may not respond to the VPN server's original request before the connection times out as the MFA request may still be being processed. The user may not have successfully responded to the MFA prompt, so the Microsoft Entra multifactor authentication NPS extension is waiting for that event to complete. In this situation, the NPS server identifies additional VPN server requests as a duplicate request. The NPS server discards these duplicate VPN server requests.
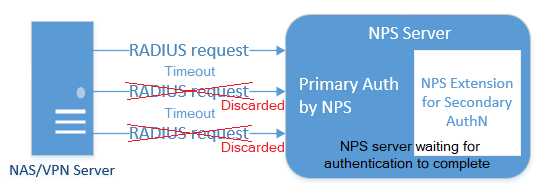
If you look at the NPS server logs, you may see these additional requests being discarded. This behavior is by design to protect the end user from getting multiple requests for a single authentication attempt. Discarded requests in the NPS server event log don't indicate there's a problem with the NPS server or the Microsoft Entra multifactor authentication NPS extension.
To minimize discarded requests, we recommend that VPN servers are configured with a timeout of at least 60 seconds. If needed, or to reduce discarded requests in the event logs, you can increase the VPN server timeout value to 90 or 120 seconds.
Due to this UDP protocol behavior, the NPS server could receive a duplicate request and send another MFA prompt, even after the user has already responded to the initial request. To avoid this timing condition, the Microsoft Entra multifactor authentication NPS extension continues to filter and discard duplicate requests for up to 10 seconds after a successful response has been sent to the VPN server.
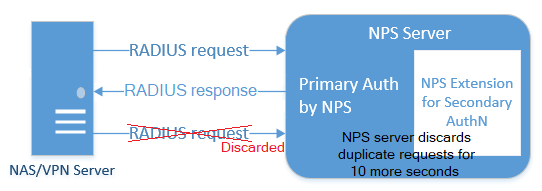
Again, you may see discarded requests in the NPS server event logs, even when the Microsoft Entra multifactor authentication prompt was successful. This is expected behavior, and doesn't indicate a problem with the NPS server or Microsoft Entra multifactor authentication NPS extension.
The NPS extension automatically handles redundancy, so you don't need a special configuration.
You can create as many Microsoft Entra multifactor authentication-enabled NPS servers as you need. If you do install multiple servers, you should use a difference client certificate for each one of them. Creating a certificate for each server means that you can update each cert individually, and not worry about downtime across all your servers.
VPN servers route authentication requests, so they need to be aware of the new Microsoft Entra multifactor authentication-enabled NPS servers.
The NPS extension is meant to work with your existing infrastructure. Make sure you have the following prerequisites before you begin.
The NPS Extension for Microsoft Entra multifactor authentication is available to customers with licenses for Microsoft Entra multifactor authentication (included with Microsoft Entra ID P1 and Premium P2 or Enterprise Mobility + Security). Consumption-based licenses for Microsoft Entra multifactor authentication, such as per user or per authentication licenses, aren't compatible with the NPS extension.
Windows Server 2012 or later. Please note that Windows Server 2012 has reached end of support.
.NET Framework 4.7.2 or later is required for the Microsoft Graph PowerShell module.
PowerShell version 5.1 or later. To check the version of PowerShell, run this command:
PS C:\> $PSVersionTable.PSVersion
Major  Minor  Build  Revision
-----  -----  -----  --------
5      1      16232  1000
Visual Studio 2017 C++ Redistributable (x64) will be installed by the NPS Extension installer.
Microsoft Graph PowerShell is also installed through a configuration script you run as part of the setup process, if not already present. There's no need to install a module in advance.
As part of the configuration of the NPS extension, you must supply administrator credentials and the ID of your Microsoft Entra tenant. To get the tenant ID, complete the following steps:
Sign in to the Microsoft Entra admin center.
Browse to Identity > Settings.
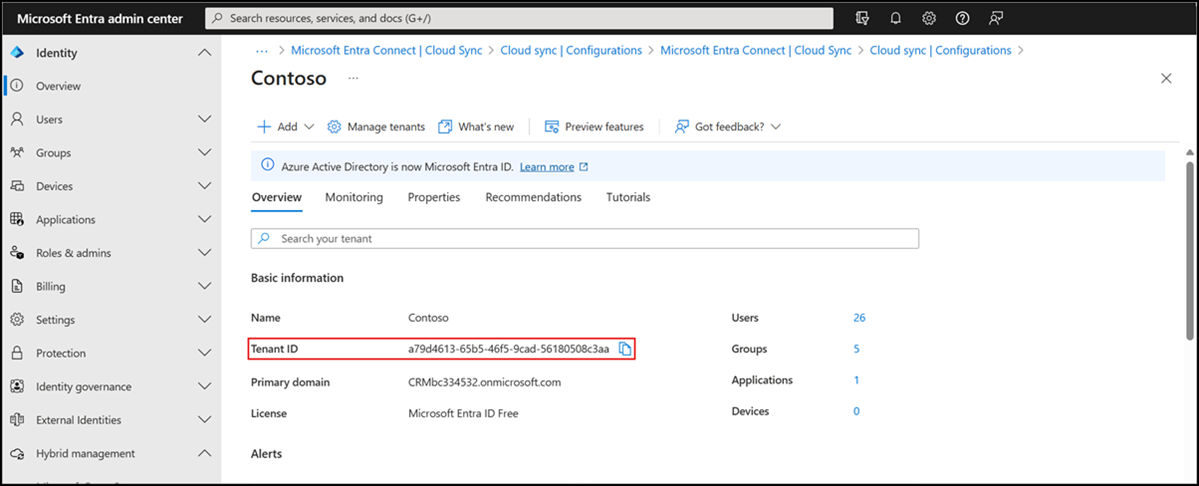
The NPS server must be able to communicate with the following URLs over TCP port 443:
https://login.microsoftonline.comhttps://login.microsoftonline.us (Azure Government)https://login.chinacloudapi.cn (Microsoft Azure operated by 21Vianet)https://credentials.azure.comhttps://strongauthenticationservice.auth.microsoft.comhttps://strongauthenticationservice.auth.microsoft.us (Azure Government)https://strongauthenticationservice.auth.microsoft.cn (Microsoft Azure operated by 21Vianet)https://adnotifications.windowsazure.comhttps://adnotifications.windowsazure.us (Azure Government)https://adnotifications.windowsazure.cn (Microsoft Azure operated by 21Vianet)
Additionally, connectivity to the following URLs is required to complete the setup of the adapter using the provided PowerShell script:
https://onegetcdn.azureedge.nethttps://login.microsoftonline.comhttps://provisioningapi.microsoftonline.comhttps://aadcdn.msauth.nethttps://www.powershellgallery.comhttps://go.microsoft.comhttps://aadcdn.msftauthimages.net
The following table describes the ports and protocols required for the NPS extension. TCP 443 (inbound and outbound) is the only port needed from the NPS Extension server to Entra ID. The RADIUS ports are needed between the access point and the NPS Extension server.
| Protocol | Port | Description |
|---|---|---|
| HTTPS | 443 | Enable user authentication against Entra ID (required when installing the extension) |
| UDP | 1812 | Common port for RADIUS Authentication by NPS |
| UDP | 1645 | Uncommon port for RADIUS Authentication by NPS |
| UDP | 1813 | Common port for RADIUS Accounting by NPS |
| UDP | 1646 | Uncommon port for RADIUS Accounting by NPS |
Before you install the NPS extension, prepare your environment to handle the authentication traffic.
The NPS server connects to Microsoft Entra ID and authenticates the MFA requests. Choose one server for this role. We recommend choosing a server that doesn't handle requests from other services, because the NPS extension throws errors for any requests that aren't RADIUS. The NPS server must be set up as the primary and secondary authentication server for your environment. It can't proxy RADIUS requests to another server.
- On your server, open Server Manager. Select Add Roles and Features Wizard from the Quickstart menu.
- For your installation type, choose Role-based or feature-based installation.
- Select the Network Policy and Access Services server role. A window may pop up to inform you of additional required features to run this role.
- Continue through the wizard until the Confirmation page. When ready, select Install.
It may take a few minutes to install the NPS server role. When finished, continue with the following sections to configure this server to handle incoming RADIUS requests from the VPN solution.
Depending on which VPN solution you use, the steps to configure your RADIUS authentication policy vary. Configure your VPN policy to point to your RADIUS NPS server.
This step may already be complete on your tenant, but it's good to double-check that Microsoft Entra Connect has synchronized your databases recently.
- Sign in to the Microsoft Entra admin center as a Hybrid Identity Administrator.
- Browse to Identity > Hybrid management > Microsoft Entra Connect.
- Verify that your sync status is Enabled and that your last sync was less than an hour ago.
If you need to kick off a new round of synchronization, see Microsoft Entra Connect Sync: Scheduler.
There are two factors that affect which authentication methods are available with an NPS extension deployment:
The password encryption algorithm used between the RADIUS client (VPN, Netscaler server, or other) and the NPS servers.
- PAP supports all the authentication methods of Microsoft Entra multifactor authentication in the cloud: phone call, one-way text message, mobile app notification, OATH hardware tokens, and mobile app verification code.
- CHAPV2 and EAP support phone call and mobile app notification.
The input methods that the client application (VPN, Netscaler server, or other) can handle. For example, does the VPN client have some means to allow the user to type in a verification code from a text or mobile app?
You can disable unsupported authentication methods in Azure.
Note
Regardless of the authentication protocol that's used (PAP, CHAP, or EAP), if your MFA method is text-based (SMS, mobile app verification code, or OATH hardware token) and requires the user to enter a code or text in the VPN client UI input field, the authentication might succeed. But any RADIUS attributes that are configured in the Network Access Policy are not forwarded to the RADIUS client (the Network Access Device, like the VPN gateway). As a result, the VPN client might have more access than you want it to have, or less access or no access.
As a workaround, you can run the CrpUsernameStuffing script to forward RADIUS attributes that are configured in the Network Access Policy and allow MFA when the user's authentication method requires the use of a One-Time Passcode (OTP), such as SMS, a Microsoft Authenticator passcode, or a hardware FOB.
Before you deploy and use the NPS extension, users that are required to perform Microsoft Entra multifactor authentication need to be registered for MFA. To test the extension as you deploy it, you also need at least one test account that is fully registered for Microsoft Entra multifactor authentication.
If you need to create and configure a test account, use the following steps:
- Sign in to https://aka.ms/mfasetup with a test account.
- Follow the prompts to set up a verification method.
- Sign in to the Microsoft Entra admin center as at least an Authentication Policy Administrator.
- Browse to Protection > Multifactor authentication and enable for the test account.
Important
Make sure that users have successfully registered for Microsoft Entra multifactor authentication. If users have previously only registered for self-service password reset (SSPR), StrongAuthenticationMethods is enabled for their account. Microsoft Entra multifactor authentication is enforced when StrongAuthenticationMethods is configured, even if the user only registered for SSPR.
Combined security registration can be enabled that configures SSPR and Microsoft Entra multifactor authentication at the same time. For more information, see Enable combined security information registration in Microsoft Entra ID.
You can also force users to re-register authentication methods if they previously only enabled SSPR.
Users who connect to the NPS server using username and password will be required to complete a multifactor authentication prompt.
Important
Install the NPS extension on a different server than the VPN access point.
To download and install the NPS extension, complete the following steps:
- Download the NPS Extension from the Microsoft Download Center.
- Copy the binary to the Network Policy Server you want to configure.
- Run setup.exe and follow the installation instructions. If you encounter errors, make sure that the libraries from the prerequisite section were successfully installed.
If you later upgrade an existing NPS extension install, to avoid a reboot of the underlying server, complete the following steps:
- Uninstall the existing version.
- Run the new installer.
- Restart the Network Policy Server (IAS) service.
The installer creates a PowerShell script at C:\Program Files\Microsoft\AzureMfa\Config (where C:\ is your installation drive). This PowerShell script performs the following actions each time it's run:
- Creates a self-signed certificate.
- Associates the public key of the certificate to the service principal on Microsoft Entra ID.
- Stores the certificate in the local machine certificate store.
- Grants access to the certificate's private key to Network User.
- Restarts the NPS service.
Unless you want to use your own certificates (instead of the self-signed certificates that the PowerShell script generates), run the PowerShell script to complete the NPS extension installation. If you install the extension on multiple servers, each server should have its own certificate.
To provide load-balancing capabilities or for redundancy, repeat these steps on additional NPS servers as desired:
Open a Windows PowerShell prompt as an administrator.
Change directories to where the installer created the PowerShell script:
cd "C:\Program Files\Microsoft\AzureMfa\Config"Run the PowerShell script created by the installer.
You might be required to first enable TLS 1.2 for PowerShell to be able to connect and download packages properly:
[Net.ServicePointManager]::SecurityProtocol = [Net.SecurityProtocolType]::Tls12Important
For customers that use the Azure for US Government or Azure operated by 21Vianet clouds, first edit the AzureMfaNpsExtnConfigSetup.ps1 script to include the AzureEnvironment parameters for the required cloud. For example, specify -AzureEnvironment USGovernment or -AzureEnvironment AzureChinaCloud.
.\AzureMfaNpsExtnConfigSetup.ps1When prompted, sign in to Microsoft Entra ID.
A Global Administrator is needed to manage this feature.
PowerShell prompts for your tenant ID. Use the Tenant ID GUID that you copied in the prerequisites section.
A success message is shown when the script is finished.
If your previous computer certificate has expired, and a new certificate has been generated, you should delete any expired certificates. Having expired certificates can cause issues with the NPS Extension starting.
Note
If you use your own certificates instead of generating certificates with the PowerShell script, make sure that they align to the NPS naming convention. The subject name must be CN=<TenantID>,OU=Microsoft NPS Extension.
For customers that use the Azure Government or Azure operated by 21Vianet clouds, the following additional configuration steps are required on each NPS server.
Important
Only configure these registry settings if you're an Azure Government or Azure operated by 21Vianet customer.
If you're an Azure Government or Azure operated by 21Vianet customer, open Registry Editor on the NPS server.
Navigate to
HKEY_LOCAL_MACHINE\SOFTWARE\Microsoft\AzureMfa.For Azure Government customers, set the following key values:
Registry key Value AZURE_MFA_HOSTNAME strongauthenticationservice.auth.microsoft.us AZURE_MFA_RESOURCE_HOSTNAME adnotifications.windowsazure.us STS_URL https://login.microsoftonline.us/ For Microsoft Azure operated by 21Vianet customers, set the following key values:
Registry key Value AZURE_MFA_HOSTNAME strongauthenticationservice.auth.microsoft.cn AZURE_MFA_RESOURCE_HOSTNAME adnotifications.windowsazure.cn STS_URL https://login.chinacloudapi.cn/ Repeat the previous two steps to set the registry key values for each NPS server.
Restart the NPS service for each NPS server.
For minimal impact, take each NPS server out of the NLB rotation one at a time and wait for all connections to drain.
With release 1.0.1.32 of the NPS extension, reading multiple certificates is now supported. This capability helps facilitate rolling certificate updates prior to their expiration. If your organization is running a previous version of the NPS extension, upgrade to version 1.0.1.32 or higher.
Certificates created by the AzureMfaNpsExtnConfigSetup.ps1 script are valid for 2 years. Monitor certificates for expiration. Certificates for the NPS extension are placed in the Local Computer certificate store under Personal and are Issued To the tenant ID provided to the installation script.
When a certificate is approaching the expiration date, a new certificate should be created to replace it. This process is accomplished by running the AzureMfaNpsExtnConfigSetup.ps1 again and keeping the same tenant ID when prompted. This process should be repeated on each NPS server in your environment.
With your environment prepared, and the NPS extension now installed on the required servers, you can configure the extension.
This section includes design considerations and suggestions for successful NPS extension deployments.
- The NPS extension for Microsoft Entra multifactor authentication doesn't include tools to migrate users and settings from MFA Server to the cloud. For this reason, we suggest using the extension for new deployments, rather than existing deployment. If you use the extension on an existing deployment, your users have to perform proof-up again to populate their MFA details in the cloud.
- The NPS extension doesn't support custom phone calls configured on Phone call settings. The default phone call language will be used (EN-US).
- The NPS extension uses the UPN from the on-premises AD DS environment to identify the user on Microsoft Entra multifactor authentication for performing the Secondary Auth. The extension can be configured to use a different identifier like alternate login ID or custom AD DS field other than UPN. For more information, see the article, Advanced configuration options for the NPS extension for multifactor authentication.
- Not all encryption protocols support all verification methods.
- PAP supports phone call, one-way text message, mobile app notification, and mobile app verification code
- CHAPV2 and EAP support phone call and mobile app notification
Once you enable MFA for a RADIUS client using the NPS extension, all authentications for this client are required to perform MFA. If you want to enable MFA for some RADIUS clients but not others, you can configure two NPS servers and install the extension on only one of them.
Configure RADIUS clients that you want to require MFA to send requests to the NPS server configured with the extension, and other RADIUS clients to the NPS server not configured with the extension.
If you have users that aren't enrolled for MFA, you can determine what happens when they try to authenticate. To control this behavior, use the setting REQUIRE_USER_MATCH in the registry path HKLM\Software\Microsoft\AzureMFA. This setting has a single configuration option:
| Key | Value | Default |
|---|---|---|
| REQUIRE_USER_MATCH | TRUE/FALSE | Not set (equivalent to TRUE) |
This setting determines what to do when a user isn't enrolled for MFA. When the key doesn't exist, is not set, or is set to TRUE, and the user isn't enrolled, the extension fails the MFA challenge.
When the key is set to FALSE and the user isn't enrolled, authentication proceeds without performing MFA. If a user is enrolled in MFA, they must authenticate with MFA even if REQUIRE_USER_MATCH is set to FALSE.
You can choose to create this key and set it to FALSE while your users are onboarding, and may not all be enrolled for Microsoft Entra multifactor authentication yet. However, since setting the key permits users that aren't enrolled for MFA to sign in, you should remove this key before going to production.
The Microsoft Entra multifactor authentication NPS Extension health check script performs a basic health check when troubleshooting the NPS extension. Run the script and choose one of available options.
How to fix the error "Service principal was not found" while running AzureMfaNpsExtnConfigSetup.ps1 script?
If for any reason the "Azure Multi-factor Auth Client" service principal was not created in the tenant, it can be manually created by running PowerShell.
Connect-MgGraph -Scopes 'Application.ReadWrite.All'
New-MgServicePrincipal -AppId 00001111-aaaa-2222-bbbb-3333cccc4444 -DisplayName "Azure Multi-Factor Auth Client"
- Sign in to the Microsoft Entra admin center as at least an Application Administrator.
- Browse to Identity > Applications > Enterprise applications > and search for "Azure Multi-factor Auth Client".
- Click Check properties for this app. Confirm if the service principal is enabled or disabled.
- Click the application entry > Properties.
- If the option Enabled for users to sign-in? is set to No, set it to Yes.
Run the AzureMfaNpsExtnConfigSetup.ps1 script again and it should not return the Service principal was not found error.
Look for the self-signed certificate created by the installer in the cert store, and check that the private key has "READ" permission granted to user NETWORK SERVICE. The cert has a subject name of CN <tenantid>, OU = Microsoft NPS Extension
Self-signed certificates generated by the AzureMfaNpsExtnConfigSetup.ps1 script have a validity lifetime of two years. When verifying that the certificate is installed, you should also check that the certificate hasn't expired.
Open PowerShell command prompt and run the following commands:
Connect-MgGraph -Scopes 'Application.Read.All'
(Get-MgServicePrincipal -Filter "appid eq '00001111-aaaa-2222-bbbb-3333cccc4444'" -Property "KeyCredentials").KeyCredentials |
Format-List KeyId, DisplayName, StartDateTime, EndDateTime,
@{Name = "Key"; Expression = {[System.Convert]::ToBase64String($_.Key) }},
@{Name = "Thumbprint"; Expression = { [Convert]::ToBase64String($_.CustomKeyIdentifier)}}
These commands print all the certificates associating your tenant with your instance of the NPS extension in your PowerShell session. Look for your certificate by exporting your client cert as a Base-64 encoded X.509(.cer) file without the private key, and compare it with the list from PowerShell. Compare the thumbprint of the certificate installed on the server to this one. The certificate thumbprints should match.
StartDateTime and EndDateTime timestamps, which are in human-readable form, can be used to filter out obvious misfits if the command returns more than one cert.
Check that your password hasn't expired. The NPS extension doesn't support changing passwords as part of the sign-in workflow. Contact your organization's IT Staff for further assistance.
This error could be due to one of several reasons. Use the following steps to troubleshoot:
- Restart your NPS server.
- Verify that client cert is installed as expected.
- Verify that the certificate is associated with your tenant on Microsoft Entra ID.
- Verify that
https://login.microsoftonline.com/is accessible from the server running the extension.
Verify that AD Connect is running, and that the user is present in both the on-premises AD DS environment and in Microsoft Entra ID.
Verify that https://adnotifications.windowsazure.com, https://strongauthenticationservice.auth.microsoft.com is reachable from the server running the NPS extension.
If your previous computer certificate has expired, and a new certificate has been generated, delete any expired certificates. Expired certificates can cause issues with the NPS extension starting.
To check if you have a valid certificate, check the local Computer Account's Certificate Store using MMC, and ensure the certificate hasn't passed its expiry date. To generate a newly valid certificate, rerun the steps from Run the PowerShell installer script.
A VPN server may send repeated requests to the NPS server if the timeout value is too low. The NPS server detects these duplicate requests and discards them. This behavior is by design, and doesn't indicate a problem with the NPS server or the Microsoft Entra multifactor authentication NPS extension.
For more information on why you see discarded packets in the NPS server logs, see RADIUS protocol behavior and the NPS extension at the start of this article.
Although NPS doesn't support number matching, the latest NPS extension does support time-based one-time password (TOTP) methods such as the TOTP available in Microsoft Authenticator, other software tokens, and hardware FOBs. TOTP sign-in provides better security than the alternative Approve/Deny experience. Make sure you run the latest version of the NPS extension.
After May 8, 2023, when number matching is enabled for all users, anyone who performs a RADIUS connection with NPS extension version 1.2.2216.1 or later will be prompted to sign in with a TOTP method instead.
Users must have a TOTP authentication method registered to see this behavior. Without a TOTP method registered, users continue to see Approve/Deny.
Prior to the release of NPS extension version 1.2.2216.1 after May 8, 2023, organizations that run earlier versions of NPS extension can modify the registry to require users to enter a TOTP. For more information, see NPS extension.
It's recommended that older and weaker cipher suites be disabled or removed unless required by your organization. Information on how to complete this task can be found in the article, Managing SSL/TLS Protocols and Cipher Suites for AD FS
Additional troubleshooting guidance and possible solutions can be found in the article, Resolve error messages from the NPS extension for Microsoft Entra multifactor authentication.
Overview and configuration of Network Policy Server in Windows Server
Configure alternate IDs for login, or set up an exception list for IPs that shouldn't perform two-step verification in Advanced configuration options for the NPS extension for multifactor authentication
Learn how to integrate Remote Desktop Gateway and VPN servers using the NPS extension
Resolve error messages from the NPS extension for Microsoft Entra multifactor authentication