Developpement Windows Phone - partie 12
Les Notifications Push pour le développement Windows Phone
Cet article fait partie d’une série d’articles sur le développement Windows Phone. Il s’agit d’une traduction des articles se trouvant sur la MSDN.
Sommaire
Bien débuter et fondamentaux
- Bien démarrer (Hello World)
- Créer une interface utilisateur pour Windows Phone en XAML
- Utiliser des contrôles
- Types de contrôles
- Contrôles Panorama et Pivot
- Travailler avec du texte sur le Windows Phone
- Mise en page sur l’écran
- Orientations de l’écran
- Saisie tactile
- Navigation
- Exécuter votre application en arrière-plan (tombstoning)
- Notifications Push pour le développement Windows Phone
- Publier votre application sur le Marketplace
Visuels et média
Travailler avec les données
- Obtenir des données dans vos applications Windows Phone
- Data binding
- Isolated storage
- Accéder à un service Web REST
- Consommer des données Windows Azure
Sondes et autres fonctionnalités spécifiques au téléphone
- Lanceurs et choosers
- Détecter des mouvements (accéléromètres)
- Développer avec le GPS Windows Phone (Services de localisation)
- Développer avec l’appareil photo du Windows Phone
Les Notifications Push pour le développement Windows Phone
Les applications Windows Phone 7 peuvent recevoir des messages d’Internet qui sont envoyés par un serveur, grâce à l’utilisation des Notifications Push. Ces notifications peuvent être reçues par l’utilisateur même si l’application n’est pas en marche. Les Notifications Push sont relayées aux périphériques Windows Phone 7 par le service de notification de Microsoft (MPNS: Microsoft Push Notification Service)
Ce tutoriel contient les sections suivantes:
- La solution en vidéo
- Vue d’ensemble des Notifications Push
- Créer un web service qui renvoie des Notifications Push
- Publier votre web service sur Windows Azure
- Créer une application mobile qui reçoit des Notifications Push
- Tester ce tutoriel
Télécharger les sources complètes de ce tutoriel
La solution en vidéo
Pour voir un exemple de cette application en marche, et pour consulter ce tutoriel en suivant une vidéo plutôt que de continuer sur la lecture de cet article, vous pouvez regarder la vidéo ci-dessous. Sur cette page de Channel9, la vidéo possède plusieurs options de téléchargement si vous souhaitez télécharger une version qui peut être lue sur des appareils (téléphones, tablettes, etc..) plutôt que sur un ordinateur, ou si le flux de la vidéo n’est pas optimisé pour vous.
Vue d’ensemble des Notifications Push
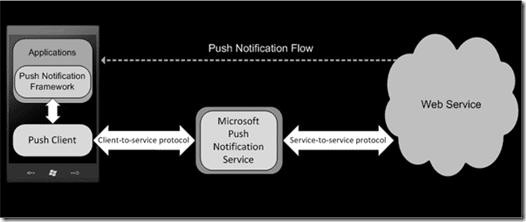
Le service de Notification de Push de Microsoft pour Windows Phone (MPNS) offre aux tiers développeurs un canal dédié et persistant pour envoyer des informations et des mises à jour à une application mobile à partir d’un web service. Dans le passé, une application mobile aurait eu besoin d’effectuer plusieurs requêtes au web service correspondant pour savoir s’il y a des notifications en attente. Bien que cela soit efficace, un usage fréquent de requêtes fait que l’on utilise le périphérique radio et que par conséquent nous réduisons la durée de vie de la batterie. En utilisant les Notifications Push au lieu que d’utiliser le polling (requêtage intensif vers un web service), un web service peut notifier une application de mises à jour importantes sur une base as-needed.
Quand un web service a une information à envoyer à une application, il envoie une notification au service de Notification de Push, qui à son tour route celle-ci à l’application. Selon le format de la Notification Push et de la charge liée, l’information est livrée sous forme de données brutes à l’application, les Tiles de celle-ci sont visuellement mises à jour, ou une notification toast est affichée. L’application peut alors communiquer avec un web service en utilisant son propre protocole si nécessaire.
Voici les types de Notifications Push supports par Windows Phone 7 avec quelques grandes lignes à garder en tête pour chacune.
Les notifications Tile:
- Mettent à jour le Live Tile pour l’application présente sur l’écran de démarrage, changement du graphique, du titre du Tile, et affichage de l’intégration d’un compteur
- Sont toujours reçues quand l’application est en marche, soyez donc prudent aux anciens Live Tiles.
- Doivent avoir un poids de 80k ou moins et être téléchargées en 15 secondes ou moins.
Les notifications Raw:
- Peuvent être utilisées pour n’importe quoi, mais avoir une limite de poids de 1K, sinon vous devrez fournir des URIs pour n’importe quels binaires et gérer le téléchargement séparément.
- Peuvent être reçues que lorsque l’application est en marche.
- Déclenchent une réaction non perceptible de l’utilisateur sur le téléphone, sauf si le code de l’application permet de le faire.
Les notifications Toast:
- Contiennent un message court avec un sujet et un corps.
- Si l’application n’est pas démarrée, les notifications Toast se mettront en haut de l’affichage, superposant ce qu’il y a sur l’écran.
- Si l’application est en marche, les notifications Toast ne déclencheront pas de réaction perceptible de l’utilisateur sur le téléphone, sauf si le code permet de le faire.
Il y a une limite quotidienne de 500 push par URI sauf si vous téléchargez un certificat TLS pour votre compte de développeur sur AppHub.com et que vous l’utilisez pour authentifier votre WebService avec MPNS. Pour plus d’informations, consultez la procédure : Configurer un WebService sécurisé pour Windows Phone.
Créer un web service qui envoie des Notifications Push
Si vous envisagez de publier votre web service sur Windows Azure, suivez ces étapes:
- Installez la dernière version du SDK de Windows Azure et inscrivez-vous pour un essai gratuit ou classique à un compte Azure.
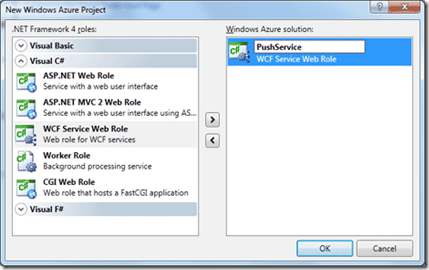
- Après installation de SDK Azure, démarrez un nouveau projet dans Visual Studio en utilisant le modèle de projet "Cloud", et sélectionnez "Windows Azure Project," en lui donnant un nom de projet.
- Ajoutez un “WCF Service Web Role” à la solution Windows Azure, éditez alors le nom. Entrez un nom différent pour le Role que ce qui était entré pour le projet Windows Azure.Dans cet exemple, le rôle est nommé "PushService," qui créera un web service avec ce même nom qui sera utilisé par défaut pour son namespace.
Saisissez le nom "PushService" ici générera un namespace avec ce même nom, comme on le voit dans le code suivant.
Si vous ne planifiez pas d’utiliser Azure, suivez ces étapes:
- Lancez Visual Studio et sélectionnez un projet de type "WCF" pour le langage souhaité. (C# est utilisé dans l’exemple).
- Sélectionnez "WCF Service Application" comme type de projet, et entrez un nom. Dans cet exemple, le projet est nommé "PushService," lequel créé un a web service avec le nom de projet utilisé pour le namespace par défaut.
Une fois le projet chargé dans Visual Studio, ouvrez le fichier IService1.cs et effacez le contenu de la classe Service1.
Dans le fichier IService1.cs, entrez les signatures des quatre méthodes, précédées par l’attribut OperationContract:
- SubscribeMyPhone, recevra un GUID représentant l’ID du téléphone qui s’inscrit pour recevoir les Notifications Push de ce service, et un objet URI représentant l’URL du service de Notification de Push de Microsoft à laquelle les Notifications Push seront relayées pour être reçues par ce téléphone.
- PushRawData, recevra un message qui sera envoyé comme notification Raw à tous les téléphones qui se seront inscrits au service par un précédent appel à la méthode SubscribeMyPhone
- PushToast, recevra un message qui sera envoyé comme une notification Toast à tous les téléphones qui se seront inscrits au service par un précédent appel à la méthode SubscribeMyPhone.
- PushTileUpdate, recevra les paramètres définissant une mise à jour du Tile qui sera envoyé à tous les téléphones qui se seront inscrits au service par un précédent appel à la méthode SubscribeMyPhone.
Le contenu final du fichier IService1.cs après la saisie de ces méthodes sera comme suit:
C# (IService1.cs)
Code Snippet
- using System;
- using System.Collections.Generic;
- using System.Linq;
- using System.Runtime.Serialization;
- using System.ServiceModel;
- using System.ServiceModel.Web;
- using System.Text;
- namespace PushService
- {
- [ServiceContract]
- public interface IService1
- {
- [OperationContract]
- void SubscribeMyPhone(Guid phoneID, string channelURI);
- [OperationContract]
- void PushRawData(string rawMessage);
- [OperationContract]
- void PushToast(string toastTitle, string toastMessage);
- [OperationContract]
- void PushTileUpdate(string tileTitle, int tileCount, string tileImageURI);
- }
- }
Dans le fichier Service1.svc.cs, nous saisirons le code qui implémente ces méthodes dans la classe par défaut, nommée Service1, qui est dans namespace par défaut « PushService ». La classe Service1 contient les implémentations des membres suivants :
- SubcsriptionURIs est un dictionnaire <Guid, Uri> qui suit les GUID des téléphones qui ont appelé la méthode SubsribeMyPhone et ont fourni une URI par laquelle ils peuvent recevoir des Notifications Push.
- BatchingIntervalValues est un Enum qui définit différents temps d’attente qui peuvent être utilisés pour retarder une Notification Push qui sera envoyée au téléphone à partir du service de notification.
- SendPushToSubscribedURIs est une méthode qui reçoit la sortie des quatres méthodes que nous avons définies dans le fichier IService1.cs, les packages dans le corps d’un paquet HTTP POST qui possède un en-tête personnalisé qui active les fonctionnalités Notification Push et envoie un paquet final pour toutes les URI définies dans le dictionnaire SubscriptionURIs. Ces URIs sont fournies par le service de Notification Push de Microsoft relayeront les messages aux téléphones destinés.
- SubscribeMyPhone sera implémenté pour mettre à jour SubscripitionURIs avec les données entrantes des URIs.
- PushRawData sera implémenté pour encoder les messages entrants comme un tableau de byte[] et enverra le résultat à sendPushToSubscribedURIs
- PushToast sera implémenté pour encoder le message entrant dans un flux XML avec une structure spécifique que le service de Notification Push de Microsoft attendra, et enverra le résultat à sendPushToSubscribedURIs
- PushTileUpdate sera implémenté pour encoder les données entrantes de type Tile Update dans un flux XML avec une structure spécifique que le service de Notification Push de Microsoft attendra, et enverra le résultat à sendPushToSubscribedURIs
Une fois terminé le fichier ressemblera à cela :
C# (Service1.svc.cs)
Code Snippet
- using System;
- using System.Collections.Generic;
- using System.Linq;
- using System.Runtime.Serialization;
- using System.ServiceModel;
- using System.ServiceModel.Web;
- using System.Text;
- using System.Xml;
- using System.IO;
- using System.Net;
- namespace PushService
- {
- public class Service1 : IService1
- {
- //Custom constructor
- public Service1()
- {
- //TODO: Load from database into SubscriptionURIs here.
- }
- //Data members.
- //This tracks the devices-to-channelURI list, which gets updated by calls to
- //SubscribeMyPhone();
- private static Dictionary<Guid, Uri> SubscriptionURIs = new Dictionary<Guid, Uri>();
- //This overwrites/creates entries for each phone that wants to receive Push Notifications.
- //Note: This list is reset whenever application restarts -- in real life, you will want
- //to store this data from the SubscriptionURIs list into a database so it persists. Hence,
- //there are TODO sections in this code.
- public void SubscribeMyPhone(Guid phoneID, string channelURI)
- {
- Uri thisURI = new Uri(channelURI);
- if (SubscriptionURIs.ContainsKey(phoneID))
- {
- //update the existing URI entry for this phone, if need be
- SubscriptionURIs[phoneID] = thisURI;
- }
- else
- {
- //otherwise, add a subscription for this phone
- SubscriptionURIs.Add(phoneID, thisURI);
- }
- // TODO: Save this data in a database, otherwise it will be lost on application restart.
- }
- //Sends the received text value as a Raw notification -- which can only be received
- //while the subscribed phone app is running. Raw notifications have a size limit of 1K.
- public void PushRawData(string rawMessage)
- {
- //Encode the message as a byte[] array as the Notification Service Expects.
- System.Text.UTF8Encoding encoding = new UTF8Encoding();
- //Send this message to all subscribed devices.
- sendPushToSubscribedURIs(encoding.GetBytes(rawMessage), "raw");
- }
- //Sends a Toast notification, using the arguments to define the notification's Title and Message.
- public void PushToast(string ToastTitle, string ToastMessage)
- {
- //Use XMLWriter to construct notification structure/contents.
- MemoryStream myStream = new MemoryStream();
- XmlWriter myWriter = XmlWriter.Create(myStream);
- myWriter.WriteStartDocument();
- myWriter.WriteStartElement("wp", "Notification", "WPNotification");
- myWriter.WriteStartElement("wp", "Toast", "WPNotification");
- myWriter.WriteStartElement("wp", "Text1", "WPNotification");
- myWriter.WriteValue(ToastTitle);
- myWriter.WriteEndElement();
- myWriter.WriteStartElement("wp", "Text2", "WPNotification");
- myWriter.WriteValue(ToastMessage);
- myWriter.WriteEndElement();
- myWriter.WriteEndElement();
- myWriter.WriteEndDocument();
- //Transfer Xml Outpute from myWriter's buffer to myStream.
- myWriter.Flush();
- //Send this message to all subscribed devices.
- sendPushToSubscribedURIs(myStream.ToArray(), "toast");
- }
- //Sends the specified Tile Title, Tile Count, and Tile Image URL as a Tile
- //notification, which can only be received while the subscribed phone app is
- //NOT running. The maximum allowed size of the Tile image is 80kb, with a
- //maximum download time of 15 seconds. Only Tile image URLs from the domains listed in
- //Push Client's ListOfAllowedDomains will be accepted. The Tile Title will overwrite
- //the text that labels the tile on the phone's menu, and the Tile Count is
- //shown as a numeric value displayed on top of the Tile image, visually.
- public void PushTileUpdate(string TileTitle, int TileCount, string TileImageURL)
- {
- // Use XmlWriter to construct notification structure/contents.
- MemoryStream myStream = new MemoryStream();
- XmlWriter myWriter = XmlWriter.Create(myStream);
- myWriter.WriteStartDocument();
- myWriter.WriteStartElement("wp", "Notification", "WPNotification");
- myWriter.WriteStartElement("wp", "Tile", "WPNotification");
- myWriter.WriteStartElement("wp", "BackgroundImage", "WPNotification");
- myWriter.WriteValue(TileImageURL);
- myWriter.WriteEndElement();
- myWriter.WriteStartElement("wp", "Count", "WPNotification");
- myWriter.WriteValue(TileCount);
- myWriter.WriteEndElement();
- myWriter.WriteStartElement("wp", "Title", "WPNotification");
- myWriter.WriteValue(TileTitle);
- myWriter.WriteEndElement();
- myWriter.WriteEndElement();
- myWriter.WriteEndDocument();
- //Transfer Xml output from myWriter's buffer to myStream.
- myWriter.Flush();
- //Send this message to all subscribed devices.
- sendPushToSubscribedURIs(myStream.ToArray(), "tile");
- }
- //This enum gives symbolic names to the numeric values used to "batch together"
- //push notifications according to the specified time intervals. You can send them
- //immediately, within 450 seconds, or within 900 seconds. Allowing the Notification
- //Service to batch notifications will let the service group messages together with
- //notifications from other apps to save phone battery life.
- public enum BatchingIntervalValues
- {
- ImmediateTile = 1,
- ImmediateToast = 2,
- ImmediateRaw = 3,
- Wait450SecondsTile = 11,
- Wait450SecondsToast = 12,
- Wait450SecondsRaw = 13,
- Wait900SecondsTile = 21,
- Wait900SecondsToast = 22,
- Wait900SecondsRaw = 23
- }
- //Iterates through SubscriptionURIs, sending the constructed Push Notification to
- //of the notification, which is every subscribed device via the Microsoft
- //Push Notification Service. The payload passed in, is packaged into an HTTP POST
- //message that defines headers containing the notification type and batching interval.
- private static void sendPushToSubscribedURIs(byte[] pushPayload, string notificationType)
- {
- //Iterate through SubscriptionURIs
- foreach (var thisURI in SubscriptionURIs.Values)
- {
- //Add headers to HTTP Post message.
- var myRequest = (HttpWebRequest)WebRequest.Create(thisURI); // Push Client's channelURI
- myRequest.Method = WebRequestMethods.Http.Post;
- myRequest.ContentType = "text/xml";
- myRequest.ContentLength = pushPayload.Length;
- // gives this message a unique ID
- myRequest.Headers.Add("X-MessageID", Guid.NewGuid().ToString());
- //Customize or exclude the X-WindowsPhone-Target header based on the notification type.
- switch (notificationType)
- {
- case "toast":
- myRequest.Headers["X-WindowsPhone-Target"] = "toast";
- myRequest.Headers.Add("X-NotificationClass",
- ((int)BatchingIntervalValues.ImmediateToast).ToString());
- break;
- case "tile":
- myRequest.Headers["X-WindowsPhone-Target"] = "token";
- myRequest.Headers.Add("X-NotificationClass",
- ((int)BatchingIntervalValues.ImmediateTile).ToString());
- break;
- case "raw":
- myRequest.Headers.Add("X-NotificationClass",
- ((int)BatchingIntervalValues.ImmediateRaw).ToString());
- //Raw notifications do not specify a value for the X-WindowsPhone-Target header.
- break;
- }
- //Merge headers with payload.
- using (var requestStream = myRequest.GetRequestStream())
- {
- requestStream.Write(pushPayload, 0, pushPayload.Length);
- }
- //Send notification to this phone!
- var response = (HttpWebResponse)myRequest.GetResponse();
- }
- }
- }
- }
Visual Basic (Service1.svc.vb)
Code Snippet
- Imports System.Collections.Generic
- Imports System.Linq
- Imports System.Runtime.Serialization
- Imports System.ServiceModel
- Imports System.ServiceModel.Web
- Imports System.Text
- Imports System.Xml
- Imports System.IO
- Imports System.Net
- Namespace PushService
- Public Class Service1
- Implements IService1
- 'Custom constructor
- 'TODO: Load from database into SubscriptionURIs here.
- Public Sub New()
- End Sub
- 'Data members.
- 'This tracks the devices-to-channelURI list, which gets updated by calls to
- 'SubscribeMyPhone();
- Private Shared SubscriptionURIs As New Dictionary(Of Guid, Uri)()
- 'This overwrites/creates entries for each phone that wants to receive Push Notifications.
- 'Note: This list is reset whenever application restarts -- in real life, you will want
- 'to store this data from the SubscriptionURIs list into a database so it persists. Hence,
- 'there are TODO sections in this code.
- Public Sub SubscribeMyPhone(phoneID As Guid, channelURI As String)
- Dim thisURI As New Uri(channelURI)
- If SubscriptionURIs.ContainsKey(phoneID) Then
- 'update the existing URI entry for this phone, if need be
- SubscriptionURIs(phoneID) = thisURI
- Else
- 'otherwise, add a subscription for this phone
- SubscriptionURIs.Add(phoneID, thisURI)
- End If
- ' TODO: Save this data in a database, otherwise it will be lost on application restart.
- End Sub
- 'Sends the received text value as a Raw notification -- which can only be received
- 'while the subscribed phone app is running. Raw notifications have a size limit of 1K.
- Public Sub PushRawData(rawMessage As String)
- 'Encode the message as a byte[] array as the Notification Service Expects.
- Dim encoding As System.Text.UTF8Encoding = New UTF8Encoding()
- 'Send this message to all subscribed devices.
- sendPushToSubscribedURIs(encoding.GetBytes(rawMessage), "raw")
- End Sub
- 'Sends a Toast notification, using the arguments to define the notification's Title and Message.
- Public Sub PushToast(ToastTitle As String, ToastMessage As String)
- 'Use XMLWriter to construct notification structure/contents.
- Dim myStream As New MemoryStream()
- Dim myWriter As XmlWriter = XmlWriter.Create(myStream)
- myWriter.WriteStartDocument()
- myWriter.WriteStartElement("wp", "Notification", "WPNotification")
- myWriter.WriteStartElement("wp", "Toast", "WPNotification")
- myWriter.WriteStartElement("wp", "Text1", "WPNotification")
- myWriter.WriteValue(ToastTitle)
- myWriter.WriteEndElement()
- myWriter.WriteStartElement("wp", "Text2", "WPNotification")
- myWriter.WriteValue(ToastMessage)
- myWriter.WriteEndElement()
- myWriter.WriteEndElement()
- myWriter.WriteEndDocument()
- 'Transfer Xml Outpute from myWriter's buffer to myStream.
- myWriter.Flush()
- 'Send this message to all subscribed devices.
- sendPushToSubscribedURIs(myStream.ToArray(), "toast")
- End Sub
- 'Sends the specified Tile Title, Tile Count, and Tile Image URL as a Tile
- 'notification, which can only be received while the subscribed phone app is
- 'NOT running. The maximum allowed size of the Tile image is 80kb, with a
- 'maximum download time of 15 seconds. Only Tile image URLs from the domains listed in
- 'Push Client's ListOfAllowedDomains will be accepted. The Tile Title will overwrite
- 'the text that labels the tile on the phone's menu, and the Tile Count is
- 'shown as a numeric value displayed on top of the Tile image, visually.
- Public Sub PushTileUpdate(TileTitle As String, TileCount As Integer, TileImageURL As String)
- ' Use XmlWriter to construct notification structure/contents.
- Dim myStream As New MemoryStream()
- Dim myWriter As XmlWriter = XmlWriter.Create(myStream)
- myWriter.WriteStartDocument()
- myWriter.WriteStartElement("wp", "Notification", "WPNotification")
- myWriter.WriteStartElement("wp", "Tile", "WPNotification")
- myWriter.WriteStartElement("wp", "BackgroundImage", "WPNotification")
- myWriter.WriteValue(TileImageURL)
- myWriter.WriteEndElement()
- myWriter.WriteStartElement("wp", "Count", "WPNotification")
- myWriter.WriteValue(TileCount)
- myWriter.WriteEndElement()
- myWriter.WriteStartElement("wp", "Title", "WPNotification")
- myWriter.WriteValue(TileTitle)
- myWriter.WriteEndElement()
- myWriter.WriteEndElement()
- myWriter.WriteEndDocument()
- 'Transfer Xml output from myWriter's buffer to myStream.
- myWriter.Flush()
- 'Send this message to all subscribed devices.
- sendPushToSubscribedURIs(myStream.ToArray(), "tile")
- End Sub
- 'This enum gives symbolic names to the numeric values used to "batch together"
- 'push notifications according to the specified time intervals. You can send them
- 'immediately, within 450 seconds, or within 900 seconds. Allowing the Notification
- 'Service to batch notifications will let the service group messages together with
- 'notifications from other apps to save phone battery life.
- Public Enum BatchingIntervalValues
- ImmediateTile = 1
- ImmediateToast = 2
- ImmediateRaw = 3
- Wait450SecondsTile = 11
- Wait450SecondsToast = 12
- Wait450SecondsRaw = 13
- Wait900SecondsTile = 21
- Wait900SecondsToast = 22
- Wait900SecondsRaw = 23
- End Enum
- 'Iterates through SubscriptionURIs, sending the constructed Push Notification to
- 'of the notification, which is every subscribed device via the Microsoft
- 'Push Notification Service. The payload passed in, is packaged into an HTTP POST
- 'message that defines headers containing the notification type and batching interval.
- Private Shared Sub sendPushToSubscribedURIs(pushPayload As Byte(), notificationType As String)
- 'Iterate through SubscriptionURIs
- For Each thisURI As var In SubscriptionURIs.Values
- 'Add headers to HTTP Post message.
- Dim myRequest = DirectCast(WebRequest.Create(thisURI), HttpWebRequest)
- ' Push Client's channelURI
- myRequest.Method = WebRequestMethods.Http.Post
- myRequest.ContentType = "text/xml"
- myRequest.ContentLength = pushPayload.Length
- ' gives this message a unique ID
- myRequest.Headers.Add("X-MessageID", Guid.NewGuid().ToString())
- 'Customize or exclude the X-WindowsPhone-Target header based on the notification type.
- Select Case notificationType
- Case "toast"
- myRequest.Headers("X-WindowsPhone-Target") = "toast"
- myRequest.Headers.Add("X-NotificationClass",
- CInBatchingIntervalValues.ImmediateToast).ToString())
- Exit Select
- Case "tile"
- myRequest.Headers("X-WindowsPhone-Target") = "token"
- myRequest.Headers.Add("X-NotificationClass",
- CIntBatchingIntervalValues.ImmediateTile).ToString())
- Exit Select
- Case "raw"
- myRequest.Headers.Add("X-NotificationClass",
- (CIntBatchingIntervalValues.ImmediateRaw).ToString())
- 'Raw notifications do not specify a value for the X-WindowsPhone-Target header.
- Exit Select
- End Select
- 'Merge headers with payload.
- Using requestStream = myRequest.GetRequestStream()
- requestStream.Write(pushPayload, 0, pushPayload.Length)
- End Using
- 'Send notification to this phone!
- Dim response = DirectCast(myRequest.GetResponse(), HttpWebResponse)
- Next
- End Sub
- End Class
- End Namespace
Comme dernière étape, il faut inclure les fichiers .png qui seront utilisés sous forme de graphiques Tile pour l’application mobile. Vous pouvez utiliser les fichiers .png inclus dans l’exemple du code téléchargeable ou créez les vôtres. Les Tiles doivent être de 80KB ou plus petit en poids et avoir une résolution de 173 x 173 pixels. Ajoutez les fichiers .png au projet WebService en faisant un clic droit sur le Web Service Role et en sélectionnant « Add Existing Item ». Une fois visible dans le Solution Explorer, cliquez sur les fichiers .png et dans le panneau des propriétés définissez la valeur de la propriété « Copy to output Directory » à « Always »
Le web service est maintenant complet et prêt à être publié. Si vous n’êtes pas intéressé par la publication sur Azure, vous pouvez exécuter ce service sur n’importe quel serveur IIS qui possède une connexion à Internet (pour contacter MPNS) et peut être atteint par votre émulateur ou téléphone Windows Phone 7.
Publier votre web service sur Windows Azure
- Inscrivez-vous pour un essai gratuit ou classique à un compte Azure. Une fois réalisé, connectez-vous à https://windows.azure.com avec le LiveID associé à votre compte Azure et assurez-vous que vous avez accès aux outils de gestion.
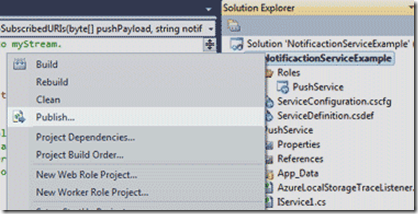
- En supposant que vous ayez suivi les instructions de la création du projet ci-dessus, vous serez en mesure de faire un clic droit sur le projet Azure dans le Solution Explorer (avec une icône représentant un globe) et sélectionnez « Publish » à partir du menu, comme indiqué ici :
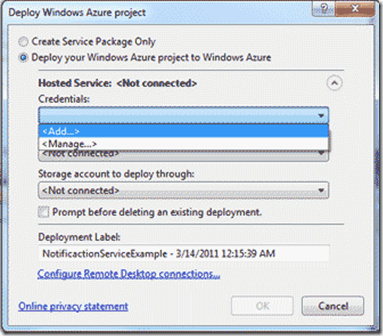
- La fenêtre de déploiement s’affichera. Sous la liste déroulante « Credentials » sélectionnez "Add," comme montré ici:
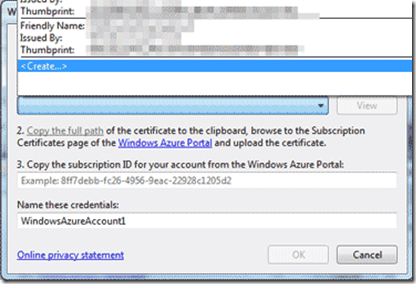
- Dans la fenêtre d’authentification du projet Windows Azure faites défiler vers le bas la liste des identifications, et sélectionnez “Create”. Donner un nom significatif à ces informations d’identification, elles peuvent être réutilisées à l’avenir pour toute activité de publication pour n’importe quel service hébergé sur votre compte. Cliquez sur le lien « copy the full path » du fichier d’identification que vous avez créé puis cliquez à nouveau sur le lien pour visiter le portail Windows Azure sur internet avec le chemin du fichier du certificat dans votre presse papier.
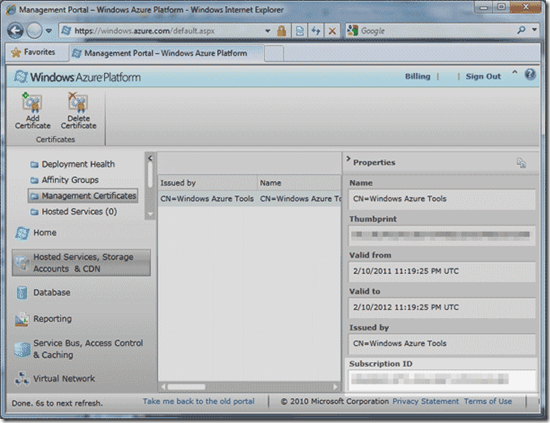
- Dans le portail Windows Azure, entrez le menu « Management Certificates » et dans la section « Hosted Services, Storage Accounts & CDN ». Cliquez sur le bouton « Add Certificate » en haut du ruban de navigation. Cliquez sur « Browse » et quand l’on vous demande de sélectionner un certificat à ajouter, collez alors le chemin complet du certificat que vous avez créé à l’étape 4 et cliquez sur « OK ». Cela télécharge le nouveau certificat et génère un Subscription ID qui est associé au certificat. Copiez le Subscription ID dans votre presse papier et revenez à Visual Studio.
- Dans Visual Studio, collez le Subscription ID dans le troisième champ de la fenêtre de gestion d’authentification du projet Windows Azure, où un exemple d’ID est déjà entré, et cliquez sur « OK » pour sauvegarder les informations authentifiées
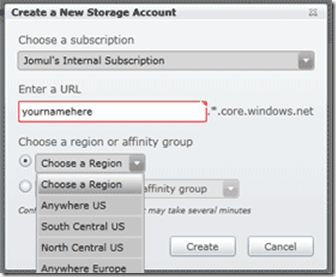
- Retournez au portail Windows Azure, cliquez sur « Storage Accounts » dans le menu gauche, et cliquez sur « New Storage Account » à partir du haut du ruban. Donnez un nom significatif à votre compte de stockage. Ce compte peut être réutilisé pour d’autres services hébergés sur Windows Azure. Choisissez un centre de données qui est situé dans une zone souhaitée, et cliquez sur « Create » pour créer le nouveau compte de stockage.
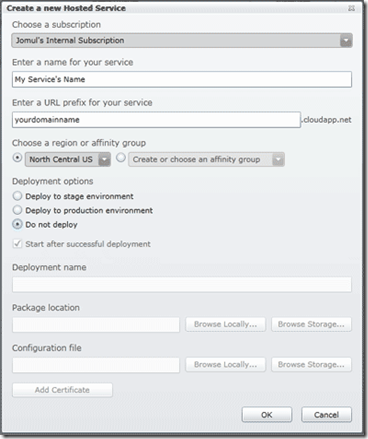
- Dans le portail Windows Azure, cliquez sur “Hosted Services” dans le menu gauche, puis cliquez sur “New Hosted Service” en haut du ruban. Entrez un nom significatif ainsi que le préfixe d’URL pour ce service.
Ceux-ci seront uniques à ce web service. Choisissez le même centre de données où le compte de stockage a été créé (permet d’éviter de payer des frais de trafic entrants/sortants pour le trafic croisant les centres de données) et sélectionnez l’option « Do Not Deploy ». Cliquez sur « OK » quand cela est fait pour créer un nouveau service hébergé.
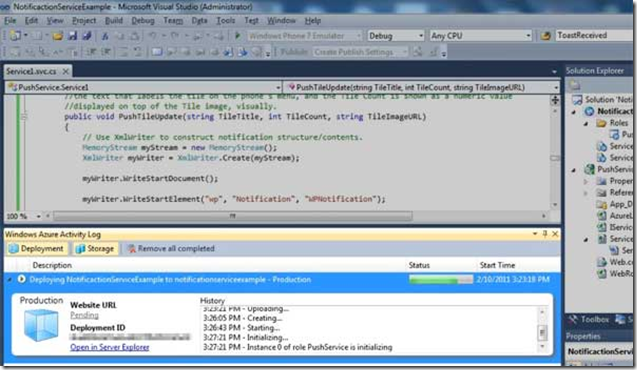
- Retournez dans Visual Studio, fermez la fenêtre de projet de déploiement de Windows Azure et rouvrez-la en faisant un clic droit sur le projet Azure et en sélectionnant à nouveau « Publish ». Cette fois, sélectionnez votre nouvelle identification à partir de la liste déroulante de Credentials ». Visual Studio chargera le « Storage Account » et le « Hosted Service Account » qui sont associés avec ce certificat de Subscription ID. Changez l’environnement de déploiement en « Production ». Cliquez sur « OK » pour publier votre web service sur Windows Azure. Cette étape peut prendre plusieurs minutes. Le journal d’activité de Windows Azure montrera l’état en cours pendant que le service est publié et initialisé.
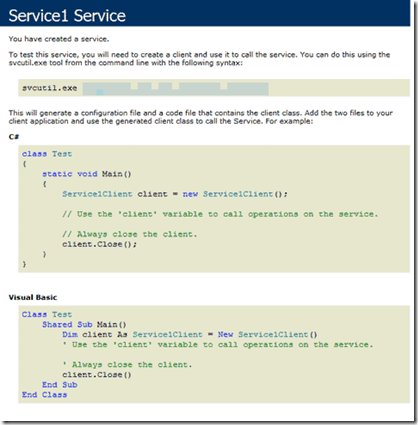
- Quand l’opération est terminée, le web service sera accessible à l’url du site listé par le journal d’activité de Windows Azure. Cette URL correspond au préfixe URL que vous avez entré pour le service hébergé. Ajoutez le nom du fichier .svc à la fin de l’url pour voir la déclaration du WDSL pour votre web service (par exemple https://my_url_prefix.cloudapp.net/Service1.svc). Votre service fonctionne sur Windows Azure et est prêt à être consommé.
Créer une application mobile de réception de Push
Assurez-vous que le Push Service, le web service que nous avons créé plus tôt, a été déployé et possède une connexion Internet afin qu’il puisse relayer les messages au service de notification de push de Microsoft. Dans la section précédente, nous avons atteint cet objectif en publiant sur Windows Azure.
Lancez Visual Studio et démarrez un projet de type « Silverlight for Windows Phone ». Puis créez une interface utilisateur (UI) qui possèdera les éléments suivants :
- Un TextBlock nommé subscriptionStatus dont le texte est défini par « Checking subscription status…. »
- Un TextBlock nommé rawmessage, avec son attribut TextWrapping défini à la valeur « Wrap ». Donnez à la propriété Text la valeur « Waiting to Receive Raw Notification »
- Un TextBlock nommé channelURITextBlock, avec son attribut TextWrapping défini à la valeur « Wrap ». Donnez à la propriété Text la valeur « This App’s ChannelUri : »
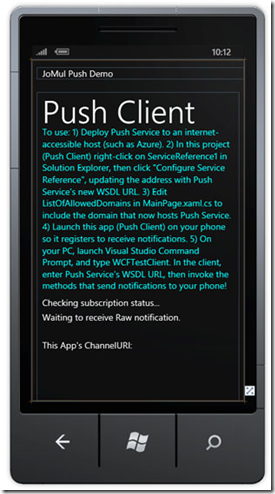
Une disposition de ces éléments est proposée et fournie ci-dessous. Ici, un quatrième TextBlock est affiché avec des instructions de test et de déploiement qui sont en bleu clair pour utiliser cette application. Cela est pour vous aider à exécuter l’exemple du code qui s’appuie sur la connexion internet, un web service, et les Push Notifications envoyées seulement après une exécution initiale de l’application sur ce téléphone. De plus, à cause de ses dépendances, l’exemple de ce projet a besoin de plusieurs modifications avant qu’il puisse s’exécuter sur votre téléphone. Ce TextBlock n’est pas mentionné ailleurs dans cet article ou dans le code lui-même.
Le document final en XAML contenant ces éléments ressemble à ceci:
XAML (MainPage.xaml)
Code Snippet
- <!--LayoutRoot is the root grid where all page content is placed-->
- <Grid x:Name="LayoutRoot" Background="Transparent">
- <Grid.RowDefinitions>
- <RowDefinition Height="Auto"/>
- <RowDefinition Height="*"/>
- </Grid.RowDefinitions>
- <!--TitlePanel contains the name of the application and page title-->
- <StackPanel x:Name="TitlePanel" Grid.Row="0" Margin="12,17,0,28">
- <TextBlock x:Name="PushDemo" Text="JoMul Push Demo" Style="{StaticResource PhoneTextNormalStyle}"/>
- </StackPanel>
- <!--ContentPanel - place additional content here-->
- <Grid x:Name="ContentPanel" Grid.Row="1" Margin="12,0,12,0">
- <TextBlock Height="30" HorizontalAlignment="Left" Margin="12,460,0,0" Name="subscriptionStatus" Text="Checking subscription status..." VerticalAlignment="Top" Width="438" />
- <TextBlock Height="380" HorizontalAlignment="Left" Margin="12,77,0,0" Name="instructions" Text="To use:
- 1) Deploy Push Service to an internet-accessible host (such as Azure).
- 2) In this project (Push Client) right-click on ServiceReference1 in Solution
- Explorer, then click "Configure Service Reference", updating the address with Push Service's new WSDL URL.
- 3) Edit ListOfAllowedDomains in MainPage.xaml.cs to include the domain that now hosts Push Service.
- 4) Launch this app (Push Client) on your phone so it registers to receive notifications.
- 5) On your PC, launch Visual Studio Command Prompt, and type WCFTestClient. In the client, enter Push Service's WSDL URL, then invoke
- the methods that send notifications to your phone!" VerticalAlignment="Top" Width="426" TextWrapping="Wrap"
- TextAlignment="Left" Foreground="Cyan" Visibility="Visible" />
- <TextBlock Height="134" HorizontalAlignment="Left" Margin="12,556,0,0" Name="channelURITextBlock" Text="This App's ChannelURI: " VerticalAlignment="Top" Width="426" TextWrapping="Wrap" />
- <TextBlock x:Name="PageTitle" Text="Push Client" Margin="12,-7,-3,613" Style="{StaticResource PhoneTextTitle1Style}"/>
- <TextBlock Height="70" HorizontalAlignment="Left" Margin="12,493,0,0" Name="rawmessage" Text="Waiting to receive Raw notification." VerticalAlignment="Top" Width="414" TextWrapping="Wrap" />
- </Grid>
- </Grid>
Dans le Solution Explorer, faites un clic droit sur “References” et sélectionnez « Add Service Reference ». Entrez l’Url pour le Push Service du fichier .svc (par exemple : https://your_url_prefix.doudapp.net/Service1.svc) et cliquez sur « Go ». Une fois que Visual Studio a confirmé avoir découvert le Push Service, remarquez que le namespace qui est assigné pour la référence au web service, qui est « ServiceReference1 » par défaut, enfin cliquez sur « OK ». Le Push Service peut maintenant être accessible via le namespace ServiceReference1 dans le code de l’application.
Ouvrez le fichier MainPage.xaml.cs et ajoutez les références aux namespace suivants: System.IO.IsolatedStorage, System.IO, Microsoft.phone.Notification ainsi que System.Collections.objectModel.
En haut de la classe MainPage, ajoutez les membres de données suivants:
- Un Guid nommé deviceID que nous utiliserons pour enregistrer un identifiant unique pour ce téléphone.
- Un « ServiceReference1.Service1Client » nommé myClient que nous utiliserons pour accéder au Push Service. Si vous changez le nom par défaut du namespace du Service Reference ou du Push Service, ce type aura un nom différent. Dans cet article, les valeurs par défaut sont supposées.
- Un objet HttpNotificationChannel nommé myPushChannel. C’est le canal qui va écouter les Notifications Push qui sont relayées du MPNS.
Maintenant, nous allons implémenter quelques méthodes qui préparent l’application à la réception des Notifications Push.
- Dans la méthode MainPage(), nous vérifions le stockage isolé du téléphone ( stockage interne qui est accessible seulement par cette application) pour une valeur de clé « DeviceID » . Si une valeur est trouvée, elle est chargée à partir de l’Isolated Storage et est assignée au membre de données deviceID. Autrement, une nouvelle valeur Guid est générée, assignée et stockée.
- Toujours dans la méthode MainPage(), nous vérifions si il existe une valeur de type HttpNotificationChannel sous la clé « myChannel ». Si elle n’existe pas, elle est créée et stockée ici, alors les fonctions de traitement de l’évènement sont attachées. Le canal de communication est ouvert, celui qui demandera une nouvelle attribution de canal URI du MPNS, à laquelle les Notifications Push peuvent être reçues par ce canal. Si ce canal existait précédemment, nous attacherons tout simplement les fonctions de gestion d’événements, et passerons sur le canal existant du Push Service.
- Une méthode nommée attachHandlerFunctions() est implémentée qui spécifie que les fonctions déléguées recevront le callback quand certaines fonctions se seront déclenchées. L’évènement ErrorOccured se déclenche que si l’origine d’une exception est levée dans la méthode myPushChannel. L’événement HttpNotificationReceived se déclenche que lorsque qu’une Raw Notification est reçue. L’événement ChannelUriUpdated se déclenche lorsque le MPNS assigne ou met à jour une nouvelle URI pour la méthode myPushChannel. Et pour finir, un évènement sur MyClient nommé SubscribeMyPhoneCompleted est géré. Cet événement se déclenche quand un appel à la méthode SubscribeMyPhone se termine normalement. Remarquez que vous n’avez pas eu à générer cet événement. Il a été généré automatiquement lorsque vous avez ajouté une référence vers Push Service.
Par la suite, nous devons implémenter les fonctions déléguées que nous assignerons pour gérer les événements spécifiés dans la méthode attachHandlerFunctions() :
- La fonction myPushChannel_ErrorOccured sera simplement un message d’erreur affiché sur l’écran en utilisant le TextBlock susbcriptionStatus.
- La fonction myPushChannel_HttpNotificationReceived décodera la Notification Push de type Raw en utilisant un StreamReader et l’affichera à l’écran en utilisant le TextBlock rawmessage. Cependant, à cause du déclenchement des événements de Push dans le thread de notification, la mise à jour de rawmessage est traitée avec la méthode BeginInvoke() du Dispatcher
- La fonction myClient_SubscribeMyPhoneCompleted affiche un message quand le téléphone a chargé normalement les valeurs de deviceID et de ChannelURI de l’application dans le Push Service en affichant la chaine de caractère « Subscribed ! » dans le TextBlock subscriptionStatus.
- myPushChannel_ChannelUriUpdated est la fonction la plus complexe. Ici, l’application vérifie et assure que myPushChannel peut recevoir la Notification Push même quand l’application ne fonctionne pas en vérifiant les valeurs IsShellTileBound et IsShellToastBound. Si ces valeurs sont « False », l’application lie le canal de communication au shell de sorte à ce que les notifications peuvent être reçues quand l’application ne fonctionne pas, en passant une liste des domaines autorisés à envoyer des mises à jour. Ici, le domaine sur lequel nous avons publié le Push Service est spécifié (e.g. https://your_url_prefix.cloudapp.net). La récupération d’une URI sur le canal est notée à l’écran en utilisant une fois encore la méthode BeginInvoke() du Dispatcher, et l’appel à la méthode SubscribeMyPhone() assure que cette URI est connue par le Push Service.
Maintenant que nous avons terminé, la page MainPage.xaml.cs doit ressembler à ceci:
C# (MainPage.xaml.cs)
Code Snippet
- using System;
- using System.Collections.Generic;
- using System.Linq;
- using System.Net;
- using System.Windows;
- using System.Windows.Controls;
- using System.Windows.Documents;
- using System.Windows.Input;
- using System.Windows.Media;
- using System.Windows.Media.Animation;
- using System.Windows.Shapes;
- using Microsoft.Phone.Controls;
- //added
- using System.IO.IsolatedStorage;
- using System.IO;
- using Microsoft.Phone.Notification;
- using System.Collections.ObjectModel;
- namespace Push_Client_Example
- {
- public partial class MainPage : PhoneApplicationPage
- {
- //Data members for this class
- //A unique ID for your phone, saved to internal memory
- Guid deviceID;
- //Add a reference to your deployed Push Service URL and name it ServiceReference1
- //and this line will compile. In Solution Explorer, Right-click References,
- //then click "Add Service Reference," then enter the URL for the SVC file
- //for the Push Service and click "Go." Verify that the
- //Push Service's four methods are indeed exposed then click "OK."
- ServiceReference1.Service1Client myClient = new ServiceReference1.Service1Client();
- //URI for this app's notification channel.
- HttpNotificationChannel myPushChannel;
- // Constructor
- public MainPage()
- {
- InitializeComponent();
- //First, generate a GUID on this phone and save it; reuse if it exists to
- //keep consistent with service's data.
- if (IsolatedStorageSettings.ApplicationSettings.Contains("DeviceId"))
- {
- //load existing
- deviceID = (Guid)IsolatedStorageSettings.ApplicationSettings["DeviceId"];
- }
- else
- {
- //generate new ID
- deviceID = Guid.NewGuid();
- IsolatedStorageSettings.ApplicationSettings["DeviceId"] = deviceID;
- }
- //Next, create a notification channel which will have its own URI that the
- //web service will need to know. We're naming the channel for this
- //app "myChannel." Channels need only be created once per app;
- //if the URI ever changes, the ChannelUriUpdated event will fire. This
- //event also fires when the channel is created for the first time.
- myPushChannel = HttpNotificationChannel.Find("myChannel");
- //check to see if this channel has already been created; if so, reuse
- if (myPushChannel == null)
- {
- rawmessage.Text += " Channel was null.";
- //This channel needs to be created. ChannelUriUpdated will fire upon completion.
- myPushChannel = new HttpNotificationChannel("myChannel"); //create, then attach delegates, then Open()
- attachHandlerFunctions();
- myPushChannel.Open(); // will not fire ChannelUriUpdated if no handler is wired up first!
- }
- else
- {
- rawmessage.Text += " Channel was found!";
- //ChannelUriUpdated is not going to fire. Call subscribing method on
- //web service. Attach delegates.
- attachHandlerFunctions();
- myClient.SubscribeMyPhoneAsync(deviceID, myPushChannel.ChannelUri.ToString());
- }
- }
- void attachHandlerFunctions()
- {
- //attaches delegates to push channel events
- //if error, print onscreen
- myPushChannel.ErrorOccurred += new EventHandler<NotificationChannelErrorEventArgs>(myPushChannel_ErrorOccurred);
- //After call to SubscribeMyPhone completes, notify of success
- myClient.SubscribeMyPhoneCompleted += new EventHandler<System.ComponentModel.AsyncCompletedEventArgs>(myClient_SubscribeMyPhoneCompleted);
- //ChannelUriUpdated fires when channel is first created or the channel URI changes
- myPushChannel.ChannelUriUpdated += new EventHandler<NotificationChannelUriEventArgs>(myPushChannel_ChannelUriUpdated);
- //Handle raw push notifications, which are received only while app is running.
- myPushChannel.HttpNotificationReceived += new EventHandler<HttpNotificationEventArgs>(myPushChannel_HttpNotificationReceived);
- }
- void myPushChannel_HttpNotificationReceived(object sender, HttpNotificationEventArgs e)
- {
- //Fires from shell thread, so updates to UI have to use dispatcher's
- //BeginInvoke() method. The body of the notification is a stream,
- //per the MPNS standard, but we know it's just text per our web
- //service design, so here we just decode, and display.
- Deployment.Current.Dispatcher.BeginInvoke(() =>
- {
- //this will fire in UI thread
- StreamReader myReader = new StreamReader(e.Notification.Body);
- rawmessage.Text = "Received Raw Notification: " + myReader.ReadToEnd();
- });
- }
- void myPushChannel_ChannelUriUpdated(object sender, NotificationChannelUriEventArgs e)
- {
- //also fires in notification thread. There are a couple things we want to do
- //here, once we know we have a valid channel from MPNS.
- // 1) Make sure phone's shell knows this channel is authorized to receive Tile
- //updates when app is not running.
- if (myPushChannel.IsShellTileBound == false)
- {
- var ListOfAllowedDomains = new Collection<Uri> {
- //Lists domains that can send tile updates and so forth as push notifications.
- //Only these authorized domains will be allowed by the shell to
- //push new tiles to the phone
- new Uri(@"https://YOUR WEB SERVICE'S DOMAIN GOES HERE")
- //e.g. if you published a webservice at https://foo.com/service1.svc -- put "https://foo.com" here.
- };
- //Register this channel with the shell, pass on authorized
- //domain in way method expects
- myPushChannel.BindToShellTile(ListOfAllowedDomains);
- }
- //2) Make sure phone's shell knows this channel is authorized to receive
- //Toast messages when app is not running
- if (myPushChannel.IsShellToastBound == false)
- {
- myPushChannel.BindToShellToast();
- }
- //3) Show that this event fired onscreen.
- Deployment.Current.Dispatcher.BeginInvoke(() =>
- {
- rawmessage.Text = "uri updated";
- });
- //4) Pass the new ChannelUri on to the subscription service.
- myClient.SubscribeMyPhoneAsync(deviceID, e.ChannelUri.ToString());
- }
- void myClient_SubscribeMyPhoneCompleted(object sender, System.ComponentModel.AsyncCompletedEventArgs e)
- {
- //Handles completion of call to SubscribeMyPhone() on web service
- if (e.Error == null)
- {
- // no server-side error occurred
- subscriptionStatus.Text = "Subscribed!";
- }
- else
- {
- //show error onscreen
- subscriptionStatus.Text = e.Error.Message;
- }
- //As a last step, since we know at this point that we will have
- //a valid ChannelUri, print its value onscreen. Don't do this in real
- //life, obviously. Here, it's just to show how MPNS works.
- channelURITextBlock.Text = myPushChannel.ChannelUri.ToString();
- }
- void myPushChannel_ErrorOccurred(object sender, NotificationChannelErrorEventArgs e)
- {
- //handles channel error caused from indirect exception
- subscriptionStatus.Text = e.Message;
- }
- }
- }
Visual Basic (MainPage.xaml.vb)
Code Snippet
- Imports System.Collections.Generic
- Imports System.Linq
- Imports System.Net
- Imports System.Windows
- Imports System.Windows.Controls
- Imports System.Windows.Documents
- Imports System.Windows.Input
- Imports System.Windows.Media
- Imports System.Windows.Media.Animation
- Imports System.Windows.Shapes
- Imports Microsoft.Phone.Controls
- 'added
- Imports System.IO.IsolatedStorage
- Imports System.IO
- Imports Microsoft.Phone.Notification
- Imports System.Collections.ObjectModel
- Namespace Push_Client_Example
- Partial Public Class MainPage
- Inherits PhoneApplicationPage
- 'Data members for this class
- 'A unique ID for your phone, saved to internal memory
- Private deviceID As Guid
- 'Add a reference to your deployed Push Service URL and name it ServiceReference1
- 'and this line will compile. In Solution Explorer, Right-click References,
- 'then click "Add Service Reference," then enter the URL for the SVC file
- 'for the Push Service and click "Go." Verify that the
- 'Push Service's four methods are indeed exposed then click "OK."
- Private myClient As New ServiceReference1.Service1Client()
- 'URI for this app's notification channel.
- Private myPushChannel As HttpNotificationChannel
- ' Constructor
- Public Sub New()
- InitializeComponent()
- 'First, generate a GUID on this phone and save it; reuse if it exists to
- 'keep consistent with service's data.
- If IsolatedStorageSettings.ApplicationSettings.Contains("DeviceId") Then
- 'load existing
- deviceID = CType(IsolatedStorageSettings.ApplicationSettings("DeviceId"), Guid)
- Else
- 'generate new ID
- deviceID = Guid.NewGuid()
- IsolatedStorageSettings.ApplicationSettings("DeviceId") = deviceID
- End If
- 'Next, create a notification channel which will have its own URI that the
- 'web service will need to know. We're naming the channel for this
- 'app "myChannel." Channels need only be created once per app;
- 'if the URI ever changes, the ChannelUriUpdated event will fire. This
- 'event also fires when the channel is created for the first time.
- myPushChannel = HttpNotificationChannel.Find("myChannel")
- 'check to see if this channel has already been created; if so, reuse
- If myPushChannel Is Nothing Then
- rawmessage.Text += " Channel was null."
- 'This channel needs to be created. ChannelUriUpdated will fire upon completion.
- myPushChannel = New HttpNotificationChannel("myChannel")
- 'create, then attach delegates, then Open()
- attachHandlerFunctions()
- ' will not fire ChannelUriUpdated if no handler is wired up first!
- myPushChannel.Open()
- Else
- rawmessage.Text += " Channel was found!"
- 'ChannelUriUpdated is not going to fire. Call subscribing method on
- 'web service. Attach delegates.
- attachHandlerFunctions()
- myClient.SubscribeMyPhoneAsync(deviceID, myPushChannel.ChannelUri.ToString())
- End If
- End Sub
- Private Sub attachHandlerFunctions()
- 'attaches delegates to push channel events
- 'if error, print onscreen
- myPushChannel.ErrorOccurred += New EventHandler(Of NotificationChannelErrorEventArgs)(AddressOf myPushChannel_ErrorOccurred)
- 'After call to SubscribeMyPhone completes, notify of success
- myClient.SubscribeMyPhoneCompleted += New EventHandler(Of System.ComponentModel.AsyncCompletedEventArgs)(AddressOf
- myClient_SubscribeMyPhoneCompleted)
- 'ChannelUriUpdated fires when channel is first created or the channel URI changes
- myPushChannel.ChannelUriUpdated += New EventHandler(Of NotificationChannelUriEventArgs)(AddressOf
- myPushChannel_ChannelUriUpdated)
- 'Handle raw push notifications, which are received only while app is running.
- myPushChannel.HttpNotificationReceived += New EventHandler(Of HttpNotificationEventArgs)(AddressOf
- myPushChannel_HttpNotificationReceived)
- End Sub
- Private Sub myPushChannel_HttpNotificationReceived(sender As Object, e As HttpNotificationEventArgs)
- 'Fires from shell thread, so updates to UI have to use dispatcher's
- 'BeginInvoke() method. The body of the notification is a stream,
- 'per the MPNS standard, but we know it's just text per our web
- 'service design, so here we just decode, and display.
- Deployment.Current.Dispatcher.BeginInvoke(Function()
- 'this will fire in UI thread
- Dim myReader As New StreamReader(e.Notification.Body)
- rawmessage.Text = "Received Raw Notification: " & myReader.ReadToEnd()
- End Function)
- End Sub
- Private Sub myPushChannel_ChannelUriUpdated(sender As Object, e As NotificationChannelUriEventArgs)
- 'also fires in notification thread. There are a couple things we want to do
- 'here, once we know we have a valid channel from MPNS.
- ' 1) Make sure phone's shell knows this channel is authorized to receive Tile
- 'updates when app is not running.
- If myPushChannel.IsShellTileBound = False Then
- 'Lists domains that can send tile updates and so forth as push notifications.
- 'Only these authorized domains will be allowed by the shell to
- 'push new tiles to the phone
- 'e.g. if you published a webservice at https://foo.com/service1.svc -- put "https://foo.com" here.
- Dim ListOfAllowedDomains = New Collection(Of Uri)() From { _
- New Uri("https://YOUR WEB SERVICE'S DOMAIN GOES HERE") _
- }
- 'Register this channel with the shell, pass on authorized
- 'domain in way method expects
- myPushChannel.BindToShellTile(ListOfAllowedDomains)
- End If
- '2) Make sure phone's shell knows this channel is authorized to receive
- 'Toast messages when app is not running
- If myPushChannel.IsShellToastBound = False Then
- myPushChannel.BindToShellToast()
- End If
- '3) Show that this event fired onscreen.
- Deployment.Current.Dispatcher.BeginInvoke(Function()
- rawmessage.Text = "uri updated"
- End Function)
- '4) Pass the new ChannelUri on to the subscription service.
- myClient.SubscribeMyPhoneAsync(deviceID, e.ChannelUri.ToString())
- End Sub
- Private Sub myClient_SubscribeMyPhoneCompleted(sender As Object, e As System.ComponentModel.AsyncCompletedEventArgs)
- 'Handles completion of call to SubscribeMyPhone() on web service
- If e.[Error] Is Nothing Then
- ' no server-side error occurred
- subscriptionStatus.Text = "Subscribed!"
- Else
- 'show error onscreen
- subscriptionStatus.Text = e.[Error].Message
- End If
- 'As a last step, since we know at this point that we will have
- 'a valid ChannelUri, print its value onscreen. Don't do this in real
- 'life, obviously. Here, it's just to show how MPNS works.
- channelURITextBlock.Text = myPushChannel.ChannelUri.ToString()
- End Sub
- Private Sub myPushChannel_ErrorOccurred(sender As Object, e As NotificationChannelErrorEventArgs)
- 'handles channel error caused from indirect exception
- subscriptionStatus.Text = e.Message
- End Sub
- End Class
- End Namespace
Test
Si vous testez sur l’émulateur de Windows Phone, suivez ces instructions pour vous assurer qu’un proxy SOCKS a bien été inscrit dans le panneau de contrôle des options Internet de votre ordinateur.
Exécutez l’application mobile. Vous devriez voir la chaîne de caractère « Subscribed! » sur l’écran. Cela signifie que le téléphone est prêt à recevoir des Push Notifications. Pour envoyer ces notifications, nous utiliserons un outil pour invoquer le Push Service.
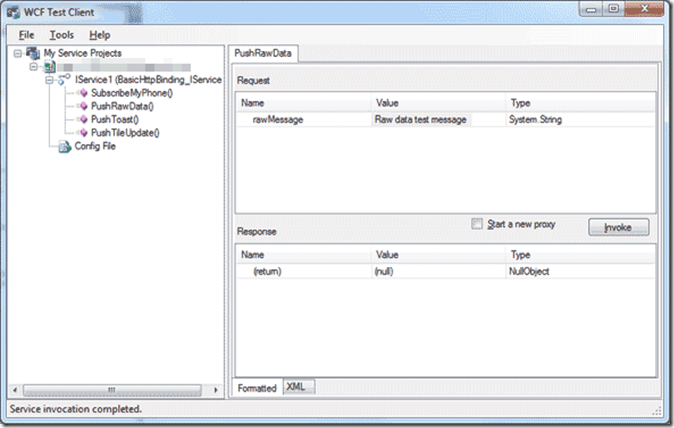
Lancez la commande de Visual Studio et saisissez “WCFTestClient”. Cet outil aussi peut être accédé en entrant les chemins suivants ; %ProgramFiles(x86)%\Microsoft Visual Studio 10.0\Common7\IDE (sur des systèmes 64-bit) et %ProgramFiles%\Microsoft Visual Studio 10.0\Common7\IDE (sur des systèmes 32-bit).
Dans l’outil WCF Test Client, allez dans « File » > « Add Service », et entrez l’url du .svc pour le Push Service (https://your_url_prefix.cloudapp.net/Service1.svc).
En utilisant l’outil WCF Test Client, vous invoquez la méthode PushRawData() pendant que l’application est en marche, elle enverra une chaîne de caractère à l’application. Celle-ci devrait rapidement apparaitre à l’écran.
Quittez l’application en appuyant sur le bouton de retour, et épinglez l’application sur le menu de démarrage du téléphone par un appui long sur l’icône de l’application et sélectionnez « Pin to Start » de la fenêtre contextuelle. Vous pouvez maintenant aller à la page de démarrage du téléphone et vous apercevoir que votre application est présente
En utilisant le WCF Test Client, vous invoquez la méthode PushTileUpdate(), saisissez l’url pour l’un des fichiers .png que vous avez inclus quand vous avez déployé le Push Service (https://your_url_prefix.doudapp.net/Service1.svc) comme valeur pour le paramètre TileImageURL.
Entrez ce que vous voulez pour les autres paramètres. Le Live Tile pour l’application présente sur le menu de démarrage devrait momentanément se mettre à jour en montrant toutes ces modifications.
Enfin, invoquez la méthode PuchToast(), entrez un sujet et le corps pour votre message. La notification apparaitra sur l’écran du téléphone et vous pouvez la toucher pour rentrer à nouveau dans l’application.
Voir aussi
- Le code source de ce tutoriel
- La solution de ce tutoriel en vidéo
- Les Notifications Push pour Windows Phone (Documents de référence)
- S’enregistrer pour un essai de Windows Azure / Télécharger le SDK Azure
Comments
- Anonymous
October 13, 2012
Bonjour, tout d'abord merci pour votre travail de traduction. Je suis enseignant chercheur à l'Université de Nice Sophia Antipolis en charge d'introduire le développement sous Windows Phone 7 (WP8 l'année prochaine j'espère ). Votre blog blogs.msdn.com/.../archive est à ce titre d'une grande utilité pour moi. J'aurais donc une requête : me permettriez-vous d'utiliser tout ou partie du support "Developpement Windows Phone" pour mes prochains enseignements ? Sachant bien sûr que :
- je ne manquerais pas de faire référence à votre nom et blog
- je ne manquerais pas de faire référence au MSDN de Microsoft
- nous disposons à Polyech'Nice de l'Université de Nice Sophia Antipolis d'une academic licence / elms. Merci pour votre réponse Mon cours commence Lundi après-midi Bien cordialement JY Tigli -- Jean-Yves Tigli Ass. Prof, Université de Nice Sophia Antipolis Laboratoire I3S - UMR CNRS Polytech'Nice Bât Templiers 930 route des Colles 06903 Sophia Antipolis cedex FRANCE Tel : (33) + 4 92 96 51 81 http://www.tigli.fr
