チュートリアル: パート 2 - プロンプト フロー SDK を使用してカスタム チャット アプリケーションを構築する
このチュートリアルでは、プロンプト フロー SDK (およびその他のライブラリ) を使用して、Contoso Trek という小売企業のためのチャット アプリを構築、構成、評価、デプロイします。 この小売会社は、キャンプ用品とアウトドア衣類を専門としています。 このチャット アプリは、製品とサービスに関する質問に答えます。 たとえば、チャット アプリは、「どのテントが最も防水性が高いか」や「寒い天候に最適な寝袋は何ですか?」などの質問に答えることができます。
このパート 2 では、取得拡張生成 (RAG) を追加してカスタム データに基づいて応答することで、基本的なチャット アプリケーションを強化する方法について説明します。 取得拡張生成 (RAG) は、大規模言語モデル (LLM) でデータを使用して、データに固有の回答を生成するパターンです。 このパート 2 では、以下の内容を学習します。
- Azure AI Studio に AI モデルをデプロイしてアプリで使用する
- カスタム RAG コードを開発する
- プロンプト フローを使用してチャット アプリをテストする
このチュートリアルは、3 部構成のチュートリアルのパート 2 です。
前提条件
「チュートリアル: パート 1 - プロンプト フロー SDK を使用してカスタム チャット アプリケーションを構築するためのリソースを作成する」を完了してください。
製品データのローカル コピーが必要です。 GitHub の Azure-Samples/rag-data-openai-python-promptflow リポジトリには、このチュートリアル シナリオに関連するサンプルの小売製品情報が含まれています。 お使いのローカル コンピューターにサンプルの Contoso Trek 小売製品データの ZIP ファイルをダウンロードします。
アプリケーション コードの構造
ローカル コンピューターに rag-tutorial というフォルダーを作成します。 このチュートリアル シリーズでは、各ファイルのコンテンツの作成について説明します。 チュートリアル シリーズを完了すると、フォルダー構造は次のようになります。
rag-tutorial/
│   .env
│   build_index.py
│   deploy.py
│   evaluate.py
│   eval_dataset.jsonl
|   invoke-local.py
│
├───copilot_flow
│   └─── chat.prompty
|   └─── copilot.py
|   └─── Dockerfile
│   └─── flow.flex.yaml
│   └─── input_with_chat_history.json
│   └─── queryIntent.prompty
│   └─── requirements.txt
│
├───data
|   └─── product-info/
|   └─── [Your own data or sample data as described in the prerequisites.]
このチュートリアルの実装では、プロンプト フローのフレックス フローを使用します。これは、フローを実装するためのコード ファーストのアプローチです。 エントリ関数 (copilot.py に含まれています) を指定し、プロンプト フローのテスト、評価、トレース機能をフローに使用します。 このフローはコード内にあり、DAG (有向非巡回グラフ) やその他のビジュアル コンポーネントはありません。 フレックス フローの開発方法の詳細については、GitHub のプロンプト フローのドキュメントを参照してください。
初期環境変数を設定する
さまざまなコード スニペットで使用される環境変数のコレクションがあります。 これらをすべて .env ファイルに追加します。
重要
これを git リポジトリに作成する場合は、誤ってリポジトリにチェックインしないように、必ず .gitignore ファイルに .env を含めてください。
これらの値から始めます。 チュートリアルの信仰に合わせて、さらに値をいくつか追加します。
.env ファイルを rag-tutorial フォルダーに作成します。 次の変数を追加します。
AZURE_SUBSCRIPTION_ID=<your subscription id>
AZURE_RESOURCE_GROUP=<your resource group>
AZUREAI_PROJECT_NAME=<your project name>
AZURE_OPENAI_CONNECTION_NAME=<your AIServices or Azure OpenAI connection name>
AZURE_SEARCH_ENDPOINT=<your Azure Search endpoint>
AZURE_SEARCH_CONNECTION_NAME=<your Azure Search connection name>
プレースホルダーを次の値に置き換えます。
AI Studio のプロジェクト ビューから
<your subscription id>、<your resource group>、<your project name>を見つけます。- AI Studio で、プロジェクトに移動し、左側のペインから [設定] を選択します。
- [プロジェクトのプロパティ] セクションで、[サブスクリプション ID] と [リソース グループ] を見つけます。 [名前] フィールドは
<your project name>です
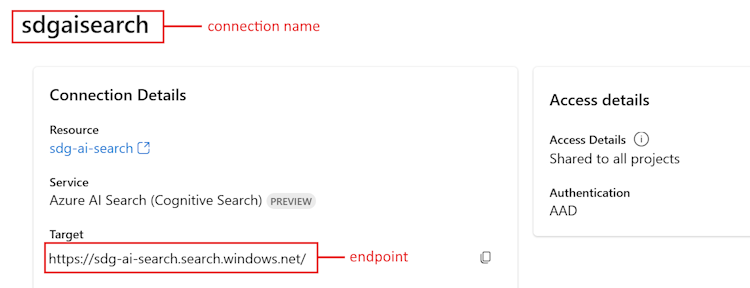
プロジェクトの [設定] の [接続されたリソース] セクションに、Azure AIServices または Azure OpenAI のエントリが表示されます。 名前を選択して、[接続の詳細] を開きます。 接続名は、[接続の詳細] ページの上部に表示されます。 この名前をコピーして、
<your AIServices or Azure OpenAI connection name>に使用します。プロジェクトの [設定] ページに戻ります。 [接続されているリソース] セクションで、Azure AI 検索のリンクを選択します。
<your Azure Search endpoint>のターゲット URL をコピーします。<your Azure Search connection name>の上部にある名前をコピーします。
モデルをデプロイする
RAG ベースのチャット アプリを構築するには、Azure OpenAI チャット モデル (gpt-3.5-turbo) と Azure OpenAI 埋め込みモデル (text-embedding-ada-002) という 2 つのモデルが必要です。 モデルごとにこの一連の手順を使用して、これらのモデルを Azure AI Studio プロジェクトにデプロイします。
これらの手順で、AI Studio のモデル カタログからモデルをリアルタイム エンドポイントにデプロイします。
AI Studio にサインインし、[ホーム] ページに移動します。
左側のサイドバーから [モデル カタログ] を選択します。
[コレクション] フィルターで、[Azure OpenAI] を選択します。

Azure OpenAI コレクションからモデルを選択します。 初回は、
gpt-3.5-turboモデルを選択します。 2 回目は、text-embedding-ada-002モデルを選択します。[デプロイ] を選択してデプロイ ウィンドウを開きます。
モデルをデプロイするハブを選択します。 プロジェクトと同じハブを使用します。
デプロイの名前を指定し、要件に応じて他の既定の設定を変更します。
展開 を選択します。
デプロイの詳細ページが表示されます。 [プレイグラウンドで開く] を選択します。
[コードの表示] を選択すると、デプロイされたモデルをアプリケーションで使用するためのコード サンプルが取得されます。

gpt-3.5-turbo モデルをデプロイするときは、[コードの表示] セクションで次の値を見つけて、.env ファイルに追加します。
AZURE_OPENAI_ENDPOINT=<chat_model_endpoint_value>
AZURE_OPENAI_CHAT_DEPLOYMENT=<chat_model_deployment_name>
AZURE_OPENAI_API_VERSION=<api_version>
text-embedding-ada-002 モデルをデプロイするときに、その名前を .env ファイルに追加します。
AZURE_OPENAI_EMBEDDING_DEPLOYMENT=<embedding_model_deployment_name>
Azure CLI をインストールしてサインインする
ユーザー資格情報を使用して Azure OpenAI Service を呼び出すことができるように、Azure CLI をインストールしてローカル開発環境からサインインします。
ほとんどの場合は、次のコマンドを使用して、ターミナルから Azure CLI をインストールできます。
これらのコマンドが特定のオペレーティング システムまたはセットアップで機能しない場合は、Azure CLI をインストールする方法の手順に従うことができます。
Azure CLI をインストールしたら、以下のように az login コマンドを使用してサインインし、ブラウザーを使用してサインインします。
az login
次に、アプリを作成し、コードから Azure OpenAI Service を呼び出します。
新しい Python 環境を作成する
最初に、プロンプト フロー SDK パッケージをインストールするために使用できる新しい Python 環境を作成する必要があります。 グローバル Python インストールにパッケージをインストールしないでください。 Python パッケージをインストールするときは、常に仮想環境または conda 環境を使用する必要があります。そうしないと、Python のグローバル インストールが中断される場合があります。
必要に応じて Python をインストールする
Python 3.10 以降を使用することをお勧めしますが、少なくとも Python 3.8 が必要です。 適切なバージョンの Python がインストールされていない場合は、オペレーティング システムへの Python のインストールの最も簡単な方法として、VS Code Python チュートリアルの手順に従うことができます。
仮想環境を作成する
Python 3.10 以降が既にインストールされている場合は、次のコマンドを使用して仮想環境を作成できます:
Python 環境をアクティブ化するということは、コマンド ラインから python または pip を実行する際に、アプリケーションの .venv フォルダーに含まれている Python インタープリターを使用するということを意味します。
Note
deactivate コマンドを使用して Python 仮想環境を終了し、必要に応じて、それを後で再アクティブ化できます。
pip をアップグレードする
最新バージョンの pip を使用していることを確認するには、次のコマンドを実行します。
python -m pip install --upgrade pip
プロンプト フロー SDK をインストールする
[プロンプト フロー] は、LLM ベースの AI アプリケーションのエンド ツー エンドの開発サイクル (構想から、プロトタイプ作成、テスト、評価、運用環境デプロイと監視まで) を効率化するように設計された一連の開発ツールです。
作成した仮想環境にプロンプト フロー SDK をインストールするには、pip を使用します。
pip install promptflow
pip install azure-identity
プロンプト フロー SDK は、次の複数のパッケージに依存しています。すべてが必要でない場合は、これらを選択して個別にインストールできます。
promptflow-core: LLM コードを実行するために使用されるコアのプロンプト フロー ランタイムが含まれているpromptflow-tracing: OpenTelemetry トレースを標準で出力するために使用される軽量ライブラリpromptflow-devkit: ローカル開発環境のためのプロンプト フロー テスト ベッドとトレース ビューアー ツールが含まれているopenai: Azure OpenAI Service を使用するためのクライアント ライブラリpython-dotenv: 環境変数を.envファイルから読み取って設定するために使用される
Azure AI 検索インデックスを作成する
この RAG ベースのアプリケーションの目標は、カスタム データに基づいてモデルの応答を行うことです。 埋め込みモデルからのベクトル化されたデータを格納する Azure AI 検索インデックスを使用します。 検索インデックスは、ユーザーの質問に基づいて、関連するドキュメントを取得するために使用されます。
Azure AI 検索インデックスがまだ作成されていない場合は、作成方法について説明します。 使用するインデックスが既にある場合は、「検索環境変数を設定する」セクションまでスキップできます。 検索インデックスは、前の手順で作成または参照された Azure AI 検索サービス上に作成されます。
独自のデータを使用するか、ローカル コンピューターにサンプルの Contoso Trek 小売製品データを ZIP ファイルでダウンロードします。 ファイルを rag-tutorial フォルダーに解凍します。 このデータは、製品情報を表すマークダウン ファイルのコレクションです。 データは、検索インデックスに取り込みやすい方法で構造化されています。 このデータから検索インデックスを構築します。
プロンプト フロー RAG パッケージを使用すると、マークダウン ファイルを取り込み、ローカルで検索インデックスを作成し、それをクラウド プロジェクトに登録できます。 プロンプト フロー RAG パッケージをインストールします。
pip install promptflow-ragrag-tutorial フォルダーに build_index.py ファイルを作成します。
次のコードをコピーして、build_index.py ファイルに貼り付けます。
import os from dotenv import load_dotenv load_dotenv() from azure.ai.ml import MLClient from azure.identity import DefaultAzureCredential from azure.ai.ml.entities import Index from promptflow.rag.config import ( LocalSource, AzureAISearchConfig, EmbeddingsModelConfig, ConnectionConfig, ) from promptflow.rag import build_index client = MLClient( DefaultAzureCredential(), os.getenv("AZURE_SUBSCRIPTION_ID"), os.getenv("AZURE_RESOURCE_GROUP"), os.getenv("AZUREAI_PROJECT_NAME"), ) import os # append directory of the current script to data directory script_dir = os.path.dirname(os.path.abspath(__file__)) data_directory = os.path.join(script_dir, "data/product-info/") # Check if the directory exists if os.path.exists(data_directory): files = os.listdir(data_directory) # List all files in the directory if files: print( f"Data directory '{data_directory}' exists and contains {len(files)} files." ) else: print(f"Data directory '{data_directory}' exists but is empty.") exit() else: print(f"Data directory '{data_directory}' does not exist.") exit() index_name = "tutorial-index" # your desired index name index_path = build_index( name=index_name, # name of your index vector_store="azure_ai_search", # the type of vector store - in this case it is Azure AI Search. Users can also use "azure_cognitive search" embeddings_model_config=EmbeddingsModelConfig( model_name=os.getenv("AZURE_OPENAI_EMBEDDING_DEPLOYMENT"), deployment_name=os.getenv("AZURE_OPENAI_EMBEDDING_DEPLOYMENT"), connection_config=ConnectionConfig( subscription_id=client.subscription_id, resource_group_name=client.resource_group_name, workspace_name=client.workspace_name, connection_name=os.getenv("AZURE_OPENAI_CONNECTION_NAME"), ), ), input_source=LocalSource(input_data=data_directory), # the location of your files index_config=AzureAISearchConfig( ai_search_index_name=index_name, # the name of the index store inside the azure ai search service ai_search_connection_config=ConnectionConfig( subscription_id=client.subscription_id, resource_group_name=client.resource_group_name, workspace_name=client.workspace_name, connection_name=os.getenv("AZURE_SEARCH_CONNECTION_NAME"), ), ), tokens_per_chunk=800, # Optional field - Maximum number of tokens per chunk token_overlap_across_chunks=0, # Optional field - Number of tokens to overlap between chunks ) # register the index so that it shows up in the cloud project client.indexes.create_or_update(Index(name=index_name, path=index_path))index_name変数を目的のインデックスの名前に設定します。- 必要に応じて、
path_to_data変数をデータ ファイルが格納されているパスに更新できます。
重要
既定では、コード サンプルは、このチュートリアルで前に説明したようなアプリケーション コード構造を想定しています。
dataフォルダーは、build_index.py と同じレベルにあり、md ファイルを含むダウンロードしたproduct-infoフォルダーがその中に含まれている必要があります。コンソールからコードを実行してインデックスをローカルに構築し、クラウド プロジェクトに登録します。
python build_index.pyスクリプトを実行すると、Azure AI Studio プロジェクトの [インデックス] ページで新しく作成したインデックスを表示できます。 詳細については、「Azure AI Studio でベクター インデックスを構築および使用する方法」を参照してください。
同じインデックス名を使用してスクリプトを再度実行すると、同じインデックスの新しいバージョンが作成されます。
検索インデックス環境変数を設定する
使用するインデックス名を取得したら (新しいインデックスを作成するか、既存のインデックスを参照して)、次のように .env ファイルに追加します。
AZUREAI_SEARCH_INDEX_NAME=<index-name>
カスタム RAG コードを開発する
次に、基本的なチャット アプリケーションに取得拡張生成 (RAG) 機能を追加するカスタム コードを作成します。 クイックスタートでは、chat.py ファイルと chat.prompty ファイルを作成しました。 ここでは、そのコードを拡張して RAG 機能を組み込みます。
RAG を使用したチャット アプリでは、次の一般的なロジックが実装されます。
- ユーザーのクエリの意図とチャット履歴に基づいて検索クエリを生成する
- 埋め込みモデルを使用してクエリを埋め込む
- クエリを指定して、検索インデックスから関連ドキュメントを取得する
- 関連するコンテキストを Azure OpenAI チャット入力候補モデルに渡す
- Azure OpenAI モデルからの応答を返す
チャット アプリの実装ロジック
チャット アプリの実装ロジックは、copilot.py ファイルにあります。 このファイルには、RAG ベースのチャット アプリのコア ロジックが含まれています。
rag-tutorial フォルダー内に copilot_flow という名前のフォルダーを作成します。
次に、copilot_flow フォルダーに copilot.py というファイルを作成します。
次のコードを copilot.py ファイルに追加します。
import os
from dotenv import load_dotenv

load_dotenv()

from promptflow.core import Prompty, AzureOpenAIModelConfiguration
from promptflow.tracing import trace
from openai import AzureOpenAI

# <get_documents>
@trace
def get_documents(search_query: str, num_docs=3):
    from azure.identity import DefaultAzureCredential, get_bearer_token_provider
    from azure.search.documents import SearchClient
    from azure.search.documents.models import VectorizedQuery

    token_provider = get_bearer_token_provider(
        DefaultAzureCredential(), "https://cognitiveservices.azure.com/.default"
    )

    index_name = os.getenv("AZUREAI_SEARCH_INDEX_NAME")

    #  retrieve documents relevant to the user's question from Cognitive Search
    search_client = SearchClient(
        endpoint=os.getenv("AZURE_SEARCH_ENDPOINT"),
        credential=DefaultAzureCredential(),
        index_name=index_name,
    )

    aoai_client = AzureOpenAI(
        azure_endpoint=os.getenv("AZURE_OPENAI_ENDPOINT"),
        azure_ad_token_provider=token_provider,
        api_version=os.getenv("AZURE_OPENAI_API_VERSION"),
    )

    # generate a vector embedding of the user's question
    embedding = aoai_client.embeddings.create(
        input=search_query, model=os.getenv("AZURE_OPENAI_EMBEDDING_DEPLOYMENT")
    )
    embedding_to_query = embedding.data[0].embedding

    context = ""
    # use the vector embedding to do a vector search on the index
    vector_query = VectorizedQuery(
        vector=embedding_to_query, k_nearest_neighbors=num_docs, fields="contentVector"
    )
    results = trace(search_client.search)(
        search_text="", vector_queries=[vector_query], select=["id", "content"]
    )

    for result in results:
        context += f"\n>>> From: {result['id']}\n{result['content']}"

    return context


# <get_documents>

from promptflow.core import Prompty, AzureOpenAIModelConfiguration

from pathlib import Path
from typing import TypedDict


class ChatResponse(TypedDict):
    context: dict
    reply: str


def get_chat_response(chat_input: str, chat_history: list = []) -> ChatResponse:
    model_config = AzureOpenAIModelConfiguration(
        azure_deployment=os.getenv("AZURE_OPENAI_CHAT_DEPLOYMENT"),
        api_version=os.getenv("AZURE_OPENAI_API_VERSION"),
        azure_endpoint=os.getenv("AZURE_OPENAI_ENDPOINT"),
    )

    searchQuery = chat_input

    # Only extract intent if there is chat_history
    if len(chat_history) > 0:
        # extract current query intent given chat_history
        path_to_prompty = f"{Path(__file__).parent.absolute().as_posix()}/queryIntent.prompty"  # pass absolute file path to prompty
        intentPrompty = Prompty.load(
            path_to_prompty,
            model={
                "configuration": model_config,
                "parameters": {
                    "max_tokens": 256,
                },
            },
        )
        searchQuery = intentPrompty(query=chat_input, chat_history=chat_history)

    # retrieve relevant documents and context given chat_history and current user query (chat_input)
    documents = get_documents(searchQuery, 3)

    # send query + document context to chat completion for a response
    path_to_prompty = f"{Path(__file__).parent.absolute().as_posix()}/chat.prompty"
    chatPrompty = Prompty.load(
        path_to_prompty,
        model={
            "configuration": model_config,
            "parameters": {"max_tokens": 256, "temperature": 0.2},
        },
    )
    result = chatPrompty(
        chat_history=chat_history, chat_input=chat_input, documents=documents
    )

    return dict(reply=result, context=documents)
copilot.py ファイルには、2 つの重要な関数 get_documents() と get_chat_response() が含まれています。
これら 2 つの関数には @trace デコレーターがあり、これにより各関数呼び出しの入力と出力のプロンプト フロー トレース ログを確認できることに注意してください。 @trace は、クイックスタートでトレース機能を示した方法に代わる拡張アプローチです。
get_documents() 関数は RAG ロジックの中核です。
- 検索クエリと取得するドキュメントの数を受け取ります。
- 埋め込みモデルを使用して検索クエリを埋め込みます。
- Azure Search インデックスのクエリを実行して、クエリに関連するドキュメントを取得します。
- ドキュメントのコンテキストを返します。
get_chat_response() 関数は、chat.py ファイル内の前のロジックから構築されます。
chat_inputと任意のchat_historyを受け取ります。chat_input意図とchat_historyに基づいて検索クエリを構築します。get_documents()を呼び出して、関連するドキュメントを取得します。- コンテキストを使用してチャット入力候補モデルを呼び出し、クエリに対する根拠のある応答を取得します。
- 応答とコンテキストを返します。 型指定された辞書を
get_chat_response()関数の戻りオブジェクトとして設定します。 ユース ケースに合わせて、コードが応答を返す方法を選択できます。
get_chat_response() 関数は 2 つの Prompty ファイルを使用して必要な大規模言語モデル (LLM) 呼び出しを行います。これについては次に説明します。
チャット用のプロンプト テンプレート
chat.prompty ファイルはシンプルで、クイックスタートの chat.prompty に似ています。 システム プロンプトは製品を反映するように更新され、プロンプト テンプレートにはドキュメント コンテキストが含まれます。
ファイル chat.prompty を copilot_flow ディレクトリに追加します。 このファイルは、チャット入力候補モデルへの呼び出しを表しており、システム プロンプト、チャット履歴、ドキュメント コンテキストが提供されています。
このコードを chat.prompty ファイルに追加します。
---
name: Chat Prompt
description: A prompty that uses the chat API to respond to queries grounded in relevant documents
model:
    api: chat
    configuration:
        type: azure_openai
inputs:
    chat_input:
        type: string
    chat_history:
        type: list
        is_chat_history: true
        default: []
    documents:
        type: object

---
system:
You are an AI assistant helping users with queries related to outdoor outdooor/camping gear and clothing.
If the question is not related to outdoor/camping gear and clothing, just say 'Sorry, I only can answer queries related to outdoor/camping gear and clothing. So, how can I help?'
Don't try to make up any answers.
If the question is related to outdoor/camping gear and clothing but vague, ask for clarifying questions instead of referencing documents. If the question is general, for example it uses "it" or "they", ask the user to specify what product they are asking about.
Use the following pieces of context to answer the questions about outdoor/camping gear and clothing as completely, correctly, and concisely as possible.
Do not add documentation reference in the response.

# Documents
{{documents}}

{% for item in chat_history %}
{{item.role}}
{{item.content}}
{% endfor %}

user:
{{chat_input}}
チャット履歴のプロンプト テンプレート
RAG ベースのアプリケーションを実装しているため、現在のユーザーのクエリだけでなく、チャット履歴も考慮して関連ドキュメントを取得するために、追加のロジックが必要になります。 この追加のロジックがなければ、LLM 呼び出しでチャット履歴が考慮されます。 しかし、そのコンテキストに適切なドキュメントを取得できないため、期待される応答は得られません。
たとえば、ユーザーが "それは防水ですか?" という質問をした場合、システムはチャット履歴を調べて "それ" という単語が何を指すのかを判断し、そのコンテキストを検索クエリに含めて埋め込む必要があります。 このようにして、"それ" (おそらく Alpine Explorer Tent) とその "コスト" に関する適切なドキュメントを取得します。
埋め込まれるユーザーのクエリのみを渡すのではなく、チャット履歴を考慮した新しい検索クエリを生成する必要があります。 特定のプロンプトと共に別の Prompty (別の LLM 呼び出し) を使用して、チャット履歴に基づいてユーザーのクエリの意図を解釈し、必要なコンテキストを持つ検索クエリを構築します。
copilot_flow フォルダーにファイル queryIntent.prompty を作成します。
プロンプト形式と少数ショットの例についての具体的な詳細は、以下のコードを入力します。
---
 name: Chat Prompt
 description: A prompty that extract users query intent based on the current_query and chat_history of the conversation
 model:
     api: chat
     configuration:
         type: azure_openai
 inputs:
     query:
       type: string
     chat_history:
         type: list
         is_chat_history: true
         default: []

 ---
 system:
 - You are an AI assistant reading a current user query and chat_history.
 - Given the chat_history, and current user's query, infer the user's intent expressed in the current user query.
 - Once you infer the intent, respond with a search query that can be used to retrieve relevant documents for the current user's query based on the intent
 - Be specific in what the user is asking about, but disregard parts of the chat history that are not relevant to the user's intent.

 Example 1:
 With a chat_history like below:
 \```
 chat_history: [    {
       "role": "user",
       "content": "are the trailwalker shoes waterproof?"
     },
     {
       "role": "assistant",
       "content": "Yes, the TrailWalker Hiking Shoes are waterproof. They are designed with a durable and waterproof construction to withstand various terrains and weather conditions."
     }
 ]
 \```
 User query: "how much do they cost?"

 Intent: "The user wants to know how much the Trailwalker Hiking Shoes cost."
 Search query: "price of Trailwalker Hiking Shoes"


 Example 2:
 With a chat_history like below:
 \```
 chat_history: [    {
       "role": "user",
       "content": "are the trailwalker shoes waterproof?"
     },
     {
       "role": "assistant",
       "content": "Yes, the TrailWalker Hiking Shoes are waterproof. They are designed with a durable and waterproof construction to withstand various terrains and weather conditions."
     },
     {
       "role": "user",
       "content": "how much do they cost?"
     },
     {
       "role": "assistant",
       "content": "The TrailWalker Hiking Shoes are priced at $110."
     },
     {
       "role": "user",
       "content": "do you have waterproof tents?"
     },
     {
       "role": "assistant",
       "content": "Yes, we have waterproof tents available. Can you please provide more information about the type or size of tent you are looking for?"
     },
     {
       "role": "user",
       "content": "which is your most waterproof tent?"
     },
     {
       "role": "assistant",
       "content": "Our most waterproof tent is the Alpine Explorer Tent. It is designed with a waterproof material and has a rainfly with a waterproof rating of 3000mm. This tent provides reliable protection against rain and moisture."
     }
 ]
 \```
 User query: "how much does it cost?"

 Intent: "the user would like to know how much the Alpine Explorer Tent costs"
 Search query: "price of Alpine Explorer Tent"

 {% for item in chat_history %}
 {{item.role}}
 {{item.content}}
 {% endfor %}

 Current user query:
 {{query}}

 Search query:
queryIntent.prompty ファイル内のシンプルなシステム メッセージは、チャット履歴で RAG ソリューションを機能させるために最低限必要なものです。
必要なパッケージを構成する
copilot_flow フォルダーにファイル requirements.txt を作成します。 次の内容を追加します。
openai
azure-identity
azure-search-documents==11.4.0
promptflow[azure]==1.11.0
promptflow-tracing==1.11.0
promptflow-tools==1.4.0
promptflow-evals==0.3.0
jinja2
aiohttp
python-dotenv
これらのパッケージは、フローをローカルおよびデプロイされた環境で実行するために必要です。
フレックス フローを使用する
前述したように、この実装ではプロンプト フローのフレックス フローを使用します。これは、フローを実装するためのコード ファーストのアプローチです。 エントリ関数 (copilot.py で定義されている) を指定します。 詳細については、フレックス フローの開発に関するページを参照してください。
この yaml はエントリ関数を指定します。これは、copilot.py で定義されている get_chat_response 関数です。 また、フローを実行するために必要な要件も指定します。
ファイル flow.flex.yaml を copilot_flow フォルダーに作成します。 次の内容を追加します。
entry: copilot:get_chat_response
environment:
  python_requirements_txt: requirements.txt
プロンプト フローを使用してチャット アプリをテストする
プロンプト フローのテスト機能を使用して、サンプル入力に対してチャット アプリがどのように想定どおりに動作するかを確認します。 flow.flex.yaml ファイルを使用すると、プロンプト フローを使用して、指定した入力でテストできます。
次のプロンプト フロー コマンドを使用してフローを実行します。
pf flow test --flow ./copilot_flow --inputs chat_input="how much do the Trailwalker shoes cost?"
または、--ui フラグを使用してフローを対話形式で実行することもできます。
pf flow test --flow ./copilot_flow --ui
--ui を使用すると、対話型のサンプル チャット エクスペリエンスによって、ローカル ブラウザーにウィンドウを開きます。
- 初めて
--uiフラグを指定して実行するときは、オプションからチャットの入力と出力を手動で選択する必要があります。 このセッションを初めて作成するときは、[チャット入出力フィールド構成] 設定を選択して、チャットを開始します。 - 次回
--uiフラグを指定して実行すると、セッションは設定を記憶します。

対話型セッションが完了したら、ターミナル ウィンドウで Ctrl + C キーを入力してサーバーを停止します。
チャット履歴でテストする
一般に、プロンプト フローと Prompty はチャット履歴をサポートします。 ローカルで提供されるフロントエンドで --ui フラグを使用してテストする場合、プロンプト フローによってチャット履歴が管理されます。 --ui を使用せずにテストする場合は、チャット履歴を含む入力ファイルを指定できます。
アプリケーションは RAG を実装しているため、チャット履歴を処理するための追加ロジックを queryIntent.prompty ファイルに追加する必要がありました。
チャット履歴でテストするには、copilot_flow フォルダーに input_with_chat_history.json というファイルを作成し、次の内容を貼り付けます。
{
    "chat_input": "how much does it cost?",
    "chat_history": [
        {
        "role": "user",
        "content": "are the trailwalker shoes waterproof?"
        },
        {
        "role": "assistant",
        "content": "Yes, the TrailWalker Hiking Shoes are waterproof. They are designed with a durable and waterproof construction to withstand various terrains and weather conditions."
        },
        {
        "role": "user",
        "content": "how much do they cost?"
        },
        {
        "role": "assistant",
        "content": "The TrailWalker Hiking Shoes are priced at $110."
        },
        {
        "role": "user",
        "content": "do you have waterproof tents?"
        },
        {
        "role": "assistant",
        "content": "Yes, we have waterproof tents available. Can you please provide more information about the type or size of tent you are looking for?"
        },
        {
        "role": "user",
        "content": "which is your most waterproof tent?"
        },
        {
        "role": "assistant",
        "content": "Our most waterproof tent is the Alpine Explorer Tent. It is designed with a waterproof material and has a rainfly with a waterproof rating of 3000mm. This tent provides reliable protection against rain and moisture."
        }
    ]
    }
このファイルを使用してテストするには、次を実行します。
pf flow test --flow ./copilot_flow --inputs ./copilot_flow/input_with_chat_history.json
予想される出力は、"Alpine Explorer Tent の価格は 350 ドルです。" のようなものです。
このシステムは "それはいくらかかりますか?" というクエリの意図を解釈することができます。"それ" が Alpine Explorer Tent を指しており、チャット履歴の最新のコンテキストであることがわかります。 次に、システムは Alpine Explorer Tent の価格に関する検索クエリを作成し、Alpine Explorer Tent のコストに関連するドキュメントを取得し、応答を取得します。
このフロー実行からトレースに移動すると、会話が動作していることがわかります。 ローカル トレース リンクは、フロー テストの実行結果の前にコンソール出力に表示されます。

リソースをクリーンアップする
不要な Azure コストが発生しないように、このチュートリアルで作成したリソースが不要になったら削除してください。 リソースを管理するために、Azure portal を使用できます。
ただし、このチュートリアル シリーズの次のパートでチャット アプリを Azure にデプロイする場合は、まだ削除しないでください。