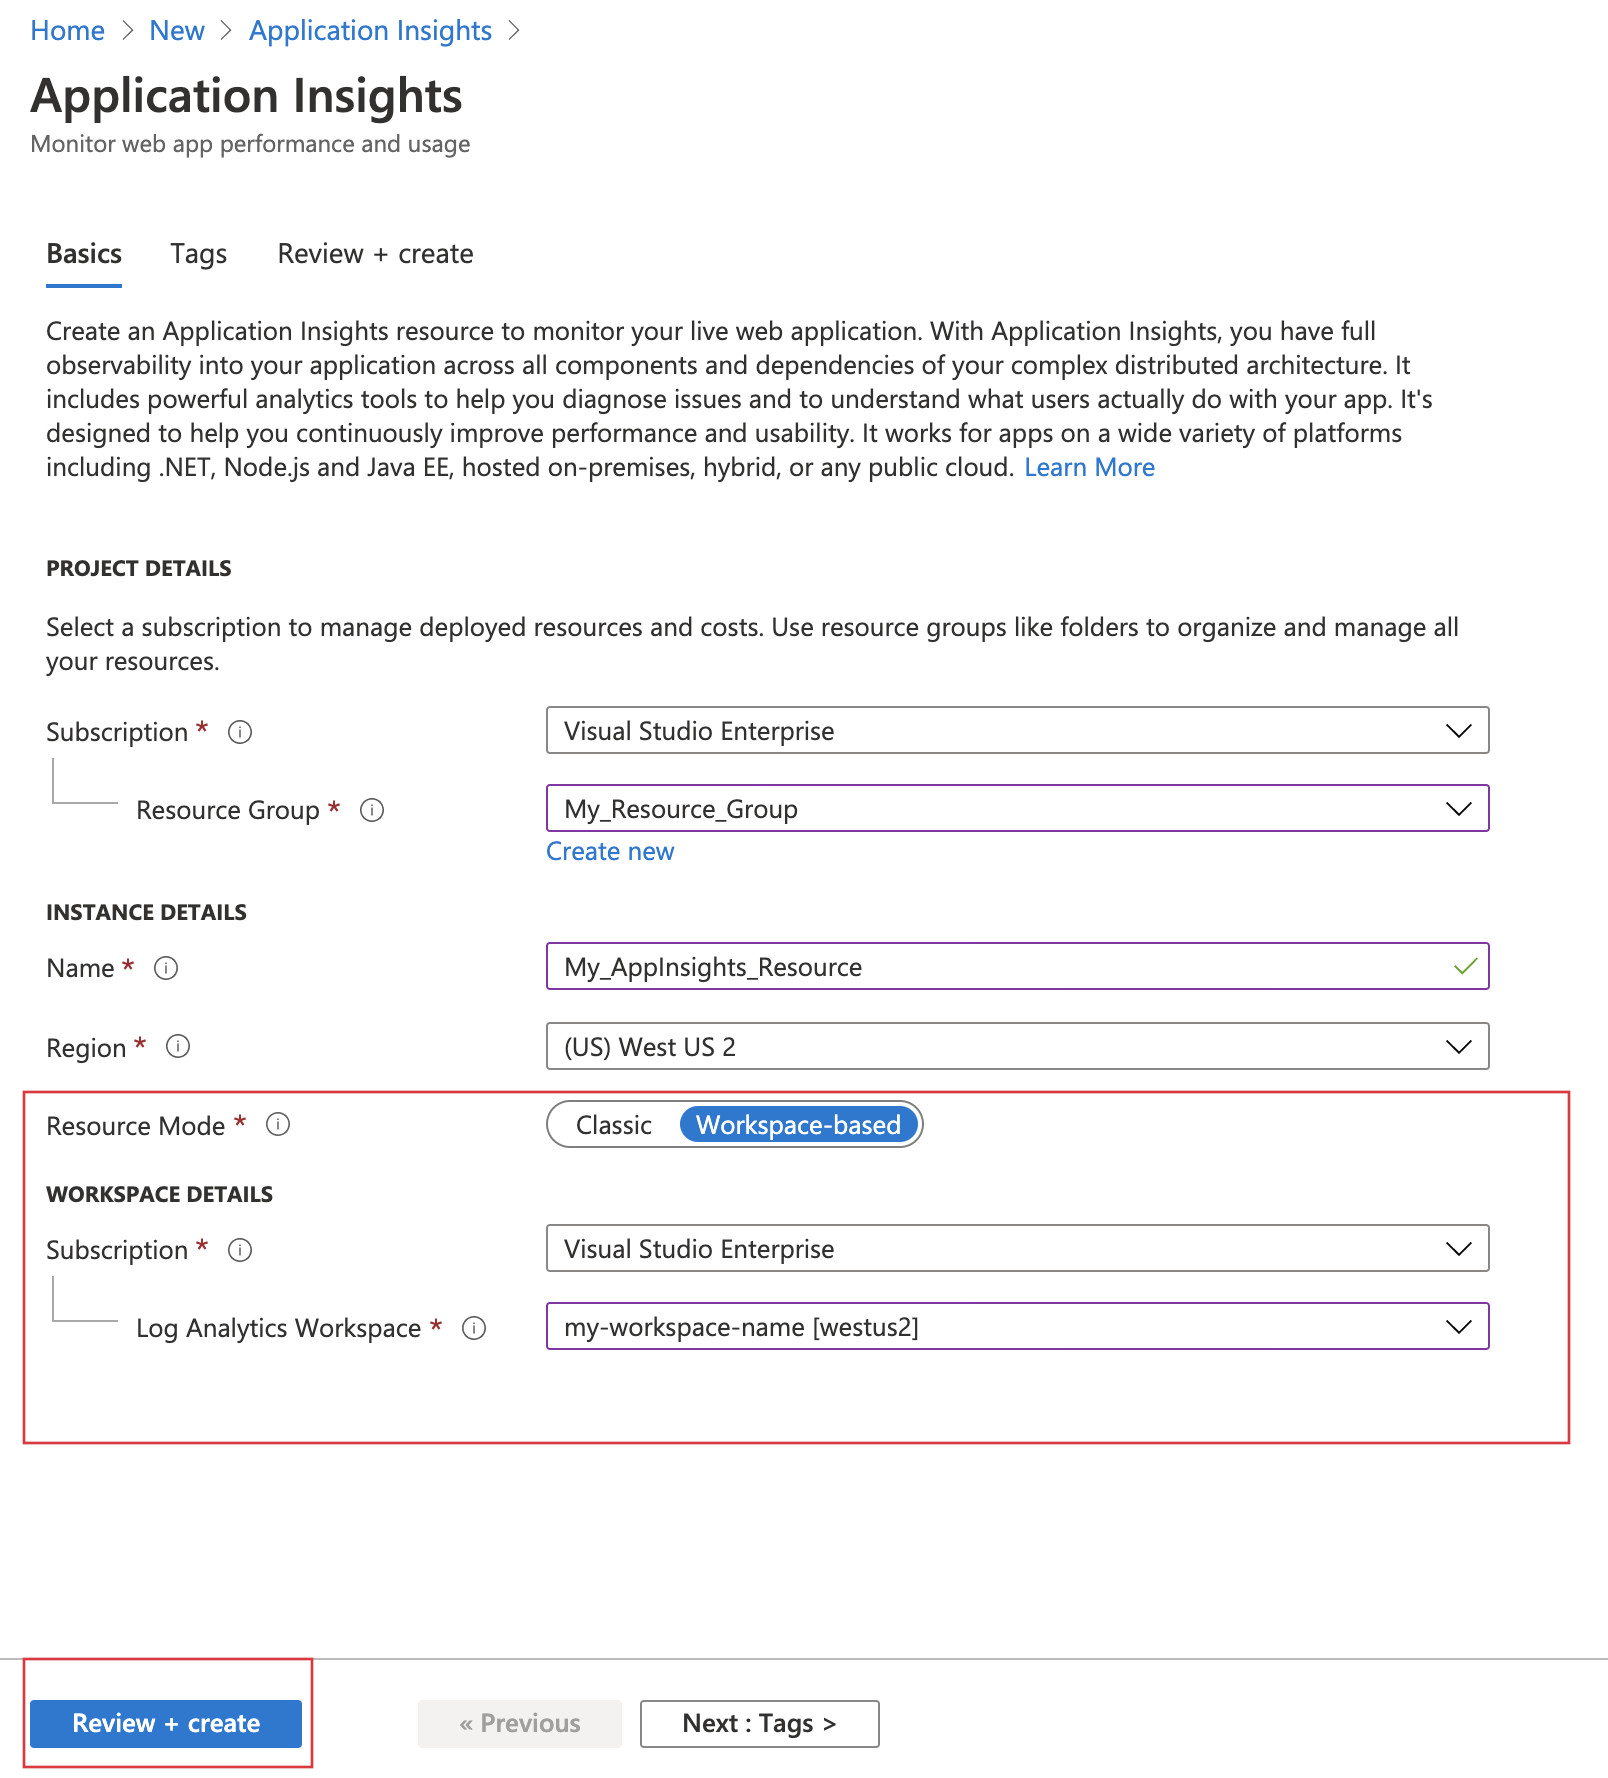
ワークスペース ベースの Application Insights リソース
Azure Monitor Application Insights のワークスペースベースのリソースを使用すると、Application Insights と Log Analytics が統合されます。
ワークスペースベースのリソースを使用すると、Application Insights からテレメトリが共通の Log Analytics ワークスペースに送信され、アプリケーション、インフラストラクチャ、プラットフォームのログを 1 つの統合された場所に保持しながら、Log Analytics のすべての機能にフル アクセスできます。 この統合により、リソース全体で一般的な Azure ロールベースのアクセス制御を使えるようになり、アプリ間またはワークスペース間のクエリが不要になります。
Note
ワークスペース ベースの Application Insights リソースのデータ インジェストとリテンション期間は、データが保管されている Log Analytics ワークスペースを通じて課金されます。 ワークスペース ベースの Application Insights リソースの課金の詳細については、「Azure Monitor ログの料金の詳細」を参照してください。
新機能
ワークスペース ベースの Application Insights は Azure Monitor および Log Analytics と連携することで、機能強化を実現します。
- カスタマー マネージド キーは、ユーザーのみがアクセスするキーを使用して保存データを暗号化します。
- Azure Private Link はプライベート エンドポイントを使用することで、Azure PaaS サービスを仮想ネットワークに安全に接続します。
- .NET Profiler とスナップショット デバッガー用の Bring Your Own Storage (BYOS) を使用すると、暗号化、有効期間、ネットワーク アクセスに関するポリシーを使用して、.NET Profiler とスナップショット デバッガーからのデータを管理できます。
- コミットメント レベルにより、従量課金制よりもコストを最大 30% 削減できます。
- Log Analytics ストリーミングがデータをより迅速に処理します。
ワークスペース ベースのリソースを作成する
Azure portal にサインインし、Application Insights リソースを作成します。
既存の Log Analytics ワークスペースがない場合は、Log Analytics ワークスペースの作成に関するドキュメントを参照してください。
"ワークスペース ベースのリソースは現在、すべての商用リージョンと Azure Government でご利用いただけます。" Application Insights と Log Analytics を 2 つの異なるリージョンに配置すると、待機時間に影響が生じ、監視ソリューションの全体的な信頼性が低下するおそれがあります。
リソースを作成すると、対応するワークスペース情報が [概要] ペインに表示されます。
青いリンク テキストを選び、関連する Log Analytics ワークスペースに移動します。ここでは、新しい統合ワークスペース クエリ環境を利用できます。
注意
Application Insights クラシックのリソース クエリ、ブック、およびログ ベースのアラートについては、引き続き完全な下位互換性を提供します。 新しいワークスペース ベースのテーブル構造またはスキーマのクエリまたは表示を行うには、まず Log Analytics ワークスペースに移動する必要があります。 従来の Application Insights クエリ エクスペリエンスにアクセスするには、[Application Insights] ペインの [ログ (Analytics)] を選びます。
接続文字列のコピー
接続文字列により、利用統計情報と関連付けるリソースが識別されます。 また、これを使用して、リソースでテレメトリの宛先として使用するエンドポイントを変更できます。 接続文字列をコピーし、アプリケーションのコードまたは環境変数に追加する必要があります。
監視の構成
ワークスペース ベースの Application Insights リソースを作成後、監視を構成します。
コードベースのアプリケーション監視
コードベースのアプリケーション監視では、適切な Application Insights SDK をインストールし、接続文字列で新しく作成したリソースを指し示します。
コードベースの監視のために Application Insights SDK を設定する方法については、言語またはフレームワークに固有の次のドキュメントを参照してください。
- ASP.NET
- ASP.NET Core
- バックグラウンド タスクと最新のコンソール アプリケーション (.NET/.NET Core)
- クラシック コンソール アプリケーション (.NET)
- Java
- JavaScript
- Node.js
- Python
コード不要の監視
Azure Functions や Azure App Service などのサービスをコードなしで監視するために、最初にワークスペース ベースの Application Insights リソースを作成できます。 その後、監視を構成するときにそのリソースを指し示します。 または、Application Insights の有効化の一部として、新しい Application Insights リソースを作成できます。
リソースを自動的に作成する
Azure CLI
プレビューの Application Insights Azure CLI コマンドにアクセスするには、まず次を実行する必要があります。
az extension add -n application-insights
az extension add コマンドを実行しないと、az : ERROR: az monitor: 'app-insights' is not in the 'az monitor' command group. See 'az monitor --help' のようなエラー メッセージが表示されます。
ここで、次のコードを実行して Application Insights リソースを作成できます。
az monitor app-insights component create --app
                                         --location
                                         --resource-group
                                         [--application-type]
                                         [--ingestion-access {Disabled, Enabled}]
                                         [--kind]
                                         [--only-show-errors]
                                         [--query-access {Disabled, Enabled}]
                                         [--tags]
                                         [--workspace]
例
az monitor app-insights component create --app demoApp --location eastus --kind web -g my_resource_group --workspace "/subscriptions/aaaa0a0a-bb1b-cc2c-dd3d-eeeeee4e4e4e/resourcegroups/test1234/providers/microsoft.operationalinsights/workspaces/test1234555"
このコマンドについての完全な Azure CLI ドキュメントについては、Azure CLI のドキュメントを参照してください。
Azure PowerShell
新しいワークスペース ベースの Application Insights リソースを作成します。
New-AzApplicationInsights -Name <String> -ResourceGroupName <String> -Location <String> -WorkspaceResourceId <String>
   [-SubscriptionId <String>]
   [-ApplicationType <ApplicationType>]
   [-DisableIPMasking]
   [-DisableLocalAuth]
   [-Etag <String>]
   [-FlowType <FlowType>]
   [-ForceCustomerStorageForProfiler]
   [-HockeyAppId <String>]
   [-ImmediatePurgeDataOn30Day]
   [-IngestionMode <IngestionMode>]
   [-Kind <String>]
   [-PublicNetworkAccessForIngestion <PublicNetworkAccessType>]
   [-PublicNetworkAccessForQuery <PublicNetworkAccessType>]
   [-RequestSource <RequestSource>]
   [-RetentionInDays <Int32>]
   [-SamplingPercentage <Double>]
   [-Tag <Hashtable>]
   [-DefaultProfile <PSObject>]
   [-Confirm]
   [-WhatIf]
   [<CommonParameters>]
例
New-AzApplicationInsights -Kind java -ResourceGroupName testgroup -Name test1027 -location eastus -WorkspaceResourceId "/subscriptions/aaaa0a0a-bb1b-cc2c-dd3d-eeeeee4e4e4e/resourcegroups/test1234/providers/microsoft.operationalinsights/workspaces/test1234555"
このコマンドレットの詳細な PowerShell ドキュメントと、接続文字列を取得する方法については、Azure PowerShell のドキュメントを参照してください。
Azure Resource Manager のテンプレート
@description('Name of Application Insights resource.')
param name string

@description('Type of app you are deploying. This field is for legacy reasons and will not impact the type of App Insights resource you deploy.')
param type string

@description('Which Azure Region to deploy the resource to. This must be a valid Azure regionId.')
param regionId string

@description('See documentation on tags: https://video2.skills-academy.com/azure/azure-resource-manager/management/tag-resources.')
param tagsArray object

@description('Source of Azure Resource Manager deployment')
param requestSource string

@description('Log Analytics workspace ID to associate with your Application Insights resource.')
param workspaceResourceId string

resource component 'Microsoft.Insights/components@2020-02-02' = {
  name: name
  location: regionId
  tags: tagsArray
  kind: 'other'
  properties: {
    Application_Type: type
    Flow_Type: 'Bluefield'
    Request_Source: requestSource
    WorkspaceResourceId: workspaceResourceId
  }
}
パラメーター ファイル
{
  "$schema": "https://schema.management.azure.com/schemas/2015-01-01/deploymentParameters.json#",
  "contentVersion": "1.0.0.0",
  "parameters": {
    "name": {
      "value": "my_workspace_based_resource"
    },
    "type": {
      "value": "web"
    },
    "regionId": {
      "value": "westus2"
    },
    "tagsArray": {
      "value": {}
    },
    "requestSource": {
      "value": "CustomDeployment"
    },
    "workspaceResourceId": {
      "value": "/subscriptions/xxxxxxxx-xxxx-xxxx-xxxx-xxxxxxxxxxxx/resourcegroups/testxxxx/providers/microsoft.operationalinsights/workspaces/testworkspace"
    }
  }
}
関連するワークスペースを変更する
ワークスペース ベースの Application Insights リソースを作成後、関連する Log Analytics ワークスペースを変更できます。
Application Insights リソース ペインで [プロパティ]>[ワークスペースの変更]>[Log Analytics ワークスペース] の順に選びます。
テレメトリのエクスポート
従来の連続エクスポート機能は、ワークスペース ベースのリソースではサポートされていません。 代わりに、Application Insights リソースで [診断設定]>[診断設定を追加する] の順に選びます。 すべてのテーブルまたはテーブルのサブセットを選び、ストレージ アカウントにアーカイブすることができます。 Azure イベント ハブにストリーム配信することもできます。
注意
診断設定のエクスポートにより、コストが増加する可能性があります。 詳細については、「Application Insights からのテレメトリのエクスポート」を参照してください。 この機能の価格情報については、「Azure Monitor の価格」ページを参照してください。 課金が開始される前に、通知が送信されます。 通知期間後もテレメトリ エクスポートを引き続き使用する場合は、該当する料金で課金されます。
デプロイする必要がある Application Insights リソースの数
Web アプリケーションの次のバージョンを開発する際に、新しいバージョンの Application Insights テレメトリとリリース済みのバージョンのテレメトリが混在することがないように設定します。
混乱を避けるために、個別の接続文字列を使用して、異なる開発段階のテレメトリを個別の Application Insights リソースに送信します。
システムが Azure Cloud Services のインスタンスである場合は、個別の接続文字列を設定する別の方法があります。
リソースと接続文字列について
Web アプリに対する Application Insights の監視を設定するときは、Azure 内に Application Insights リソースを作成します。 アプリから収集したテレメトリを表示して分析するには、Azure portal でこのリソースを開きます。 接続文字列がリソースを特定します。 アプリを監視するために Application Insights パッケージをインストールする際に、パッケージがどこにテレメトリを送信するべきかがわかるように、接続文字列を使用してパッケージを構成します。
各 Application Insights リソースには、すぐに使用できるメトリックが付属しています。 分離されたコンポーネントが同じ Application Insights リソースに報告している場合は、これらのメトリックでアラートを生成しても意味がない場合があります。
単一の Application Insights リソースを使用するケース
以下の場合、単一の Application Insights リソースを使用します。
- 一緒にデプロイされ、通常は同じチームによって開発および管理されるアプリケーションの DevOps/ITOps 管理を合理化する。
- 既定ではダッシュボードで応答時間や失敗率などの主要業績評価指標を一元管理する。 必要に応じ、メトリック エクスプローラーでロール名ごとにセグメント化する。
- アプリケーション コンポーネント間で異なる Azure ロールベースのアクセス制御を管理する必要がない場合。
- 同じメトリック アラート条件、連続エクスポート、コンポーネント間の課金/クォータ管理で十分な場合。
- 1 つのAPI キーがすべてのコンポーネントのデータに同様にアクセスしても問題なく、10 個の API キーがすべてのコンポーネントのニーズを満たす場合。
- すべてのロールで同じスマート検出と作業項目の統合を設定することが適切な場合。
Note
複数の Application Insights リソースを統合する場合、統合後の新しい Application Insights リソースに既存のアプリケーション コンポーネントをさし向けることができます。 古いリソースに格納されているテレメトリは、新しいリソースに転送されません。 ビジネスを継続するのに十分なテレメトリが新しいリソースにある場合にのみ、古いリソースを削除するようにしてください。
その他の考慮事項
ポータル エクスペリエンスを有効化するには、カスタム コードを追加して、Cloud_RoleName 属性に意味のある値を割り当てます。 これらの値がないと、ポータル機能は機能しません。
Azure Service Fabric アプリケーションと従来のクラウド サービスについては、SDK が Azure ロール環境からこれらのサービスを読み取ることで、自動的に設定します。 他の種類のアプリの場合、通常は明示的に設定する必要があります。
ライブ メトリックは、ロール名ごとにデータを分割できません。
追加で Application Insights リソースを作成する
Applications Insights リソースを作成するには、「Application Insights リソースを作成する」を参照してください。
警告
Application Insights リソースが別のリージョンの Azure リソース (つまりテレメトリ プロデューサー) を監視している場合、ネットワーク コストが追加で発生する場合があります。 コストはテレメトリの取得元と送信先によって異なります。 詳細については、「Azure 帯域幅の価格」を参照してください。
接続文字列を取得する
接続文字列は、作成したリソースを特定します。
アプリがデータを送信するすべてのリソースの接続文字列が必要です。
ビルド番号でフィルター処理する
新しいバージョンのアプリを発行するときは、異なるビルドのテレメトリを区別する必要があります。
[Application Version](アプリケーション バージョン) プロパティを設定することで、検索とメトリックス エクスプローラーの結果をフィルター処理できます。
[Application Version](アプリケーション バージョン) プロパティを設定するには複数の方法があります。
直接設定します。
telemetryClient.Context.Component.Version = typeof(MyProject.MyClass).Assembly.GetName().Version;その行をテレメトリ初期化子にラップして、すべての
TelemetryClientインスタンスが一貫して設定されるようにします。ASP.NET:
BuildInfo.configでバージョンを設定します。 Web モジュールはBuildLabelノードからバージョンを取得します。 このファイルをプロジェクトに追加し、ソリューション エクスプローラーで [Copy Always](常にコピーする) プロパティを設定します。<?xml version="1.0" encoding="utf-8"?> <DeploymentEvent xmlns:xsi="https://www.w3.org/2001/XMLSchema-instance" xmlns:xsd="https://www.w3.org/2001/XMLSchema" xmlns="http://schemas.microsoft.com/VisualStudio/DeploymentEvent/2013/06"> <ProjectName>AppVersionExpt</ProjectName> <Build type="MSBuild"> <MSBuild> <BuildLabel kind="label">1.0.0.2</BuildLabel> </MSBuild> </Build> </DeploymentEvent>ASP.NET: Microsoft Build Engine で
BuildInfo.configが自動的に生成されます。.csprojファイルに数行を追加します。<PropertyGroup> <GenerateBuildInfoConfigFile>true</GenerateBuildInfoConfigFile> <IncludeServerNameInBuildInfo>true</IncludeServerNameInBuildInfo> </PropertyGroup>このステップにより、yourProjectName
.BuildInfo.configという名前のファイルが生成されます。 これは発行プロセスでBuildInfo.configという名前に変更されます。Visual Studio でビルドすると、ビルド ラベルにはプレースホルダー
(*AutoGen_...*)が含まれます。 ただし、Microsoft Build Engine を使用してビルドすると、正しいバージョン番号が設定されます。Microsoft Build Engine でバージョン番号を生成できるようにするには、
AssemblyReference.csに1.0.*のようにバージョンを設定します。
バージョンおよびリリースの追跡
アプリケーションのバージョンを追跡するには、Microsoft Build Engine プロセスが buildinfo.config が生成することを確認してください。 .csproj ファイルに以下を追加します。
<PropertyGroup>
  <GenerateBuildInfoConfigFile>true</GenerateBuildInfoConfigFile>    <IncludeServerNameInBuildInfo>true</IncludeServerNameInBuildInfo>
</PropertyGroup>
Application Insights Web モジュールにビルド情報があると、プロパティとして [Application Version](アプリケーション バージョン) がテレメトリのすべての項目に自動的に追加されます。 これにより、診断の検索を実行するとき、またはメトリックを調べるときに、バージョンによってフィルター処理できます。
Microsoft Build Engine は、Visual Studio の開発者向けのビルドではなくビルドのバージョン番号のみを生成します。
リリース注釈
Azure DevOps を使用する場合は、新しいバージョンをリリースするたびに、グラフに注釈マーカーを追加できます。
よく寄せられる質問
このセクションでは、一般的な質問への回答を示します。
Application Insights リソースを新しいリージョンに移動するにはどうすればよいですか?
リージョン間で既存の Application Insights リソースを転送することはできず、履歴データは新しいリージョンに移行できません。 回避策には次のものが含まれます。
- 対象となるリージョンに新しいワークスペースベースの Application Insights リソースを作成します。
- 元のリソース用の独自カスタマイズを新しいリソースで再作成します。
- 新しいリージョンのリソースの接続文字列を使用してアプリケーションを更新します。
- 新しい Application Insights リソースですべてが期待どおりに動作することを確認するためのテストを実施します。
- 元の Application Insights リソースを保持または削除するのか決定します。 従来のリソースを削除すると、すべての履歴データが失われます。 リソースがワークスペース ベースの場合、データは Log Analytics に残るため、保持期間が切れるまで履歴データにアクセスできます。
新しいリージョンのリソースに対して、通常、手動で再作成または更新する必要がある独自のカスタマイズには、以下のものがありますが、これらに限定されません。
- カスタム ダッシュボードとブックを再作成します。
- カスタム ログまたはメトリック アラートのスコープを再作成または更新します。
- 可用性アラートを再作成します。
- ユーザーが新しいリソースにアクセスするために必要なカスタムの Azure ロールベースのアクセス制御設定を再作成します。
- インジェスト サンプリング、データ保有、日次上限、およびカスタム メトリックの有効化を含む設定をレプリケートします。 これらの設定は、 [使用量と推定コスト] ペインで制御します。
- リリース注釈、ライブ メトリックと安全なコントロール チャネルなど、API キーに依存するすべての統合。 新しい API キーを生成し、関連する統合を更新する必要があります。
- クラシック リソースの連続エクスポートを再構成する必要があります。
- ワークスペースベースのリソースの診断設定を再構成する必要があります。
Azure Resource Manager のデプロイで providers('Microsoft.Insights', 'components').apiVersions[0] を使用できますか?
API バージョンの設定に、この方法を使用することは推奨されません。 最新バージョンは、破壊的変更が含まれる可能性があるプレビュー リリースを表す場合があります。 新しいプレビュー以外のリリースでも、API バージョンは、既存のテンプレートとの下位互換性が常にあるわけではありません。 場合によっては、API バージョンがすべてのサブスクリプションで使用できないことがあります。

