通話を管理する
Azure Communication Services SDK を使用して通話を管理する方法について説明します。 通話を行い、参加者とプロパティを管理する方法について説明します。
前提条件
- アクティブなサブスクリプションが含まれる Azure アカウント。 無料でアカウントを作成できます。
- デプロイ済みの Communication Services リソース。 Communication Services リソースを作成します。
- 通話クライアントを有効にするための
User Access Token。User Access Tokenを取得する方法についての詳細 - 省略可能: アプリケーションへの通話の追加の概要に関するクイックスタートを完了します
SDK のインストール
npm install コマンドを使用して、JavaScript 用の Azure Communication Services の Common SDK と Calling SDK をインストールします。
npm install @azure/communication-common --save
npm install @azure/communication-calling --save
必要なオブジェクトを初期化する
CallClient インスタンスは、ほとんどの通話操作に必要です。 新しい CallClient インスタンスを作成する際に、Logger インスタンスなどのカスタム オプションを使用してこれを構成できます。
CallClient インスタンスでは、createCallAgent を呼び出すことで CallAgent インスタンスを作成できます。 このメソッドでは、非同期的に CallAgent インスタンス オブジェクトが返されます。
createCallAgent メソッドでは、CommunicationTokenCredential が引数として使用されます。 これは、ユーザー アクセス トークンを受け取ります。
CallClient インスタンスで getDeviceManager メソッドを使用して、deviceManager にアクセスできます。
const { CallClient } = require('@azure/communication-calling');
const { AzureCommunicationTokenCredential} = require('@azure/communication-common');
const { AzureLogger, setLogLevel } = require("@azure/logger");

// Set the logger's log level
setLogLevel('verbose');

// Redirect log output to console, file, buffer, REST API, or whatever location you want
AzureLogger.log = (...args) => {
    console.log(...args); // Redirect log output to console
};

const userToken = '<USER_TOKEN>';
callClient = new CallClient(options);
const tokenCredential = new AzureCommunicationTokenCredential(userToken);
const callAgent = await callClient.createCallAgent(tokenCredential, {displayName: 'optional Azure Communication Services user name'});
const deviceManager = await callClient.getDeviceManager()
Microsoft インフラストラクチャへの SDK 接続を最適に管理する方法
Call Agent インスタンスは、(呼び出しを結合または開始するために) 呼び出しを管理するのに役立ちます。 呼び出しの SDK を機能させるには、Microsoft インフラストラクチャに接続して着信呼び出しの通知を取得し、他の呼び出しの詳細を調整する必要があります。 Call Agent には、次の 2 つの状態があります。
接続済み - Connected の Call Agent connectionStatue 値は、クライアント SDK が接続されており、Microsoft インフラストラクチャから通知を受信できることを意味します。
切断済み - Disconnected の Call Agent connectionStatue 値は、SDK の正常な接続を妨げる問題があることを示します。 Call Agent を再作成する必要があります。
invalidToken: トークンが有効期限切れであるか、無効な場合、Call Agentインスタンスがこのエラーで切断されます。connectionIssue: クライアントの Microsoft インフラストラクチャへの接続で問題が発生した場合、何度も再試行した後に、Call AgentがconnectionIssueエラーを提示します。
connectionState プロパティの現在の値を調べて、ローカル Call Agent が Microsoft インフラストラクチャに接続されているかどうかを確認できます。 アクティブな呼び出し中に、connectionStateChanged イベントをリッスンして、Call Agent の状態が接続済みから切断済みに変化したかどうかを判断できます。
const connectionState = callAgentInstance.connectionState;
console.log(connectionState); // it may return either of 'Connected' | 'Disconnected'

const connectionStateCallback = (args) => {
    console.log(args); // it will return an object with oldState and newState, each of having a value of either of 'Connected' | 'Disconnected'
    // it will also return reason, either of 'invalidToken' | 'connectionIssue'
}
callAgentInstance.on('connectionStateChanged', connectionStateCallback);
通話を行う
通話を作成して開始するには、callAgent で API のいずれかを使用し、Communication Services ID SDK を使用して作成したユーザーを指定する必要があります。
通話の作成と開始は同期的に行われます。 call インスタンスを使用すると、通話イベントをサブスクライブできます。
ユーザーまたは PSTN と 1:n の通話を行う
別の Communication Services ユーザーと通話を行うには、callAgent で startCall メソッドを呼び出し、Communication Services 管理ライブラリで作成した、受信者の CommunicationUserIdentifier を渡します。
相手がユーザー 1 名の場合の "1 対 1" の通話には、次のコードを使用します。
const userCallee = { communicationUserId: '<ACS_USER_ID>' }
const oneToOneCall = callAgent.startCall([userCallee]);
公衆交換電話網 (PSTN) の通話を行うには、callAgent で startCall メソッドを使用し、受信者の PhoneNumberIdentifier を渡します。 PSTN 通話を許可するように Communication Services リソースを構成する必要があります。
PSTN 番号に電話をかけるときは、代替の発信者 ID を指定します。 代替の発信者 ID は、PSTN 通話の呼び出し元を識別する (E.164 標準に基づく) 電話番号です。 これは、着信通話の場合に通話受信者に表示される電話番号です。
Note
PSTN 通話オファリングの詳細を確認してください。 プレビュー プログラムにアクセスするには、早期導入者プログラムに申し込みます。
相手が PSTN 番号の場合の 1 対 1 の通話には、次のコードを使用します。
const pstnCallee = { phoneNumber: '<ACS_USER_ID>' }
const alternateCallerId = {phoneNumber: '<ALTERNATE_CALLER_ID>'};
const oneToOneCall = callAgent.startCall([pstnCallee], {alternateCallerId});
相手がユーザー 1 名と PSTN 番号の場合の 1 対 n 名の通話には、次のコードを使用します。
const userCallee = { communicationUserId: '<ACS_USER_ID>' }
const pstnCallee = { phoneNumber: '<PHONE_NUMBER>'};
const alternateCallerId = {phoneNumber: '<ALTERNATE_CALLER_ID>'};
const groupCall = callAgent.startCall([userCallee, pstnCallee], {alternateCallerId});
ルーム通話に参加する
room 呼び出しに参加するには、roomId プロパティを room 識別子として使用してコンテキスト オブジェクトをインスタンス化できます。 通話に参加するには、join メソッドを使用し、コンテキスト インスタンスを渡します。
const context = { roomId: '<RoomId>' }
const call = callAgent.join(context);
room を使用すると、アプリケーション開発者は、誰が通話に参加できるか、いつ会うか、そしてどのように共同作業を行うかをより制御しやすくなります。 rooms の詳細については、概念説明のドキュメントを参照するか、クイック スタート ガイドに従ってください。
グループ通話に参加する
Note
groupId パラメーターはシステム メタデータと見なされ、システムの実行に必要な操作のために Microsoft によって使用される場合があります。 groupId 値には個人データを含めないでください。 Microsoft ではこのパラメーターを個人データとして扱わず、そのコンテンツが Microsoft の従業員に表示されたり、長期間保管されたりすることがあります。
groupId パラメーターのデータは GUID 形式でなければなりません。 ご利用のシステム内で個人データと見なされない、ランダムに生成された GUID を使用することをお勧めします。
新しいグループ通話を始めるか、進行中のグループ通話に参加するには、join メソッドを使用して、groupId プロパティを含むオブジェクトを渡します。 groupId 値には GUID を指定する必要があります。
const context = { groupId: '<GUID>'};
const call = callAgent.join(context);
着信通話を受信する
ログインしている ID が着信通話を受信すると、callAgent インスタンスで incomingCall イベントが生成されます。 このイベントをリッスンするには、次のいずれかのオプションを使用してサブスクライブします。
const incomingCallHandler = async (args: { incomingCall: IncomingCall }) => {
    const incomingCall = args.incomingCall;

    // Get incoming call ID
    var incomingCallId = incomingCall.id

    // Get information about this Call. This API is provided as a preview for developers
    // and may change based on feedback that we receive. Do not use this API in a production environment.
    // To use this api please use 'beta' release of Azure Communication Services Calling Web SDK
    var callInfo = incomingCall.info;

    // Get information about caller
    var callerInfo = incomingCall.callerInfo

    // Accept the call
    var call = await incomingCall.accept();

    // Reject the call
    incomingCall.reject();

    // Subscribe to callEnded event and get the call end reason
     incomingCall.on('callEnded', args => {
        console.log(args.callEndReason);
    });

    // callEndReason is also a property of IncomingCall
    var callEndReason = incomingCall.callEndReason;
};
callAgentInstance.on('incomingCall', incomingCallHandler);
incomingCall イベントには、受け入れまたは拒否できる incomingCall インスタンスが含まれています。
Azure Communication Calling SDK は、ビデオを有効にして通話を開始、受け入れ、または参加するときにカメラが使用できない場合に、cameraStartFailed: true 呼び出し診断を発生させます。 この場合、通話はビデオがオフの状態で開始されます。 カメラが別のプロセスで使用されているか、オペレーティング システムで無効になっているため、使用できない可能性があります。
通話の保留と再開
Note
どの時点でも、アクティブな通話 (アクティブなメディアで Connected 状態) は 1 つだけである必要があります。 他のすべての通話は、ユーザーが保留にするか、アプリケーションによってプログラムで保留にする必要があります。 これが一般的であるのは、ユーザーが複数の発信通話と着信通話を処理する必要があり、すべての非アクティブな通話を保留にし、ユーザーがアクティブな通話でのみ他のユーザーと対話する必要がある、コンタクト センターなどのシナリオです。
通話を保留または再開するには、hold と resume の非同期 API を使用できます。
通話を保留にするには
await call.hold();
hold API が解決されると、呼び出し状態は LocalHold に設定されます。 1 対 1 の通話では、相手側の参加者も保留になり、その参加者の観点からの通話の状態は "RemoteHold" に設定されます。 その後、相手側の参加者が通話を保留にすると、状態は LocalHold に変わります。
グループ通話または会議では、hold はローカル操作であり、他の通話参加者の通話は保留になりません。
その通話を再開するには、保留を開始したすべてのユーザーが再開する必要があります。
保留から通話を再開するには:
await call.resume();
resume API が解決されると、通話状態は再び Connected に設定されます。
通話をミュートまたはミュート解除する
ローカル エンドポイントをミュートまたはミュート解除するには、非同期 API の mute と unmute を使用します。
//mute local device (microphone / sent audio)
await call.mute();

//unmute local device (microphone / sent audio)
await call.unmute();
着信オーディオのミュートとミュート解除
着信オーディオをミュートすると、通話ボリュームが 0 に設定されます。 着信オーディオをミュートまたはミュート解除するには、muteIncomingAudio と unmuteIncomingAudio 非同期 API を使用します。
//mute local device (speaker)
await call.muteIncomingAudio();

//unmute local device (speaker)
await call.unmuteIncomingAudio();
着信オーディオがミュートされている場合でも、参加者クライアント SDK は通話オーディオ (リモート参加者のオーディオ) を受け取ります。 通話オーディオはスピーカーでは聞こえず、参加者は "call.unmuteIncomingAudio()" が呼び出されるまで聞くことができません。 ただし、通話オーディオにフィルターを適用し、フィルター処理されたオーディオを再生できます。
他の参加者をミュートする
Note
この API は開発者向けにプレビューとして提供されており、寄せられたフィードバックにもとづいて変更される場合があります。 この API を使うには、Azure Communication Services Calling Web SDK バージョン 1.25.1 以降の、"ベータ" リリースをご使用ください。
他のすべての参加者をミュートしたり、特定の参加者をミュートしたりするには、通話に非同期 API muteAllRemoteParticipants を使用し、リモート参加者に次の mute を使用できます。 通話からの mutedByOthers イベントは、ローカル参加者が他のユーザーによってミュートされたときに発生します。
注: PSTN (電話番号) 参加者をミュートするシナリオはサポートされていません。
//mute all participants except yourself
await call.muteAllRemoteParticipants();

//mute a specific participant
await call.remoteParticipants[0].mute();
リモート参加者を管理する
リモート参加者は全員、RemoteParticipant オブジェクトで詳細が指定され、通話インスタンスの remoteParticipants コレクションを通じて利用できます。 remoteParticipants は Call インスタンスからアクセスできます。
通話の参加者を一覧表示する
remoteParticipants コレクションで、通話におけるリモート参加者の一覧が返されます。
call.remoteParticipants; // [remoteParticipant, remoteParticipant....]
通話に参加者を追加する
通話に参加者 (ユーザーまたは電話番号) を追加するには、addParticipant API を使用します。 Identifier の種類のいずれかを指定します。 remoteParticipant インスタンスを同期的に返します。 参加者が通話に正常に追加されると、通話から remoteParticipantsUpdated イベントが発生します。
const userIdentifier = { communicationUserId: '<ACS_USER_ID>' };
const pstnIdentifier = { phoneNumber: '<PHONE_NUMBER>' }
const remoteParticipant = call.addParticipant(userIdentifier);
const remoteParticipant = call.addParticipant(pstnIdentifier, {alternateCallerId: '<ALTERNATE_CALLER_ID>'});
通話から参加者を削除する
通話から参加者 (ユーザーまたは電話番号) を削除するには、removeParticipant を呼び出します。 Identifier の種類のいずれかを渡す必要があります。 このメソッドは、参加者が通話から削除されると、非同期的に終了します。 参加者は、remoteParticipants コレクションからも削除されます。
const userIdentifier = { communicationUserId: '<ACS_USER_ID>' };
const pstnIdentifier = { phoneNumber: '<PHONE_NUMBER>' }
await call.removeParticipant(userIdentifier);
await call.removeParticipant(pstnIdentifier);
リモート参加者のプロパティにアクセスする
リモート参加者には、一連のプロパティとコレクションが関連付けられています。
CommunicationIdentifier: リモート参加者の識別子を取得します。 ID はCommunicationIdentifierの種類の 1 つです。
const identifier = remoteParticipant.identifier;
これは、次の
CommunicationIdentifierの種類のいずれかになります。{ communicationUserId: '<ACS_USER_ID'> }: Azure Communication Services ユーザーを表すオブジェクト。{ phoneNumber: '<E.164>' }: E.164 形式で電話番号を表すオブジェクト。{ microsoftTeamsUserId: '<TEAMS_USER_ID>', isAnonymous?: boolean; cloud?: "public" | "dod" | "gcch" }: Tems ユーザーを表すオブジェクト。{ id: string }: 他の識別子の種類に適合しない識別子を表すオブジェクト
state: リモート参加者の状態を取得します。
const state = remoteParticipant.state;
次の状態があります。
Idle: 初期状態。Connecting: 参加者が通話に接続している間の遷移状態。Ringing: 参加者が発信しています。Connected: 参加者は通話に接続されています。Hold: 参加者は保留中です。EarlyMedia: 参加者が通話に接続する前に再生されるアナウンス。InLobby: リモート参加要素がロビーにあることを示します。Disconnected: 最終状態。 参加者は通話から切断されました。 リモート参加者がネットワーク接続を失うと、2 分後に状態はDisconnectedに変わります。
callEndReason: 参加者が通話を終了した理由を知るには、callEndReasonプロパティを調べます。const callEndReason = remoteParticipant.callEndReason; const callEndReasonCode = callEndReason.code // (number) code associated with the reason const callEndReasonSubCode = callEndReason.subCode // (number) subCode associated with the reason注:
- このプロパティは、たとえば、Call.addParticipant() API を使用してリモートの参加者を追加し、リモートの参加者が拒否した場合にのみ設定されます。
- UserB が UserC をキックするシナリオでは、UserA の視点からは、このフラグが UserC に対して設定されていることを認識できません。 言い換えると、UserA は UserC の callEndReason プロパティが設定されることをまったく認識できません。
isMuted状態: リモート参加者がミュートされているかどうかを確認するには、isMutedプロパティを調べます。Booleanを返します。const isMuted = remoteParticipant.isMuted;isSpeaking状態: リモート参加者が話しているかどうかを確認するには、isSpeakingプロパティを調べます。Booleanを返します。const isSpeaking = remoteParticipant.isSpeaking;videoStreams: 特定の参加者がこの通話で送信しているすべての動画ストリームを調べるには、videoStreamsコレクションを確認します。 これには、RemoteVideoStreamオブジェクトが含まれています。const videoStreams = remoteParticipant.videoStreams; // [RemoteVideoStream, ...]displayName: このリモート参加者の表示名を取得するには、文字列を返すdisplayNameプロパティを調べます。const displayName = remoteParticipant.displayName;endpointDetails: このリモート参加者に関するすべてのエンドポイントの詳細を取得しますconst endpointDetails: EndpointDetails[] = remoteParticipant.endpointDetails;注: リモート参加者は、多くのエンドポイントからの通話に参加する可能性があり、エンドポイントごとに独自で一意の
participantIdがあります。participantIdは RemoteParticipant.identifier の生 ID とは異なります。
通話のプロパティを確認する
通話の一意の ID (文字列) を取得します。
const callId: string = call.id;
ローカル参加者 ID を取得します。
const participantId: string = call.info.participantId;
注: Azure Communication Services ID は多くのエンドポイントで Web Calling SDK を使用でき、エンドポイントごとに独自で一意の participantId があります。 participantId は、Azure Communication Services ID の生 ID とは異なります。
Teams 会議に参加する場合は、スレッド ID を取得します。
const threadId: string | undefined = call.info.threadId;
通話に関する情報を取得する:
const callInfo = call.info;
通話の他の参加者について知るには、"call" インスタンスの remoteParticipants コレクションを調べます。
const remoteParticipants = call.remoteParticipants;
着信通話の発信者を特定します。
const callerIdentity = call.callerInfo.identifier;
identifier は CommunicationIdentifier の種類の 1 つです。
通話の状態を取得します。
const callState = call.state;
これにより、通話の現在の状態を表す文字列が返されます。
None: 通話の初期状態。Connecting: 通話が発信または受信されたときの初期遷移状態。Ringing: 発信通話の場合、リモート参加者に対して通話が発信されていることを示します。 参加者側では、これはIncomingです。EarlyMedia: 通話が接続される前に、アナウンスが再生されている状態を示します。Connected: 通話が接続されていることを示します。LocalHold: 通話がローカル参加者によって保留にされていることを示します。 ローカル エンドポイントとリモート参加者の間でメディアは送信されていません。RemoteHold: 通話がリモート参加者によって保留にされていることを示します。 ローカル エンドポイントとリモート参加者の間でメディアは送信されていません。InLobby: ユーザーがロビーにいることを示します。Disconnecting: 通話がDisconnected状態になる前の遷移状態。Disconnected: 通話の最終状態。 ネットワーク接続が失われると、2 分後に状態はDisconnectedになります。
通話が終了した理由を確認するには、callEndReason プロパティを調べます。
const callEndReason = call.callEndReason;
const callEndReasonCode = callEndReason.code // (number) code associated with the reason
const callEndReasonSubCode = callEndReason.subCode // (number) subCode associated with the reason
現在の通話が着信か、発信かを知るには、direction プロパティを調べます。 CallDirection を返します。
const isIncoming = call.direction == 'Incoming';
const isOutgoing = call.direction == 'Outgoing';
アクティブな動画ストリームとアクティブな画面共有ストリームを調べるには、localVideoStreams コレクションを確認します。 これにより、localVideoStreams API から Video、ScreenSharing、または RawMedia 型の LocalVideoStream オブジェクトが返されます。
const localVideoStreams = call.localVideoStreams;
現在マイクがミュートされているかどうかを調べます。 Boolean を返します。
const muted = call.isMuted;
現在の着信オーディオ (スピーカー) がミュートされているかどうかを確認します。 Boolean を返します。
const incomingAudioMuted = call.isIncomingAudioMuted;
動画がオンになっているかどうかを確認します。 Boolean を返します。
const isLocalVideoStarted = call.isLocalVideoStarted;
画面共有がオンになっているかどうかを確認します。 Boolean を返します。
const isScreenSharingOn = call.isScreenSharingOn;
SDK のインストール
プロジェクトレベルの build.gradle ファイルを見つけて、buildscript と allprojects の下にあるリポジトリの一覧に「mavenCentral()」を追加します。
buildscript {
    repositories {
    ...
        mavenCentral()
    ...
    }
}
allprojects {
    repositories {
    ...
        mavenCentral()
    ...
    }
}
次に、モジュール レベルの build.gradle ファイル内で、次の行を dependencies セクションに追加します。
dependencies {
    ...
    implementation 'com.azure.android:azure-communication-calling:1.0.0'
    ...
}
必要なオブジェクトを初期化する
CallAgent インスタンスを作成するには、CallClient インスタンス上で createCallAgent メソッドを呼び出す必要があります。 この呼び出しは、CallAgent インスタンス オブジェクトを非同期に返します。
createCallAgent メソッドは、アクセス トークンをカプセル化する CommunicationUserCredential を引数として受け取ります。
DeviceManager にアクセスするには、まず callAgent インスタンスを作成する必要があります。 それから、CallClient.getDeviceManager メソッドを使用して DeviceManager を取得することができます。
String userToken = '<user token>';
CallClient callClient = new CallClient();
CommunicationTokenCredential tokenCredential = new CommunicationTokenCredential(userToken);
android.content.Context appContext = this.getApplicationContext(); // From within an activity, for instance
CallAgent callAgent = callClient.createCallAgent(appContext, tokenCredential).get();
DeviceManager deviceManager = callClient.getDeviceManager(appContext).get();
呼び出し元の表示名を設定するには、この代替メソッドを使用します。
String userToken = '<user token>';
CallClient callClient = new CallClient();
CommunicationTokenCredential tokenCredential = new CommunicationTokenCredential(userToken);
android.content.Context appContext = this.getApplicationContext(); // From within an activity, for instance
CallAgentOptions callAgentOptions = new CallAgentOptions();
callAgentOptions.setDisplayName("Alice Bob");
DeviceManager deviceManager = callClient.getDeviceManager(appContext).get();
CallAgent callAgent = callClient.createCallAgent(appContext, tokenCredential, callAgentOptions).get();
通話を行う
通話を作成して開始するには、CallAgent.startCall() メソッドを呼び出して、通話先の Identifier を指定する必要があります。
グループ通話に参加するには、CallAgent.join() メソッドを呼び出して、groupId を指定する必要があります。 グループ ID は、GUID または UUID 形式にする必要があります。
通話の作成と開始は同期的に行われます。 通話インスタンスを使用すると、通話のすべてのイベントをサブスクライブできます。
ユーザーと 1:1 の通話を行う
別の Communication Services ユーザーと通話するには、callAgent で call メソッドを呼び出し、communicationUserId キーを使用してオブジェクトを渡します。
StartCallOptions startCallOptions = new StartCallOptions();
Context appContext = this.getApplicationContext();
CommunicationUserIdentifier acsUserId = new CommunicationUserIdentifier(<USER_ID>);
CommunicationUserIdentifier participants[] = new CommunicationUserIdentifier[]{ acsUserId };
call oneToOneCall = callAgent.startCall(appContext, participants, startCallOptions);
ユーザーおよび PSTN と 1:n の通話を行う
Note
PSTN 通話オファリングの詳細を確認してください。 プレビュー プログラムにアクセスするには、早期導入者プログラムに申し込みます。
ユーザーおよび PSTN 番号との 1:n の通話を行うには、通話先の電話番号を指定する必要があります。 PSTN 通話を許可するように Communication Services リソースを構成する必要があります。
CommunicationUserIdentifier acsUser1 = new CommunicationUserIdentifier(<USER_ID>);
PhoneNumberIdentifier acsUser2 = new PhoneNumberIdentifier("<PHONE_NUMBER>");
CommunicationIdentifier participants[] = new CommunicationIdentifier[]{ acsUser1, acsUser2 };
StartCallOptions startCallOptions = new StartCallOptions();
Context appContext = this.getApplicationContext();
Call groupCall = callAgent.startCall(participants, startCallOptions);
通話を受信する
着信を受け入れるには、呼び出しオブジェクトに対して "accept" メソッドを呼び出します。
Context appContext = this.getApplicationContext();
IncomingCall incomingCall = retrieveIncomingCall();
Call call = incomingCall.accept(context).get();
ビデオ カメラを使用して着信を受け入れるには:
Context appContext = this.getApplicationContext();
IncomingCall incomingCall = retrieveIncomingCall();
AcceptCallOptions acceptCallOptions = new AcceptCallOptions();
VideoDeviceInfo desiredCamera = callClient.getDeviceManager().get().getCameraList().get(0);
acceptCallOptions.setVideoOptions(new VideoOptions(new LocalVideoStream(desiredCamera, appContext)));
Call call = incomingCall.accept(context, acceptCallOptions).get();
着信は、callAgent オブジェクトの onIncomingCall イベントをサブスクライブすることによって取得できます。
// Assuming "callAgent" is an instance property obtained by calling the 'createCallAgent' method on CallClient instance
public Call retrieveIncomingCall() {
    IncomingCall incomingCall;
    callAgent.addOnIncomingCallListener(new IncomingCallListener() {
        void onIncomingCall(IncomingCall inboundCall) {
            // Look for incoming call
            incomingCall = inboundCall;
        }
    });
    return incomingCall;
}
ルーム通話に参加する
CallAgent と RoomCallLocator を使用し、roomId を指定してルーム呼び出しに参加します。 CallAgent.join メソッドは、Call オブジェクトを返します。
val roomCallLocator = RoomCallLocator(roomId)
call = callAgent.join(applicationContext, roomCallLocator, joinCallOptions)
room を使用すると、アプリケーション開発者は、誰が通話に参加できるか、いつ会うか、そしてどのように共同作業を行うかをより制御しやすくなります。 rooms の詳細については、概念説明のドキュメントを参照するか、クイック スタート ガイドに従ってください。
グループ通話に参加する
新しいグループ通話を始めるか、進行中のグループ通話に参加するには、"join" メソッドを呼び出して、groupId プロパティを含むオブジェクトを渡す必要があります。 値には GUID を指定する必要があります。
Context appContext = this.getApplicationContext();
GroupCallLocator groupCallLocator = new GroupCallLocator("<GUID>");
JoinCallOptions joinCallOptions = new JoinCallOptions();

call = callAgent.join(context, groupCallLocator, joinCallOptions);
通話のプロパティ
この通話の一意の ID を取得します。
String callId = call.getId();
通話の他の参加者について知るには、call インスタンスの remoteParticipant コレクションを調べます。
List<RemoteParticipant> remoteParticipants = call.getRemoteParticipants();
通話が着信の場合の呼び出し元の ID です。
CommunicationIdentifier callerId = call.getCallerInfo().getIdentifier();
通話の状態を取得します。
CallState callState = call.getState();
これにより、通話の現在の状態を表す文字列が返されます。
- "NONE" - 通話の初期状態です
- "EARLY_MEDIA" - 通話が接続される前の、アナウンスの再生状態を示します
- "CONNECTING" - 通話が発信または受諾された後の初期遷移状態です
- "RINGING" - 発信通話の場合 - リモート参加者に対して通話が発信されています
- "CONNECTED" - 通話は接続されています
- "LOCAL_HOLD" - 通話はローカル参加者によって保留にされており、ローカル エンドポイントとリモート参加者の間でメディアは送信されていません
- "REMOTE_HOLD" - 通話はリモート参加者によって保留にされており、ローカル エンドポイントとリモート参加者の間でメディアは送信されていません
- "DISCONNECTING" - 通話は、"Disconnected" 状態になる前の移行状態です
- "DISCONNECTED" - 通話の最終状態です
- "IN_LOBBY" - Teams の会議の相互運用性のためにロビーにいます
通話が終了した理由を確認するには、callEndReason プロパティを調べます。 これには、コードとサブコードが含まれます。
CallEndReason callEndReason = call.getCallEndReason();
int code = callEndReason.getCode();
int subCode = callEndReason.getSubCode();
現在の通話が着信通話と発信通話のどちらであるかを確認するには、callDirection プロパティを調べます。
CallDirection callDirection = call.getCallDirection();
// callDirection == CallDirection.INCOMING for incoming call
// callDirection == CallDirection.OUTGOING for outgoing call
現在マイクがミュートされているかどうかを確認するには、muted プロパティを調べます。
boolean muted = call.isMuted();
アクティブな動画ストリームを調べるには、localVideoStreams コレクションを確認します。
List<LocalVideoStream> localVideoStreams = call.getLocalVideoStreams();
ミュートとミュート解除
ローカル エンドポイントをミュートまたはミュート解除するには、非同期 API の mute と unmute を使用できます。
Context appContext = this.getApplicationContext();
call.mute(appContext).get();
call.unmute(appContext).get();
他の参加者をミュートする
Note
この API は開発者向けにパブリック プレビューとして提供されており、寄せられたフィードバックを基にして変更される場合があります。 この API を使うには、Azure Communication Services Calling Android SDK バージョン 2.6.0-beta.8 以降の "ベータ" リリースをお使いください。
通話の他の参加者をすべてミュートするには、通話で muteAllRemoteParticipants API を使います。
call.muteAllRemoteParticipants();
特定のリモート参加者をミュートするには、特定のリモート参加者に対して mute API を使います。
remoteParticipant.mute();
他のユーザーによってミュートされたことをローカル参加者に通知するには、onMutedByOthers イベントを登録します。
通話の音量を変更する
通話中は、ユーザーが電話のハードウェア音量キーを使用して通話ボリュームを変更できるようにする必要があります。
これを行うには、通話が行われるアクティビティで setVolumeControlStream メソッドをストリーム型 AudioManager.STREAM_VOICE_CALL と共に使用します。
この場合、ハードウェアの音量キー (音量スライダーに表示される電話アイコンまたは類似のもの) を使用して通話の音量を変更できますが、アラーム、メディア、システム全体の音量などの他のサウンド プロファイルの音量は変更されません。 詳細については、「音声出力の変更の処理 | Android 開発者」を確認してください。
@Override
protected void onCreate(Bundle savedInstanceState) {
    ...
    setVolumeControlStream(AudioManager.STREAM_VOICE_CALL);
}
リモート参加者の管理
すべてのリモート参加者は RemoteParticipant 型で表され、通話インスタンスの remoteParticipants コレクションを通して使用できます。
通話の参加者の一覧を取得する
remoteParticipants コレクションで、特定の通話におけるリモート参加者の一覧が返されます。
List<RemoteParticipant> remoteParticipants = call.getRemoteParticipants(); // [remoteParticipant, remoteParticipant....]
通話に参加者を追加する
通話に参加者を追加するには (ユーザーまたは電話番号のいずれか)、addParticipant を呼び出します。
これにより、リモート参加者インスタンスが同期的に返されます。
const acsUser = new CommunicationUserIdentifier("<acs user id>");
const acsPhone = new PhoneNumberIdentifier("<phone number>");
RemoteParticipant remoteParticipant1 = call.addParticipant(acsUser);
AddPhoneNumberOptions addPhoneNumberOptions = new AddPhoneNumberOptions(new PhoneNumberIdentifier("<alternate phone number>"));
RemoteParticipant remoteParticipant2 = call.addParticipant(acsPhone, addPhoneNumberOptions);
通話から参加者を削除する
通話から参加者を削除するには (ユーザーまたは電話番号のいずれか)、removeParticipant を呼び出します。
参加者が通話から削除されると、非同期的に解決されます。
参加者は、remoteParticipants コレクションからも削除されます。
RemoteParticipant acsUserRemoteParticipant = call.getParticipants().get(0);
RemoteParticipant acsPhoneRemoteParticipant = call.getParticipants().get(1);
call.removeParticipant(acsUserRemoteParticipant).get();
call.removeParticipant(acsPhoneRemoteParticipant).get();
リモート参加者のプロパティ
特定のリモート参加者には、プロパティのセットとコレクションが関連付けられています。
このリモート参加者の識別子を取得します。 ID は "Identifier" 型の 1 つです。
CommunicationIdentifier participantIdentifier = remoteParticipant.getIdentifier();このリモート参加者の状態を取得します。
ParticipantState state = remoteParticipant.getState();
状態は次のいずれかです
"IDLE" - 初期状態です
"EARLY_MEDIA" - 参加者が通話に接続される前に、アナウンスが再生されています
'RINGING' - 参加者の通話が発信されています
"CONNECTING" - 参加者が通話に接続している間の遷移状態です
"CONNECTED" - 参加者は通話に接続されています
"HOLD" - 参加者は保留中です
'IN_LOBBY' - 参加者がロビーで許可されるのを待機しています。 現在、Teams の相互運用シナリオでのみ使用されています
"DISCONNECTED" - 最終状態 - 参加者は通話から切断されました
参加者が通話を終了した理由を確認するには、
callEndReasonプロパティを調べます。CallEndReason callEndReason = remoteParticipant.getCallEndReason();このリモート参加者がミュートされているかどうかを確認するには、
isMutedプロパティを調べます。boolean isParticipantMuted = remoteParticipant.isMuted();このリモート参加者が話しているかどうかを確認するには、
isSpeakingプロパティを調べます。boolean isParticipantSpeaking = remoteParticipant.isSpeaking();特定の参加者がこの通話で送信しているすべての動画ストリームを調べるには、
videoStreamsコレクションを確認します。List<RemoteVideoStream> videoStreams = remoteParticipant.getVideoStreams(); // [RemoteVideoStream, RemoteVideoStream, ...]
フォアグラウンド サービスの使用
アプリケーションがバックグラウンドで動作しているときでも、ユーザーに表示されるタスクを実行する場合は、フォアグラウンド サービスを使用できます。
フォアグラウンド サービスを使用すると、たとえば、アプリケーションにアクティブな通話があるときに、ユーザーに通知を表示したままにすることができます。 これにより、ユーザーがホーム画面に移動した場合や、最近の画面からアプリケーションを削除した場合でも、通話は引き続きアクティブになります。
通話中にフォアグラウンド サービスを使用しない場合、ホーム画面に移動しても通話は継続されますが、アプリケーションを最近の画面から削除すると、Android OS によってアプリケーションのプロセスを強制終了された場合に通話が停止する可能性があります。
たとえば、通話の開始時または参加時にフォアグラウンド サービスを開始することをお勧めします。
call = callAgent.startCall(context, participants, options);
startService(yourForegroundServiceIntent);
また、通話を切断したときや、通話の状態が切断済みの場合にフォアグラウンド サービスを停止します。
call.hangUp(new HangUpOptions()).get();
stopService(yourForegroundServiceIntent);
フォアグラウンド サービスの使用に関する注意事項
アプリが最近の一覧から削除されたときに、既に実行されているフォアグラウンド サービスを停止するようなシナリオの場合、ユーザーに表示される通知が削除されても、Android OS によってアプリケーションのプロセスが一定期間維持される可能性があることに注意してください。つまり、この期間中も通話はアクティブな可能性があります。
たとえば、service onTaskRemoved メソッドでアプリケーションによってフォアグラウンド サービスが停止されている場合、アクティビティのライフサイクルに従って音声とビデオが開始または停止される可能性があります (onDestroy メソッドのオーバーライドでアクティビティが破棄されたときに音声とビデオが停止されるなど)。
システムを設定する
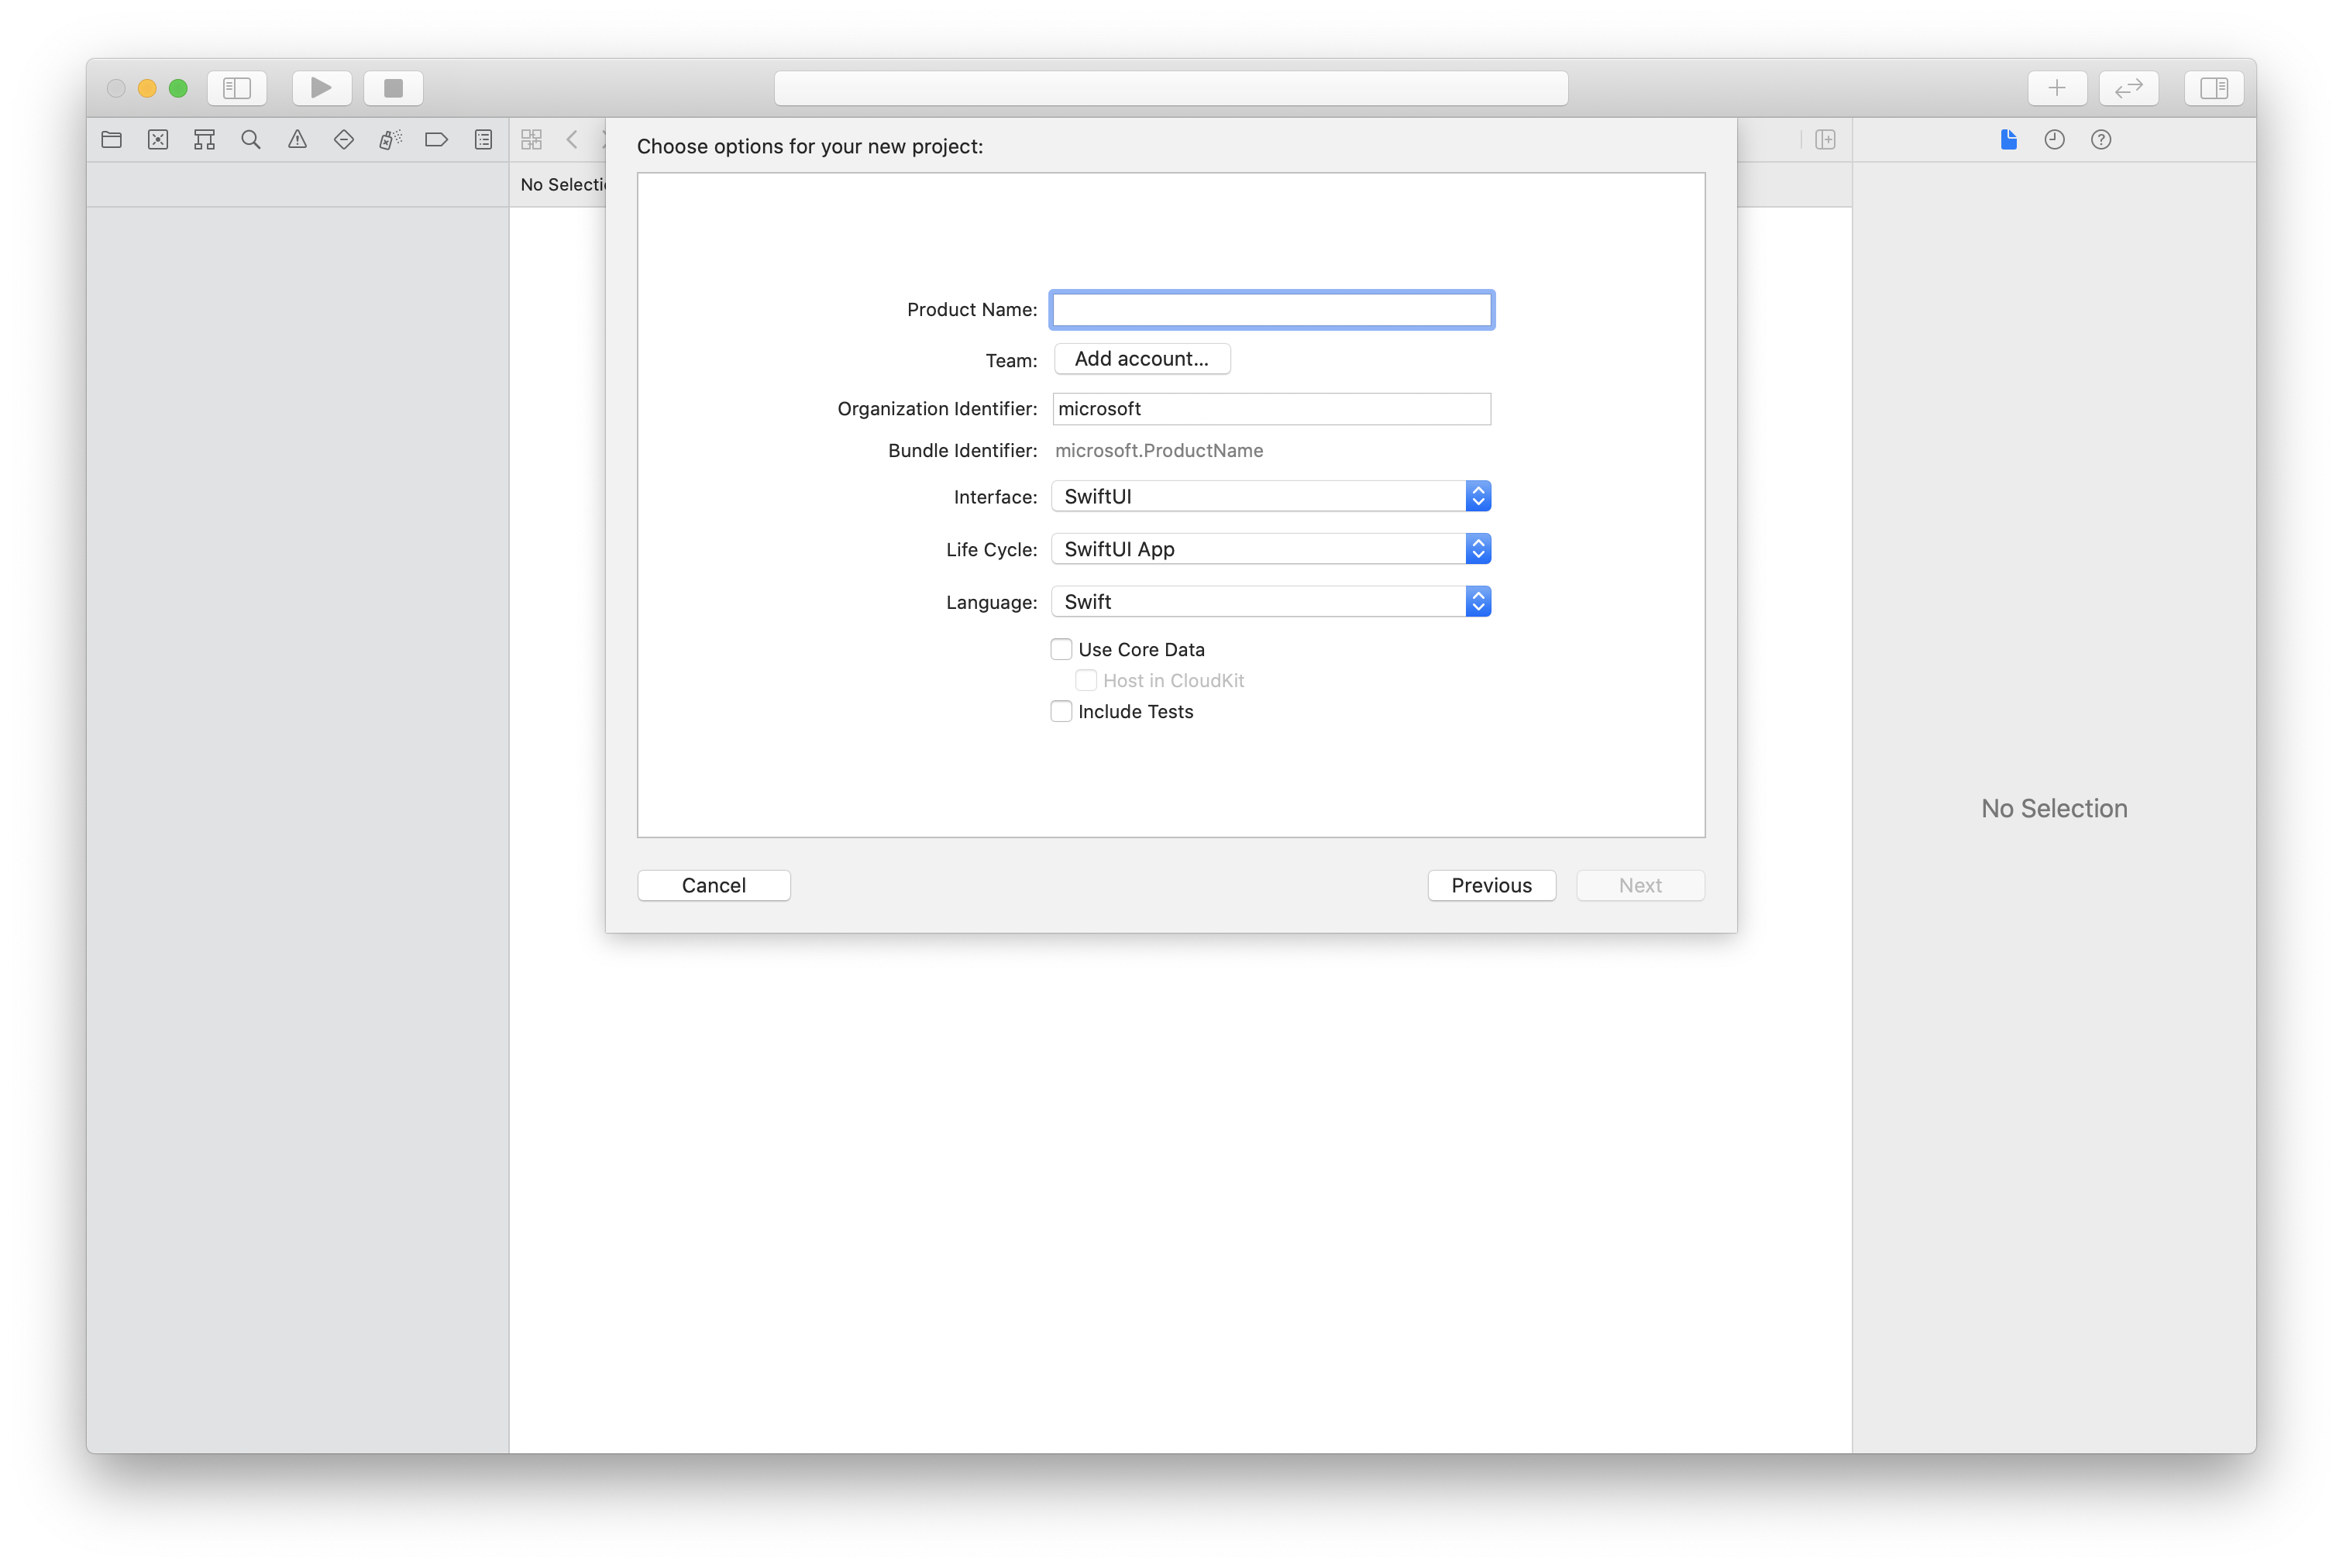
Xcode プロジェクトを作成する
Xcode で、新しい iOS プロジェクトを作成し、[単一ビュー アプリ] テンプレートを選択します。 このクイックスタートでは SwiftUI フレームワークを使用します。そのため、[Language] を Swift に、[Interface] を SwiftUI に設定する必要があります。
このクイックスタートでは、テストは作成しません。 [Include Tests] チェック ボックスはオフにしてもかまいません。
CocoaPods を使用してパッケージと依存関係をインストールする
この例のように、アプリケーション用の Podfile を作成します。
platform :ios, '13.0'
use_frameworks!
target 'AzureCommunicationCallingSample' do
    pod 'AzureCommunicationCalling', '~> 1.0.0'
end
pod installを実行します。Xcode を使用して
.xcworkspaceを開きます。
マイクへのアクセスを要求する
デバイスのマイクにアクセスするには、NSMicrophoneUsageDescription を使用してアプリの情報プロパティ一覧を更新する必要があります。 関連付けられた値を文字列に設定します。これは、システムがユーザーにアクセスを要求するために使用するダイアログ内に含まれます。
プロジェクト ツリーの [Info.plist] エントリを右クリックし、[Open As]>[Source Code] を選択します。 最上位の <dict> セクションに以下の行を追加してから、ファイルを保存します。
<key>NSMicrophoneUsageDescription</key>
<string>Need microphone access for VOIP calling.</string>
アプリのフレームワークを設定する
プロジェクトの ContentView.swift ファイルを開きます。 ファイルの先頭に import 宣言を追加して、AzureCommunicationCalling ライブラリをインポートします。 さらに、AVFoundation をインポートします。 これは、コード内のオーディオ アクセス許可要求に必要になります。
import AzureCommunicationCalling
import AVFoundation
CallAgent を初期化する
CallClient から CallAgent インスタンスを作成するには、初期化された後に CallAgent オブジェクトを非同期に返す callClient.createCallAgent メソッドを使用する必要があります。
通話クライアントを作成するには、CommunicationTokenCredential オブジェクトを渡します。
import AzureCommunication

let tokenString = "token_string"
var userCredential: CommunicationTokenCredential?
do {
    let options = CommunicationTokenRefreshOptions(initialToken: token, refreshProactively: true, tokenRefresher: self.fetchTokenSync)
    userCredential = try CommunicationTokenCredential(withOptions: options)
} catch {
    updates("Couldn't created Credential object", false)
    initializationDispatchGroup!.leave()
    return
}

// tokenProvider needs to be implemented by Contoso, which fetches a new token
public func fetchTokenSync(then onCompletion: TokenRefreshOnCompletion) {
    let newToken = self.tokenProvider!.fetchNewToken()
    onCompletion(newToken, nil)
}
作成した CommunicationTokenCredential オブジェクトを CallClient に渡し、表示名を設定します。
self.callClient = CallClient()
let callAgentOptions = CallAgentOptions()
options.displayName = " iOS Azure Communication Services User"

self.callClient!.createCallAgent(userCredential: userCredential!,
    options: callAgentOptions) { (callAgent, error) in
        if error == nil {
            print("Create agent succeeded")
            self.callAgent = callAgent
        } else {
            print("Create agent failed")
        }
})
Note
アプリケーションでは、イベント デリゲートを実装する際に、イベント サブスクリプションを必要とするオブジェクトへの強い参照を保持する必要があります。 たとえば、call.addParticipant メソッドの呼び出し時に RemoteParticipant オブジェクトが返され、アプリケーションによって RemoteParticipantDelegate でリッスンするようにデリゲートが設定された場合には、そのアプリケーションによって RemoteParticipant オブジェクトへの強い参照が保持される必要があります。 それ以外の場合に、このオブジェクトが収集されると、Calling SDK によってオブジェクトの呼び出しが試行されるときに、デリゲートによって致命的な例外がスローされます。
発信通話を行う
通話を作成して開始するには、CallAgent でいずれかの API を呼び出し、Communication Services 管理クライアント SDK を使用してプロビジョニングしたユーザーの Communication Services ID を指定する必要があります。
通話の作成と開始は同期的に行われます。 通話のすべてのイベントにサブスクライブできる通話インスタンスを受信します。
ユーザーに対する 1:1 の通話、またはユーザーおよび PSTN と 1:n の通話を行う
let callees = [CommunicationUser(identifier: 'UserId')]
self.callAgent?.startCall(participants: callees, options: StartCallOptions()) { (call, error) in
     if error == nil {
         print("Successfully started outgoing call")
         self.call = call
     } else {
         print("Failed to start outgoing call")
     }
}
ユーザーおよび PSTN と 1:n の通話を行う
Note
PSTN 通話オファリングの詳細を確認してください。 プレビュー プログラムにアクセスするには、早期導入者プログラムに申し込みます。
PSTN への通話を行うには、Communication Services で取得した電話番号を指定する必要があります。
let pstnCallee = PhoneNumberIdentifier(phoneNumber: '+1999999999')
let callee = CommunicationUserIdentifier('UserId')
self.callAgent?.startCall(participants: [pstnCallee, callee], options: StartCallOptions()) { (groupCall, error) in
     if error == nil {
         print("Successfully started outgoing call to multiple participants")
         self.call = groupCall
     } else {
         print("Failed to start outgoing call to multiple participants")
     }
}
ルーム通話に参加する
room 呼び出しに参加するには、roomId プロパティを room 識別子として指定します。 通話に参加するには、join メソッドを使用し、roomCallLocator を渡します。
func joinRoomCall() {
    if self.callAgent == nil {
        print("CallAgent not initialized")
        return
    }

    if (self.roomId.isEmpty) {
        print("Room ID not set")
        return
    }

    // Join a call with a Room ID
    let options = JoinCallOptions()
    let audioOptions = AudioOptions()
    audioOptions.muted = self.muted

    options.audioOptions = audioOptions

    let roomCallLocator = RoomCallLocator(roomId: roomId)
    self.callAgent!.join(with: roomCallLocator, joinCallOptions: options) { (call, error) in
        self.setCallAndObserver(call: call, error: error)
    }
}
room を使用すると、アプリケーション開発者は、誰が通話に参加できるか、いつ会うか、そしてどのように共同作業を行うかをより制御しやすくなります。 rooms の詳細については、概念説明のドキュメントを参照するか、クイック スタート ガイドに従ってください。
グループ通話に参加する
通話に参加するには、CallAgent でいずれかの API を呼び出す必要があります。
let groupCallLocator = GroupCallLocator(groupId: UUID(uuidString: "uuid_string")!)
self.callAgent?.join(with: groupCallLocator, joinCallOptions: JoinCallOptions()) { (call, error) in
    if error == nil {
        print("Successfully joined group call")
        self.call = call
    } else {
        print("Failed to join group call")
    }
}
着信通話をサブスクライブする
着信通話イベントをサブスクライブします。
final class IncomingCallHandler: NSObject, CallAgentDelegate, IncomingCallDelegate
{
    // Event raised when there is an incoming call
    public func callAgent(_ callAgent: CallAgent, didReceiveIncomingCall incomingcall: IncomingCall) {
        self.incomingCall = incomingcall
        // Subscribe to get OnCallEnded event
        self.incomingCall?.delegate = self
    }

    // Event raised when incoming call was not answered
    public func incomingCall(_ incomingCall: IncomingCall, didEnd args: PropertyChangedEventArgs) {
        print("Incoming call was not answered")
        self.incomingCall = nil
    }
}
電話の着信を受け入れる
通話を受け入れるには、IncomingCall オブジェクトに対して accept メソッドを呼び出します。
self.incomingCall!.accept(options: AcceptCallOptions()) { (call, error) in
   if (error == nil) {
       print("Successfully accepted incoming call")
       self.call = call
   } else {
       print("Failed to accept incoming call")
   }
}

let firstCamera: VideoDeviceInfo? = self.deviceManager!.cameras.first
localVideoStreams = [LocalVideoStream]()
localVideoStreams!.append(LocalVideoStream(camera: firstCamera!))
let acceptCallOptions = AcceptCallOptions()
acceptCallOptions.videoOptions = VideoOptions(localVideoStreams: localVideoStreams!)
if let incomingCall = self.incomingCall {
    incomingCall.accept(options: acceptCallOptions) { (call, error) in
        if error == nil {
            print("Incoming call accepted")
        } else {
            print("Failed to accept incoming call")
        }
    }
} else {
  print("No incoming call found to accept")
}
通話中の操作を実行する
通話の間にさまざまな操作を実行し、動画やオーディオに関連する設定を管理できます。
ミュートとミュート解除
ローカル エンドポイントのミュートまたはその解除を行う場合は、非同期 API の mute と unmute を使用できます。
call!.mute { (error) in
    if error == nil {
        print("Successfully muted")
    } else {
        print("Failed to mute")
    }
}
ローカル エンドポイントのミュートを非同期に解除するには、次のコードを使用します。
call!.unmute { (error) in
    if error == nil {
        print("Successfully un-muted")
    } else {
        print("Failed to unmute")
    }
}
他の参加者をミュートする
Note
この API は開発者向けにパブリック プレビューとして提供されており、寄せられたフィードバックを基にして変更される場合があります。 この API を使うには、Azure Communication Services Calling iOS SDK バージョン 2.9.0-beta.1 以降の "ベータ" リリースをお使いください。
通話の他の参加者をすべてミュートするには、通話で muteAllRemoteParticipants API を使います。
call!.muteAllRemoteParticipants { (error) in
    if error == nil {
        print("Successfully muted all remote participants.")
    } else {
        print("Failed to mute remote participants.")
    }
}
特定のリモート参加者をミュートするには、特定のリモート参加者に対して mute API を使います。
remoteParticipant.mute { (error) in
    if error == nil {
        print("Successfully muted participant.")
    } else {
        print("Failed to mute participant.")
    }
}
他のユーザーによってミュートされたことをローカル参加者に通知するには、onMutedByOthers イベントを登録します。
リモート参加者を管理する
すべてのリモート参加者は RemoteParticipant 型で表され、通話インスタンスの remoteParticipants コレクションを通して使用できます。
通話の参加者の一覧を取得する
call.remoteParticipants
通話に参加者を追加する
通話に参加者 (ユーザーまたは電話番号のいずれか) を追加する場合は、addParticipant を呼び出すことができます。 このコマンドにより、リモート参加者インスタンスが同期的に返されます。
let remoteParticipantAdded: RemoteParticipant = call.add(participant: CommunicationUserIdentifier(identifier: "userId"))
通話から参加者を削除する
通話から参加者 (ユーザーまたは電話番号のいずれか) を削除する場合は、removeParticipant API を呼び出すことができます。 これは、非同期に解決されます。
call!.remove(participant: remoteParticipantAdded) { (error) in
    if (error == nil) {
        print("Successfully removed participant")
    } else {
        print("Failed to remove participant")
    }
}
リモート参加者のプロパティを取得する
// [RemoteParticipantDelegate] delegate - an object you provide to receive events from this RemoteParticipant instance
var remoteParticipantDelegate = remoteParticipant.delegate

// [CommunicationIdentifier] identity - same as the one used to provision a token for another user
var identity = remoteParticipant.identifier

// ParticipantStateIdle = 0, ParticipantStateEarlyMedia = 1, ParticipantStateConnecting = 2, ParticipantStateConnected = 3, ParticipantStateOnHold = 4, ParticipantStateInLobby = 5, ParticipantStateDisconnected = 6
var state = remoteParticipant.state

// [Error] callEndReason - reason why participant left the call, contains code/subcode/message
var callEndReason = remoteParticipant.callEndReason

// [Bool] isMuted - indicating if participant is muted
var isMuted = remoteParticipant.isMuted

// [Bool] isSpeaking - indicating if participant is currently speaking
var isSpeaking = remoteParticipant.isSpeaking

// RemoteVideoStream[] - collection of video streams this participants has
var videoStreams = remoteParticipant.videoStreams // [RemoteVideoStream, RemoteVideoStream, ...]
システムを設定する
Visual Studio プロジェクトの作成
UWP アプリの場合、Visual Studio 2022 で、新しい空のアプリ (ユニバーサル Windows) プロジェクトを作成します。 プロジェクト名を入力した後、10.0.17763.0 より後の Windows SDK を自由に選択できます。
WinUI 3 アプリの場合、Blank App, Packaged (WinUI 3 in Desktop) テンプレートで新しいプロジェクトを作成し、シングルページの WinUI 3 アプリを設定します。 Windows App SDK バージョン 1.3 以降が必要です。
NuGet パッケージ マネージャーを使用してパッケージと依存関係をインストールする
Calling SDK の API とライブラリは、NuGet パッケージにより一般公開されています。
次の手順では、Calling SDK NuGet パッケージを検索、ダウンロード、インストールする方法の例を示します。
- [ツール]>[NuGet パッケージ マネージャー]>[ソリューションの NuGet パッケージの管理] を選んで、NuGet パッケージ マネージャーを開きます。
- [参照] を選び、検索ボックスに「
Azure.Communication.Calling.WindowsClient」と入力します。 - [プレリリースを含める] チェック ボックスがオンになっていることを確認します。
Azure.Communication.Calling.WindowsClientパッケージを選んでから、Azure.Communication.Calling.WindowsClient1.4.0-beta.1 以降のバージョンを選びます。- 右側のタブで、Communication Services プロジェクトに対応するチェック ボックスをオンにします。
- [インストール] ボタンを選択します。
マイクへのアクセスを要求する
アプリを正常に実行するには、マイクへのアクセスが必要です。 UWP アプリでは、マイク機能をアプリ マニフェスト ファイルで宣言する必要があります。
それを行うための手順を次に示します。
Solution Explorerパネルで、.appxmanifest拡張子が付いたファイルをダブルクリックします。- [
Capabilities] タブをクリックします。 - 機能の一覧から [
Microphone] チェック ボックスをオンにします。
通話の発信と終了を行うための UI ボタンを作成する
この単純なサンプル アプリには、2 つのボタンが含まれます。 1 つは呼び出しを行い、もう 1 つは通話を終了します。 次の手順では、これらのボタンをアプリに追加する方法を示します。
Solution Explorerパネルで、UWP の場合はMainPage.xaml、WinUI 3 の場合はMainWindows.xamlという名前のファイルをダブルクリックします。- 中央のパネルで、UI プレビューの下にある XAML コードを探します。
- XAML コードを次の抜粋で変更します。
<TextBox x:Name="CalleeTextBox" PlaceholderText="Who would you like to call?" />
<StackPanel>
    <Button x:Name="CallButton" Content="Start/Join call" Click="CallButton_Click" />
    <Button x:Name="HangupButton" Content="Hang up" Click="HangupButton_Click" />
</StackPanel>
Calling SDK API を使用したアプリの設定
Calling SDK API は、2 つの異なる名前空間に含まれています。 次の手順では、これらの名前空間について C# コンパイラに通知し、Visual Studio の Intellisense がコード開発を支援できるようにします。
Solution Explorerパネルで、UWP の場合はMainPage.xaml、WinUI 3 の場合はMainWindows.xamlという名前のファイルの左側にある矢印をクリックします。MainPage.xaml.csまたはMainWindows.xaml.csという名前のファイルをダブルクリックします。- 現在の
usingステートメントの下部に次のコマンドを追加します。
using Azure.Communication.Calling.WindowsClient;
MainPage.xaml.cs または MainWindows.xaml.cs は開いたままにします。 次の手順で、さらにコードを追加します。
アプリの対話を許可する
以前に追加した UI ボタンは、発信された CommunicationCall の上で操作する必要があります。 つまり、CommunicationCall データ メンバーを MainPage または MainWindow クラスに追加する必要があります。
さらに、非同期操作の CallAgent 作成を成功させるには、CallAgent データ メンバーも同じクラスに追加する必要があります。
MainPage または MainWindow クラスに次のデータ メンバーを追加します。
CallAgent callAgent;
CommunicationCall call;
ボタン ハンドラーを作成する
前に、2 つの UI ボタンが XAML コードに追加されました。 次のコードでは、ユーザーがボタンを選択すると実行されるハンドラーを追加します。 次のコードは、前のセクションのデータ メンバーの後に追加する必要があります。
private async void CallButton_Click(object sender, RoutedEventArgs e)
{
    // Start call
}

private async void HangupButton_Click(object sender, RoutedEventArgs e)
{
    // End the current call
}
オブジェクト モデル
UWP 用の Azure Communication Services Calling クライアント ライブラリが備える主な機能のいくつかは、以下のクラスとインターフェイスにより処理されます。
| 名前 | 説明 |
|---|---|
CallClient |
CallClient は、通話クライアント ライブラリへのメイン エントリ ポイントです。 |
CallAgent |
CallAgent は、通話を開始して参加するために使用します。 |
CommunicationCall |
CommunicationCall は、開始した、または参加した通話の管理に使用されます。 |
CommunicationTokenCredential |
CommunicationTokenCredential は、CallAgent をインスタンス化するためのトークン資格情報として使用されます。 |
CallAgentOptions |
CallAgentOptions には、呼び出し元を識別するための情報が含まれています。 |
HangupOptions |
HangupOptions は、呼び出しを終了する必要があるかどうかをすべての参加者に対して通知します。 |
CallAgent を初期化する
CallClient から CallAgent インスタンスを作成するには、初期化されると CallAgent オブジェクトを非同期に返す CallClient.CreateCallAgentAsync メソッドを使用する必要があります。
CallAgent を作成するには、CallTokenCredential オブジェクトと CallAgentOptions オブジェクトを渡す必要があります。 形式に誤りがあるトークンが渡されると CallTokenCredential がスローされることに注意してください。
次のコードを内部に追加し、アプリの初期化でヘルパー関数を呼び出す必要があります。
var callClient = new CallClient();
this.deviceManager = await callClient.GetDeviceManagerAsync();

var tokenCredential = new CallTokenCredential("<AUTHENTICATION_TOKEN>");
var callAgentOptions = new CallAgentOptions()
{
    DisplayName = "<DISPLAY_NAME>"
};

this.callAgent = await callClient.CreateCallAgentAsync(tokenCredential, callAgentOptions);
リソース用の有効な資格情報トークンで <AUTHENTICATION_TOKEN> を変更します。 資格情報トークンを入手する必要がある場合は、ユーザー アクセス トークンのドキュメントを参照してください。
CallAgent を作成して通話を行う
CallAgent を作成するために必要なオブジェクトの準備ができました。 次に、CallAgent を非同期的に作成して通話を行います。
前の手順の例外を処理した後に、次のコードを追加する必要があります。
var startCallOptions = new StartCallOptions();
var callees = new [] { new UserCallIdentifier(CalleeTextBox.Text.Trim()) };

this.call = await this.callAgent.StartCallAsync(callees, startCallOptions);
this.call.OnStateChanged += Call_OnStateChangedAsync;
8:echo123 を使用して Azure Communication Services エコー ボットとご自由にお話しください。
ミュートとミュート解除
発信オーディオをミュートまたはミュート解除するには、MuteOutgoingAudioAsync と UnmuteOutgoingAudioAsync 非同期 API を使います。
// mute outgoing audio
await this.call.MuteOutgoingAudioAsync();

// unmute outgoing audio
await this.call.UnmuteOutgoingAudioAsync();
他の参加者をミュートする
Note
この API は開発者向けにパブリック プレビューとして提供されており、寄せられたフィードバックを基にして変更される場合があります。 この API を使うには、Azure Communication Services Calling Windows SDK バージョン 1.6.0-beta.1 以降の "ベータ" リリースをお使いください。
他のすべての参加者をミュートしたり、特定の参加者をミュートしたりするには、呼び出しに非同期 API MuteAllRemoteParticipantsAsync を使用し、リモート参加者に次の MuteAsync を使用できます。
// mute all participants except yourself
await this.call.MuteAllRemoteParticipantsAsync();

// mute specific participant in the call
await this.call.RemoteParticipants.FirstOrDefault().MuteAsync();
他のユーザーによってミュートされたことをローカル参加者に通知するには、MutedByOthers イベントを登録します。
通話を終了する
通話を開始したら、CommunicationCall オブジェクトの HangupAsync メソッドを使用して通話を終了する必要があります。
また、すべての参加者に対して通話を終了する必要があるかどうかを通知するために、HangupOptions のインスタンスも使用する必要があります。
次のコードを HangupButton_Click 内に追加する必要があります。
this.call.OnStateChanged -= Call_OnStateChangedAsync;
await this.call.HangUpAsync(new HangUpOptions() { ForEveryone = false });
コードの実行
Visual Studio がアプリを x64、x86、または ARM64 向けにビルドすることを確認し、F5 を押してアプリの実行を開始します。 その後、Call ボタンをクリックして、定義された呼び出し先と通話を行います。
アプリを初めて実行すると、マイクへのアクセスを許可するようにユーザーに求めるダイアログが表示されます。
次のステップ
フィードバック
以下は間もなく提供いたします。2024 年を通じて、コンテンツのフィードバック メカニズムとして GitHub の issue を段階的に廃止し、新しいフィードバック システムに置き換えます。 詳細については、「https://aka.ms/ContentUserFeedback」を参照してください。
フィードバックの送信と表示