オンオブジェクト書式設定 API (プレビュー)
オンオブジェクト書式設定では、ユーザーは変更する要素を直接選んで、視覚化の書式をすばやく簡単に変更できます。 要素が選ばれると、自動的に書式ウィンドウに移動して、選んだ要素に対する特定の書式設定が展開されます。 オンオブジェクト書式設定の詳細については、Power BI Desktop でのオンオブジェクト書式設定に関するページを参照してください。
これらの機能を視覚化に追加するには、各視覚化で副選択できるリージョンごとに副選択スタイル オプションとショートカットを提供する必要があります。
Note
- オンオブジェクトの書式設定をサポートする視覚化では、API バージョン 5.1 から使用できる getFormattingModel API を実装する必要があります。
- powerbi-visuals-utils-formattingmodel を使っている場合は、少なくともバージョン 6.0.0 を使います。
オンオブジェクトの環境を作成する
ユーザーが副選択できる要素を選んで Power BI に副選択を送信する場合は、副選択サービスを使います。 副選択 API を使って、副選択のスタイルとショートカットを提供します。 副選択ヘルパーを使うと、プロセスを簡略化できます。
書式モード
書式モードは、ユーザーが作成モードのときに onObject 書式設定をオンまたはオフにできる新しいモードです。 視覚化は、更新オプションの書式モードの状態に応じて更新されます。 更新オプションには、現在サブセレクトされている subSelection も CustomVisualSubSelection として含まれています。
オンオブジェクト書式設定 API を実装する方法
機能ファイル
capabilites.json ファイルに次のプロパティを追加して、視覚化がオンオブジェクト書式設定をサポートしていることを宣言します。
{
  "supportsOnObjectFormatting": true,
  "enablePointerEventsFormatMode": true,
}
IVisual インターフェイス
視覚化は、IVisual インターフェイスの一部として VisualOnObjectFormatting インターフェイスを実装する必要があります。
VisualOnObjectFormatting には、次の 3 つのメソッドが含まれています。
getSubSelectionStyles
各視覚化は、副選択できる要素が副選択されたときに呼び出される getSubSelectionStyles メソッドを実装する必要があります。 getSubSelectionStyles メソッドには、現在副選択されている要素が CustomVisualSubSelection 配列として提供され、SubSelectionStyles オブジェクトまたは undefined のいずれかを返す必要があります。
ほとんどのシナリオをカバーする副選択スタイルの 3 つのカテゴリがあります。
- テキスト
- 数値テキスト
- 図形
各 SubSelectionStyles オブジェクトは、要素のスタイルを変更するための異なる環境をユーザーに提供します。
getSubSelectionShortcuts
ユーザーにさらに多くのオプションを提供するには、視覚化で getSubSelectionShortcuts メソッドを実装する必要があります。 このメソッドは、VisualSubSelectionShortcuts または undefined を返します。 さらに、SubSelectionShortcuts が指定されている場合は、ユーザーが要素を副選択して書式ウィンドウが開いているときに、ウィンドウが適切なカードまで自動的にスクロールするように、VisualNavigateSubSelectionShortcut も指定する必要があります。
視覚化の状態を変更するための副選択のショートカットがいくつかあります。 それぞれに、適切なラベルが付いたコンテキスト メニュー内のメニュー項目が定義されます。
副選択のあいまいさ排除メニュー: オンオブジェクトのあいまいさ排除メニューは、どの視覚化要素が副選択されているかが明確でない場合に、ユーザーが目的の副選択を選ぶための方法を提供します。 これは、ユーザーが視覚化の背景を副選択したときによく発生します。 明確なメニューでより多くの副選択を表示するには、視覚化ですべての副選択を getSubSelectables メソッド経由で提供する必要があります。
getSubSelectables
あいまいさ排除メニューに副選択を含めるには、視覚化で getSubSelectables メソッドを実装する必要があります。 このメソッドには、型 SubSelectionStylesType の省略可能な filterType 引数が指定され、CustomVisualSubSelection または undefined の配列を返します。
HTMLSubSelectionHelper を使って副選択を作成している場合は、HTMLSubSelectionHelper.getSubSelectables() メソッドを使って、DOM から副選択できる要素を収集できます。
サブセレクトの直接テキスト編集: オンオブジェクト書式設定では、サブセレクト可能な要素のテキストをダブルクリックしてそれを直接編集できます。
直接編集機能を提供するには、SubSelectableDirectEdit オブジェクトが設定された適切な cVDirectEdit プロパティを RectangleSubSelectionOutline に提供する必要があります。 アウトラインはカスタム アウトラインとして提供することも、HTMLSubSelectionHelper を使っている場合は SubSelectableDirectEdit 属性を使うこともできます。 (HTMLSubSelectionHelper によって提供される属性を参照してください)
(セレクターを使って) 特定のデータ ポイントに直接編集を追加することはまだサポートされていません。
FormattingId インターフェイス
次のインターフェイスは、subSelection のショートカットとスタイルを参照するために使われます。
interface FormattingId {
            objectName: string;
            propertyName: string;
            selector?: powerbi.data.Selector;
        }
- objectName: capabilities.json で宣言されているオブジェクト名。
- propertyName: capabilities.json で宣言されているオブジェクトのプロパティ名。
- selector: データ ポイントに selectionId がある場合は、selectionId.getSelector() を使います。このセレクターは、書式設定モデルのスライスに提供されているものと同じである必要があります。
例
この例では、2 つのオブジェクト colorSelector と directEdit を持つカスタム ビジュアルを構築します。 onobjectFormatting ユーティリティの HTMLSubSelectionHelper を使って、subSelection ジョブの大部分を処理します。
詳細については、オンオブジェクトのユーティリティに関するページを参照してください。
まず、書式ウィンドウのカードを作成し、各副選択可能項目に subSelectionShortcuts と styles を提供します。
オブジェクトを定義する
オブジェクトを定義し、視覚化がオンオブジェクト書式設定をサポートしていることを capabilities.json で宣言します。
"objects": {
      "directEdit": {
      "properties": {
        "show": {
          "displayName": "Show",
          "type": {
            "bool": true
          }
        },
        "textProperty": {
          "displayName": "Text",
          "type": {
            "text": true
          }
        },
        "fontFamily": {
          "type": {
            "formatting": {
              "fontFamily": true
            }
          }
        },
        "fontSize": {
          "type": {
            "formatting": {
              "fontSize": true
            }
          }
        },
        "bold": {
          "type": {
            "bool": true
          }
        },
        "italic": {
          "type": {
            "bool": true
          }
        },
        "underline": {
          "type": {
            "bool": true
          }
        },
        "fontColor": {
          "displayName": "Font Color",
          "type": {
            "fill": {
              "solid": {
                "color": true
              }
            }
          }
        },
        "background": {
          "displayName": "Background",
          "type": {
            "fill": {
              "solid": {
                "color": true
              }
            }
          }
        },
        "position": {
          "displayName": "Position",
          "type": {
            "enumeration": [
              { "displayName": "Left", "value": "Left" }, { "displayName": "Right", "value": "Right" }
            ]
          }
        }
      }
    },
    "colorSelector": {
      "displayName": "Data Colors",
      "properties": {
        "fill": {
          "displayName": "Color",
          "type": {
            "fill": {
              "solid": {
                "color": true
              }
            }
          }
        }
      }
    },
   },
  "supportsOnObjectFormatting": true,
  "enablePointerEventsFormatMode": true,
書式設定カードを作成する
formattingModel ユーティリティを使って書式設定カードを作成します。
カラー セレクター カードの設定
class ColorSelectorCardSettings extends Card {
    name: string = "colorSelector";
    displayName: string = "Data Colors";
    slices = [];
}
formattingSetting にメソッドを追加して、colorSelector オブジェクト (データポイント) のスライスを動的に設定できるようにします。
populateColorSelector(dataPoints: BarChartDataPoint[]) {
        let slices: formattingSettings.ColorPicker[] = this.colorSelector.slices;
        if (dataPoints) {
            dataPoints.forEach(dataPoint => {
                slices.push(new formattingSettings.ColorPicker({
                    name: "fill",
                    displayName: dataPoint.category,
                    value: { value: dataPoint.color },
                    selector: dataPoint.selectionId.getSelector(),
                }));
            });
        }
    }
selector フィールドに特定のデータポイントのセレクターを渡します。 このセレクターは、オンオブジェクトの get API を実装するときに使われるセレクターです。
カード設定を直接編集する
class DirectEditSettings extends Card {
    displayName = 'Direct Edit';
    name = 'directEdit';
    private minFontSize: number = 8;
    private defaultFontSize: number = 11;
    show = new formattingSettings.ToggleSwitch({
        name: "show",
        displayName: undefined,
        value: true,
    });
    topLevelSlice = this.show;
    textProperty = new formattingSettings.TextInput({
        displayName: "Text Property",
        name: "textProperty",
        value: "What is your quest?",
        placeholder: ""
    });
    position = new formattingSettings.ItemDropdown({
        name: 'position',
        items: [{ displayName: 'Left', value: 'Left' }, { displayName: 'Right', value: 'Right' }],
        value: { displayName: 'Right', value: 'Right' }
    });
    font = new formattingSettings.FontControl({
        name: "font",
        displayName: 'Font',
        fontFamily: new formattingSettings.FontPicker({
            name: "fontFamily",
            displayName: "Font Family",
            value: "Segoe UI, wf_segoe-ui_normal, helvetica, arial, sans-serif"
        }),
        fontSize: new formattingSettings.NumUpDown({
            name: "fontSize",
            displayName: "Font Size",
            value: this.defaultFontSize,
            options: {
                minValue: {
                    type: powerbi.visuals.ValidatorType.Min,
                    value: this.minFontSize,
                }
            }
        }),
        bold: new formattingSettings.ToggleSwitch({
            name: 'bold',
            displayName: "Font Size",
            value: true
        }),
        italic: new formattingSettings.ToggleSwitch({
            name: 'italic',
            displayName: "Font Size",
            value: true
        }),
        underline: new formattingSettings.ToggleSwitch({
            name: 'underline',
            displayName: "Font Size",
            value: true
        })
    });
    fontColor = new formattingSettings.ColorPicker({
        name: "fontColor",
        displayName: "Color",
        value: { value: "#000000" }
    });
    background = new formattingSettings.ColorPicker({
        name: "background",
        displayName: "Color",
        value: { value: "#FFFFFF" }
    });
    slices = [this.show, this.textProperty, this.font, this.fontColor, this.background, this.position];
}
副選択ヘルパー属性を使う
HTMLSubSelectionHelper 属性をオブジェクトに追加します。 HTMLSubSelectionHelper が提供する属性を確認するには、オブジェクト ユーティリティのドキュメントを確認します。
directEdit 属性の場合:
import { HtmlSubSelectableClass, HtmlSubSelectionHelper, SubSelectableDirectEdit as SubSelectableDirectEditAttr, SubSelectableDisplayNameAttribute, SubSelectableObjectNameAttribute, SubSelectableTypeAttribute } from 'powerbi-visuals-utils-onobjectutils'; const DirectEdit: powerbi.visuals.SubSelectableDirectEdit = { reference: { objectName: 'directEdit', propertyName: 'textProperty' }, style: SubSelectableDirectEditStyle.Outline, }; private visualDirectEditSubSelection = JSON.stringify(DirectEdit); this.directEditElement .classed('direct-edit', true) .classed('hidden', !this.formattingSettings.directEditSettings.show.value) .classed(HtmlSubSelectableClass, options.formatMode && this.formattingSettings.directEditSettings.show.value) .attr(SubSelectableObjectNameAttribute, 'directEdit') .attr(SubSelectableDisplayNameAttribute, 'Direct Edit') .attr(SubSelectableDirectEditAttr, this.visualDirectEditSubSelection)HTMLSubSelectionHelperは、SubSelectableDirectEditAttr属性を使って directEdit の枠線の directEdit 参照を提供するため、ユーザーが要素をダブル クリックすると直接編集が開始されます。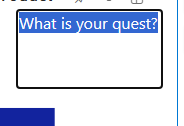
colorSelector の場合:
barSelectionMerged
          .attr(SubSelectableObjectNameAttribute, 'colorSelector')
          .attr(SubSelectableDisplayNameAttribute, (dataPoint: BarChartDataPoint) => this.formattingSettings.colorSelector.slices[dataPoint.index].displayName)
          .attr(SubSelectableTypeAttribute, powerbi.visuals.SubSelectionStylesType.Shape)
          .classed(HtmlSubSelectableClass, options.formatMode)
参照の定義
例を簡略化するために、次のインターフェイスを定義します。
Note
指定する cardUid は、getFormattingModel API に指定したものと同じである必要があります。 たとえば、powerbi-visuals-utils-formattingmodel を使っている場合は、cardUid を Visual-cardName-card として指定します。ここで、cardName は、書式設定モデルの設定でこのカードに割り当てた名前です。 それ以外の場合は、このカードに割り当てた Visual-cardUid として指定します。
interface References {
    cardUid?: string;
    groupUid?: string;
    fill?: FormattingId;
    font?: FormattingId;
    fontColor?: FormattingId;
    show?: FormattingId;
    fontFamily?: FormattingId;
    bold?: FormattingId;
    italic?: FormattingId;
    underline?: FormattingId;
    fontSize?: FormattingId;
    position?: FormattingId;
    textProperty?: FormattingId;
}
この例では、オブジェクト名の列挙型を作成します。
const enum BarChartObjectNames {
    ColorSelector = 'colorSelector',
    DirectEdit = 'directEdit'
}
directEditオブジェクトの参照:
const directEditReferences: References = {
    cardUid: 'Visual-directEdit-card',
    groupUid: 'directEdit-group',
    fontFamily: {
        objectName: BarChartObjectNames.DirectEdit,
        propertyName: 'fontFamily'
    },
    bold: {
        objectName: BarChartObjectNames.DirectEdit,
        propertyName: 'bold'
    },
    italic: {
        objectName: BarChartObjectNames.DirectEdit,
        propertyName: 'italic'
    },
    underline: {
        objectName: BarChartObjectNames.DirectEdit,
        propertyName: 'underline'
    },
    fontSize: {
        objectName: BarChartObjectNames.DirectEdit,
        propertyName: 'fontSize'
    },
    fontColor: {
        objectName: BarChartObjectNames.DirectEdit,
        propertyName: 'fontColor'
    },
    show: {
        objectName: BarChartObjectNames.DirectEdit,
        propertyName: 'show'
    },
    position: {
        objectName: BarChartObjectNames.DirectEdit,
        propertyName: 'position'
    },
    textProperty: {
        objectName: BarChartObjectNames.DirectEdit,
        propertyName: 'textProperty'
    }
};
colorSelectorの場合:
const colorSelectorReferences: References = {
    cardUid: 'Visual-colorSelector-card',
    groupUid: 'colorSelector-group',
    fill: {
        objectName: BarChartObjectNames.ColorSelector,
        propertyName: 'fill'
    }
};
API を実装する
次に、オンオブジェクト書式設定の get API を実装し、visualOnObjectFormatting で提供します。
コンストラクターのコードで、visualOnObjectFormatting に get メソッドを提供します。
public visualOnObjectFormatting: powerbi.extensibility.visual.VisualOnObjectFormatting;
constructor(options: VisualConstructorOptions) {
        this.subSelectionHelper = HtmlSubSelectionHelper.createHtmlSubselectionHelper({
                 hostElement: options.element,
                 subSelectionService: options.host.subSelectionService,
                 selectionIdCallback: (e) => this.selectionIdCallback(e),
            });

 this.visualOnObjectFormatting = {
                getSubSelectionStyles: (subSelections) => this.getSubSelectionStyles(subSelections),
                getSubSelectionShortcuts: (subSelections, filter) => this.getSubSelectionShortcuts(subSelections, filter),
                getSubSelectables: (filter) => this. getSubSelectables(filter)
            }
   }

private getSubSelectionStyles(subSelections: CustomVisualSubSelection[]): powerbi.visuals.SubSelectionStyles | undefined {
        const visualObject = subSelections[0]?.customVisualObjects[0];
        if (visualObject) {
            switch (visualObject.objectName) {
                case BarChartObjectNames.ColorSelector:
                    return this.getColorSelectorStyles(subSelections);
                 case BarChartObjectNames.DirectEdit:
                    return this.getDirectEditStyles();
            }
        }
    }

private getSubSelectionShortcuts(subSelections: CustomVisualSubSelection[], filter: SubSelectionShortcutsKey | undefined):    VisualSubSelectionShortcuts | undefined {
        const visualObject = subSelections[0]?.  customVisualObjects[0];
        if (visualObject) {
            switch (visualObject.objectName) {
                case BarChartObjectNames.ColorSelector:
                    return this.getColorSelectorShortcuts(subSelections);
                case BarChartObjectNames.DirectEdit:
                    return this.getDirectEditShortcuts();
            }
        }
    }
colorSelector の getSubSelection ショートカットとスタイルを実装します。
private getColorSelectorShortcuts(subSelections:  CustomVisualSubSelection[]): VisualSubSelectionShortcuts   {
        const selector = subSelections[0].customVisualObjects[0].selectionId?.getSelector();
        return [
            {
                type: VisualShortcutType.Reset,
                relatedResetFormattingIds: [{
                    ...colorSelectorReferences.fill,
                    selector
                }],
            },
            {
                type: VisualShortcutType.Navigate,
                destinationInfo: { cardUid: colorSelectorReferences.cardUid },
                label: 'Color'
            }
        ];
    }
上記のショートカットは、コンテキスト メニューに関連するメニュー項目を返し、次の機能を追加します。
- VisualShortcutType.Navigate: ユーザーがいずれかの横棒 (データ ポイント) を選択して、書式設定ペインが開くと、書式設定ペインは色選択カードまでスクロールしてそれを開きます
- VisualShortcutType.Reset: コンテキスト メニューにリセット ショートカットを追加します。 塗りつぶしの色が変更された場合に有効になります。
private getColorSelectorStyles(subSelections: CustomVisualSubSelection[]): SubSelectionStyles {
        const selector = subSelections[0].customVisualObjects[0].selectionId?.getSelector();
        return {
            type: SubSelectionStylesType.Shape,
            fill: {
                label: 'Fill',
                reference: {
                    ...colorSelectorReferences.fill,
                 selector
                },
            },
        };
    }
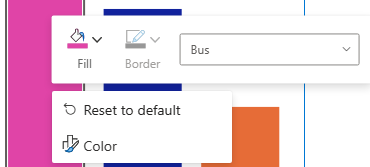
ユーザーがバーを右クリックすると、以下が表示されます。
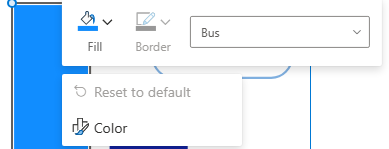
色を変更する場合:
副選択のショートカット
directEdit の subSelection ショートカットとスタイルを実装するには:
private getDirectEditShortcuts(): VisualSubSelectionShortcuts {
        return [
            {
                type: VisualShortcutType.Reset,
                relatedResetFormattingIds: [
                    directEditReferences.bold,
                    directEditReferences.fontFamily,
                    directEditReferences.fontSize,
                    directEditReferences.italic,
                    directEditReferences.underline,
                    directEditReferences.fontColor,
                    directEditReferences.textProperty
                ]
            },
            {
                type: VisualShortcutType.Toggle,
                relatedToggledFormattingIds: [{
                    ...directEditReferences.show,
                }],
                ...directEditReferences.show,
                disabledLabel: 'Delete',
            },
            {
                type: VisualShortcutType.Picker,
                ...directEditReferences.position,
                label: 'Position'
            },
            {
                type: VisualShortcutType.Navigate,
                destinationInfo: { cardUid: directEditReferences.cardUid },
                label: 'Direct edit'
            }
        ];
    }
このショートカットは、コンテキスト メニューに関連するメニュー項目を追加し、次の機能を追加します。
- VisualShortcutType.Reset: relatedResetFormattingIds 配列で指定されるプロパティの 1 つが変更されたときに、既定の項目へのリセットをコンテキスト メニューに追加します。
- VisualShortcutType.Toggle: コンテキスト メニューに削除オプションを追加します。 クリックすると、directEdit カードのトグル スイッチがオフになります。
- VisualShortcutType.Picker: directEdit の書式設定カードに位置スライスを追加したため、右と左の間で選ぶオプションをコンテキスト メニューに追加します。
- VisualShortcutType.Navigate: 書式設定ペインが開いているときにユーザーが directEdit 要素を選択すると、書式設定ペインがスクロールして directEdit カードを開きます。
private getDirectEditStyles(): SubSelectionStyles {
        return {
            type: powerbi.visuals.SubSelectionStylesType.Text,
            fontFamily: {
                reference: {
                    ...directEditReferences.fontFamily
                },
                label: 'font family'
            },
            bold: {
                reference: {
                    ...directEditReferences.bold
                },
                label: 'bold'
            },
            italic: {
                reference: {
                    ...directEditReferences.italic
                },
                label: 'italic'
            },
            underline: {
                reference: {
                    ...directEditReferences.underline
                },
                label: 'underline'
            },
            fontSize: {
                reference: {
                    ...directEditReferences.fontSize
                },
                label: 'font size'
            },
            fontColor: {
                reference: {
                    ...directEditReferences.fontColor
                },
                label: 'font color'
            },
            background: {
                reference: {
                    objectName: 'directEdit',
                    propertyName: 'background'
                },
                label: 'background'
            }
        }
    }
formattingSettings に追加したため、関連プロパティを指定しました。
次の図は、directEdit 要素を右クリックしたときの UI の外観を示しています。

ローカリゼーション
視覚化はローカライズを処理し、ローカライズされた文字列を提供する必要があります。
GitHub リソース
- オンオブジェクト書式設定インターフェイスのすべては、on-object-formatting-api.d.ts (API がリリースされたらリンクが提供されます) にあります
- [HTMLSubSelectionHelper](API がリリースされたらリンクが提供されます) を含む [オンオブジェクトのユーティリティ] を使うことをお勧めします
- API バージョン 5.8.0 を使い、オンオブジェクトのユーティリティを使ってオブジェクトの書式設定のサポートを実装するカスタム ビジュアル SampleBarChart の例は、次の場所にあります (API がリリースされたらリンクが提供されます)