Tutorial: Develop a .NET console application with Azure Cosmos DB for NoSQL
APPLIES TO:
NoSQL
The Azure SDK for .NET allows you to add data to an API for NoSQL container either asynchronous individual operations or a transactional batch. This tutorial walks through the process of create a new .NET console application that adds multiple items to a container.
In this tutorial, you learn how to:
- Create a database using API for NoSQL
- Create a .NET console application and add the Azure SDK for .NET
- Add individual items into an API for NoSQL container
- Retrieve items efficient from an API for NoSQL container
- Create a transaction with batch changes for the API for NoSQL container
Prerequisites
- An existing Azure Cosmos DB for NoSQL account.
- If you have an existing Azure subscription, create a new account.
- No Azure subscription? You can try Azure Cosmos DB free with no credit card required.
- Visual Studio Code
- .NET 8 or later
- Experience writing C# applications.
Create API for NoSQL resources
First, create an empty database in the existing API for NoSQL account. You create a container using the Azure SDK for .NET later.
Navigate to your existing API for NoSQL account in the Azure portal.
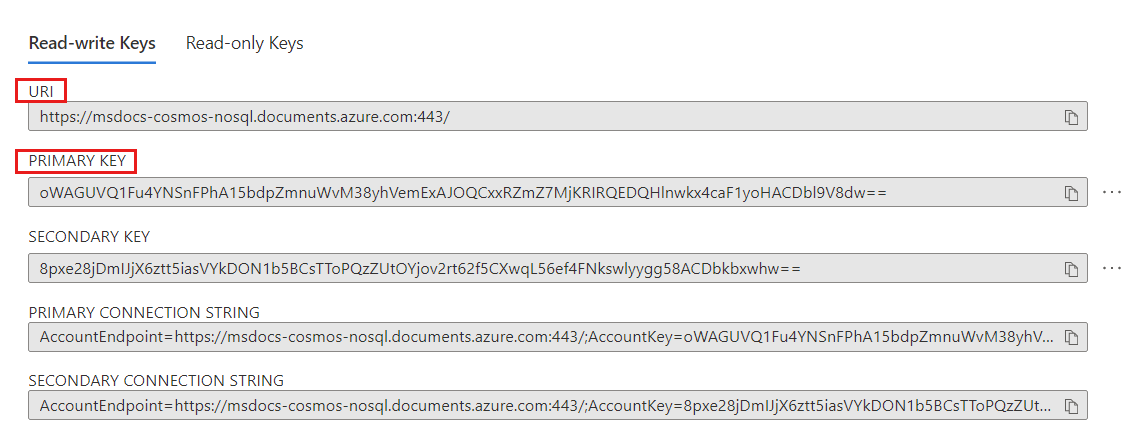
In the resource menu, select Keys.
On the Keys page, observe and record the value of the URI and PRIMARY KEY fields. These values are used throughout the tutorial.
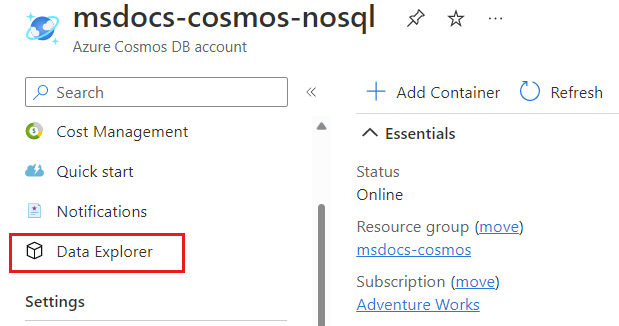
In the resource menu, select Data Explorer.
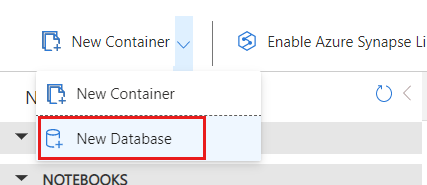
On the Data Explorer page, select the New Database option in the command bar.
In the New Database dialog, create a new container with the following settings:
Value Database id cosmicworksDatabase throughput type Manual Database throughput amount 400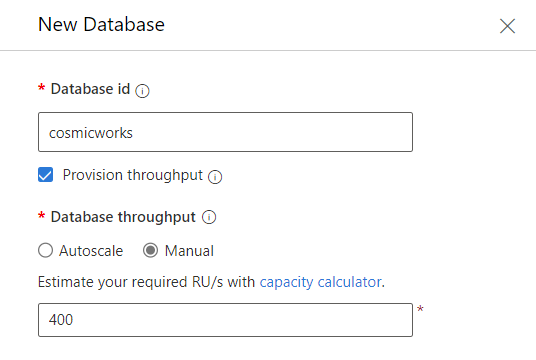
Select OK to create the database.
Create .NET console application
Now, you create a new .NET console application and import the Azure SDK for .NET by using the Microsoft.Azure.Cosmos library from NuGet.
Open a terminal in an empty directory.
Create a new console application using the
consolebuilt-in templatedotnet new console --langVersion previewAdd the 3.31.1-preview version of the
Microsoft.Azure.Cosmospackage from NuGet.dotnet add package Microsoft.Azure.Cosmos --version 3.31.1-previewAlso, add the pre-release version of the
System.CommandLinepackage from NuGet.dotnet add package System.CommandLine --prereleaseAlso, add the
Humanizerpackage from NuGet.dotnet add package HumanizerBuild the console application project.
dotnet buildOpen Visual Studio Code using the current project folder as the workspace.
Tip
You can run
code .in the terminal to open Visual Studio Code and automatically open the working directory as the current workspace.Navigate to and open the Program.cs file. Delete all of the existing code in the file.
Add this code to the file to use the System.CommandLine library to parse the command line for two strings passed in through the
--firstand--lastoptions.using System.CommandLine; var command = new RootCommand(); var nameOption = new Option<string>("--name") { IsRequired = true }; var emailOption = new Option<string>("--email"); var stateOption = new Option<string>("--state") { IsRequired = true }; var countryOption = new Option<string>("--country") { IsRequired = true }; command.AddOption(nameOption); command.AddOption(emailOption); command.AddOption(stateOption); command.AddOption(countryOption); command.SetHandler( handle: CosmosHandler.ManageCustomerAsync, nameOption, emailOption, stateOption, countryOption ); await command.InvokeAsync(args);Note
For this tutorial, it's not entirely important that you understand how the command-line parser works. The parser has four options that can be specified when the application is running. Three of the options are required since they will be used to construct the ID and partition key fields.
At this point, the project won't build since you haven't defined the static
CosmosHandler.ManageCustomerAsyncmethod yet.Save the Program.cs file.
Add items to a container using the SDK
Next, you use individual operations to add items into the API for NoSQL container. In this section, you define the CosmosHandler.ManageCustomerAsync method.
Create a new CosmosHandler.cs file.
In the CosmosHandler.cs file, add a new using directive for the
HumanizerandMicrosoft.Azure.Cosmosnamespaces.using Humanizer; using Microsoft.Azure.Cosmos;Create a new static class named
CosmosHandler.public static class CosmosHandler { }Just to validate this app works, create a short implementation of the static
ManageCustomerAsyncmethod to print the command-line input.public static async Task ManageCustomerAsync(string name, string email, string state, string country) { await Console.Out.WriteLineAsync($"Hello {name} of {state}, {country}!"); }Save the CosmosHandler.cs file.
Back in the terminal, run the application.
dotnet run -- --name 'Mica Pereira' --state 'Washington' --country 'United States'The output of the command should be a fun greeting.
Hello Mica Pereira of Washington, United States!Return to the CosmosHandler.cs file.
Within the static CosmosHandler class, add a new
private static readonlymember of typeCosmosClientnamed_client.private static readonly CosmosClient _client;Create a new static constructor for the
CosmosHandlerclass.static CosmosHandler() { }Within the constructor, create a new instance of the
CosmosClientclass passing in two string parameters with the URI and PRIMARY KEY values you previously recorded in the lab. Store this new instance in the_clientmember.static CosmosHandler() { _client = new CosmosClient( accountEndpoint: "<uri>", authKeyOrResourceToken: "<primary-key>" ); }Back within the static CosmosHandler class, create a new asynchronous method named
GetContainerAsyncthat returns anContainer.private static async Task<Container> GetContainerAsync() { }For the next steps, add this code within the
GetContainerAsyncmethod.Get the
cosmicworksdatabase and store it in a variable nameddatabase.Database database = _client.GetDatabase("cosmicworks");Create a new generic
List<>ofstringvalues within a list of hierarchical partition key paths and store it in a variable namedkeyPaths.List<string> keyPaths = new() { "/address/country", "/address/state" };Create a new
ContainerPropertiesvariable with the name of the container (customers) and the list of partition key paths.ContainerProperties properties = new( id: "customers", partitionKeyPaths: keyPaths );Use the
CreateContainerIfNotExistsAsyncmethod to supply the container properties and retrieve the container. This method will, per the name, asynchronously create the container if it doesn't already exist within the database. Return the result as the output of theGetContainerAsyncmethod.return await database.CreateContainerIfNotExistsAsync( containerProperties: properties );
Delete all of the code within the
ManageCustomerAsyncmethod.For the next steps, add this code within the
ManageCustomerAsyncmethod.Asynchronously call the
GetContainerAsyncmethod and store the result in a variable namedcontainer.Container container = await GetContainerAsync();Create a new variable named
idthat uses theKebaberizemethod from Humanizer to transform thenamemethod parameter.string id = name.Kebaberize();Note
The
Kebaberizemethod will replace all spaces with hyphens and conver the text to lowercase.Create a new anonymous typed item using the
name,state, andcountrymethod parameters and theidvariable. Store the item as a variable namedcustomer.var customer = new { id = id, name = name, address = new { state = state, country = country } };Use the container's asynchronous
CreateItemAsyncmethod to create a new item in the container and assign the HTTP response metadata to a variable namedresponse.var response = await container.CreateItemAsync(customer);Write the values of the
responsevariable'sStatusCodeandRequestChargeproperties to the console. Also write the value of theidvariable.Console.WriteLine($"[{response.StatusCode}]\t{id}\t{response.RequestCharge} RUs");
Save the CosmosHandler.cs file.
Back in the terminal, run the application again.
dotnet run -- --name 'Mica Pereira' --state 'Washington' --country 'United States'The output of the command should include a status and request charge for the operation.
[Created] mica-pereira 7.05 RUsNote
Your request charge may vary.
Run the application one more time.
dotnet run -- --name 'Mica Pereira' --state 'Washington' --country 'United States'This time, the program should crash. If you scroll through the error message, you see the crash occurred because of a conflict in the unique identifier for the items.
Unhandled exception: Microsoft.Azure.Cosmos.CosmosException : Response status code does not indicate success: Conflict (409);Reason: (
    Errors : [
      "Resource with specified id or name already exists."
    ]
);
Retrieve an item using the SDK
Now that you've created your first item in the container, you can use the same SDK to retrieve the item. Here, you'll query and point read the item to compare the difference in request unit (RU) consumption.
Return to or open the CosmosHandler.cs file.
Delete all lines of code from the
ManageCustomerAsyncmethod except for the first two lines.public static async Task ManageCustomerAsync(string name, string email, string state, string country) { Container container = await GetContainerAsync(); string id = name.Kebaberize(); }For the next steps, add this code within the
ManageCustomerAsyncmethod.Use the container's asynchronous
CreateItemAsyncmethod to create a new item in the container and assign the HTTP response metadata to a variable namedresponse.var response = await container.CreateItemAsync(customer);Create a new string named
sqlwith a SQL query to retrieve items where a filter (@id) matches.string sql = @" SELECT * FROM customers c WHERE c.id = @id ";Create a new
QueryDefinitionvariable namedquerypassing in thesqlstring as the only query parameter. Also, use theWithParameterfluid method to apply the value of the variableidto the@idparameter.var query = new QueryDefinition( query: sql ) .WithParameter("@id", id);Use the
GetItemQueryIterator<>generic method and thequeryvariable to create an iterator that gets data from Azure Cosmos DB. Store the iterator in a variable namedfeed. Wrap this entire expression in a using statement to dispose the iterator later.using var feed = container.GetItemQueryIterator<dynamic>( queryDefinition: query );Asynchronously call the
ReadNextAsyncmethod of thefeedvariable and store the result in a variable namedresponse.var response = await feed.ReadNextAsync();Write the values of the
responsevariable'sStatusCodeandRequestChargeproperties to the console. Also write the value of theidvariable.Console.WriteLine($"[{response.StatusCode}]\t{id}\t{response.RequestCharge} RUs");
Save the CosmosHandler.cs file.
Back in the terminal, run the application to read the single item using a SQL query.
dotnet run -- --name 'Mica Pereira' --state 'Washington' --country 'United States'The output of the command should indicate that the query required multiple request units (RUs).
[OK] mica-pereira 2.82 RUsBack in the CosmosHandler.cs file, delete all lines of code from the
ManageCustomerAsyncmethod again except for the first two lines.public static async Task ManageCustomerAsync(string name, string email, string state, string country) { Container container = await GetContainerAsync(); string id = name.Kebaberize(); }For the next steps, add this code within the
ManageCustomerAsyncmethod.Create a new instance of
PartitionKeyBuilderby adding thestateandcountryparameters as a multi-part partition key value.var partitionKey = new PartitionKeyBuilder() .Add(country) .Add(state) .Build();Use the container's
ReadItemAsync<>method to point read the item from the container using theidandpartitionKeyvariables. Save the result in a variable namedresponse.var response = await container.ReadItemAsync<dynamic>( id: id, partitionKey: partitionKey );Write the values of the
responsevariable'sStatusCodeandRequestChargeproperties to the console. Also write the value of theidvariable.Console.WriteLine($"[{response.StatusCode}]\t{id}\t{response.RequestCharge} RU");
Save the CosmosHandler.cs file again.
Back in the terminal, run the application one more time to point read the single item.
dotnet run -- --name 'Mica Pereira' --state 'Washington' --country 'United States'The output of the command should indicate that the query required a single RU.
[OK] mica-pereira 1 RUs
Create a transaction using the SDK
Finally, you take the item you created, read that item, and create a different related item as part of a single transaction using the Azure SDK for .NET.
Return to or open the CosmosHandler.cs file.
Delete these lines of code from the
ManageCustomerAsyncmethod.var response = await container.ReadItemAsync<dynamic>( id: id, partitionKey: partitionKey ); Console.WriteLine($"[{response.StatusCode}]\t{id}\t{response.RequestCharge} RUs");For the next steps, add this new code within the
ManageCustomerAsyncmethod.Create a new anonymous typed item using the
name,state, andcountrymethod parameters and theidvariable. Store the item as a variable namedcustomerCart. This item represents a real-time shopping cart for the customer that is currently empty.var customerCart = new { id = $"{Guid.NewGuid()}", customerId = id, items = new string[] {}, address = new { state = state, country = country } };Create another new anonymous typed item using the
name,state, andcountrymethod parameters and theidvariable. Store the item as a variable namedcustomerCart. This item represents shipping and contact information for the customer.var customerContactInfo = new { id = $"{id}-contact", customerId = id, email = email, location = $"{state}, {country}", address = new { state = state, country = country } };Create a new batch using the container's
CreateTransactionalBatchmethod passing in thepartitionKeyvariable. Store the batch in a variable namedbatch. Use fluent methods to perform the following actions:Method Parameter ReadItemidstring variableCreateItemcustomerCartanonymous type variableCreateItemcustomerContactInfoanonymous type variablevar batch = container.CreateTransactionalBatch(partitionKey) .ReadItem(id) .CreateItem(customerCart) .CreateItem(customerContactInfo);Use the batch's
ExecuteAsyncmethod to start the transaction. Save the result in a variable namedresponse.using var response = await batch.ExecuteAsync();Write the values of the
responsevariable'sStatusCodeandRequestChargeproperties to the console. Also write the value of theidvariable.Console.WriteLine($"[{response.StatusCode}]\t{response.RequestCharge} RUs");
Save the CosmosHandler.cs file again.
Back in the terminal, run the application one more time to point read the single item.
dotnet run -- --name 'Mica Pereira' --state 'Washington' --country 'United States'The output of the command should show the request units used for the entire transaction.
[OK] 16.05 RUsNote
Your request charge may vary.
Validate the final data in the Data Explorer
To wrap up things, you use the Data Explorer in the Azure portal to view the data, and container you created in this tutorial.
Navigate to your existing API for NoSQL account in the Azure portal.
In the resource menu, select Data Explorer.

On the Data Explorer page, expand the
cosmicworksdatabase, and then select thecustomerscontainer.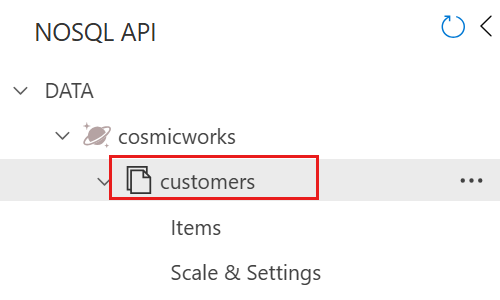
In the command bar, select New SQL query.

In the query editor, observe this SQL query string.
SELECT * FROM cSelect Execute Query to run the query and observe the results.

The results should include a JSON array with three items created in this tutorial. Observe that all of the items have the same hierarchical partition key value, but unique ID fields. The example output included is truncated for brevity.
[
  {
    "id": "mica-pereira",
    "name": "Mica Pereira",
    "address": {
      "state": "Washington",
      "country": "United States"
    },
    ...
  },
  {
    "id": "33d03318-6302-4559-b5c0-f3cc643b2f38",
    "customerId": "mica-pereira",
    "items": [],
    "address": {
      "state": "Washington",
      "country": "United States"
    },
    ...
  },
  {
    "id": "mica-pereira-contact",
    "customerId": "mica-pereira",
    "email": null,
    "location": "Washington, United States",
    "address": {
      "state": "Washington",
      "country": "United States"
    },
    ...
  }
]
Clean up resources
When no longer needed, delete the database used in this tutorial. To do so, navigate to the account page, select Data Explorer, select the cosmicworks database, and then select Delete.
