Add a lakehouse destination to an eventstream
This article shows you how to add a lakehouse as a destination to an eventstream in Microsoft Fabric eventstreams. For optimized streaming performance and real-time querying, consider streaming data to an eventhouse with add Eventhouse destination to an eventstream and then enable Eventhouse OneLake Availability.
Note
If you want to use enhanced capabilities that are in preview, select Enhanced capabilities at the top. Otherwise, select Standard capabilities. For information about enhanced capabilities that are in preview, see Introduction to Fabric event streams.
Important
There is schema enforcement for writing data into a lakehouse destination table. All new writes to the table must be compatible with the target table's schema at write time, ensuring data quality.
When output is written to a new delta table, the table schema is created based on the first record. All records of the output data are projected onto the schema of the existing table.
If the incoming data has columns that aren't in the existing table schema, the extra columns aren't included in the data written to the table. Likewise, if the incoming data is missing columns that are in the existing table schema, the missing columns write to the table with the values set to null.
Prerequisites
- Access to the Fabric premium workspace where your eventstream is located with Contributor or higher permissions.
- Access to the premium workspace where your lakehouse is located with Contributor or higher permissions.
Note
The maximum number of sources and destinations for one eventstream is 11.
Add a lakehouse as a destination
To add a lakehouse destination to a default or derived eventstream, follow these steps.
In Edit mode for your eventstream, select Add destination on the ribbon and select Lakehouse from the dropdown list.

Connect the lakehouse node to your stream node or operator.
On the Lakehouse configuration screen, complete the following information:
- Enter a Destination name.
- Select the Workspace that contains your lakehouse.
- Select an existing Lakehouse from the workspace you specified.
- Select an existing Delta table, or create a new one to receive data.
- Select the Input data format that is sent to your lakehouse. The supported data formats are JSON, Avro, and CSV (with header).
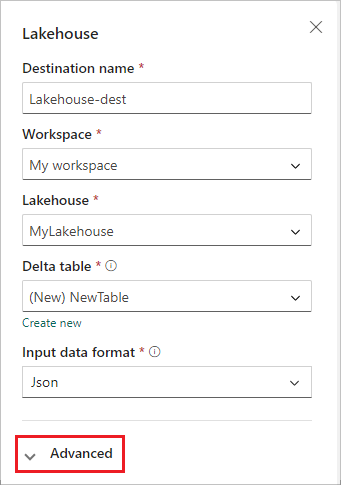
Select Advanced.
Two ingestion modes are available for a lakehouse destination. Based on your scenario, configure these modes to optimize how Fabric event streams writes to the lakehouse.
Minimum rows is the minimum number of rows that the lakehouse ingests in a single file. The minimum is 1 row, and the maximum is 2 million rows per file. The smaller the minimum number of rows, the more files the lakehouse creates during ingestion.
Maximum duration is the maximum duration that the lakehouse takes to ingest a single file. The minimum is 1 minute and maximum is 2 hours. The longer the duration, the more rows are ingested in a file.
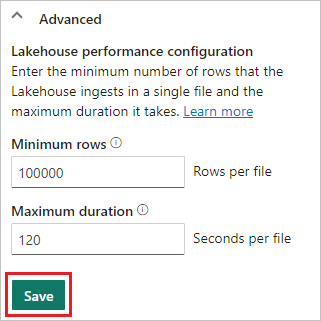
Select Save.
To implement the newly added lakehouse destination, select Publish.


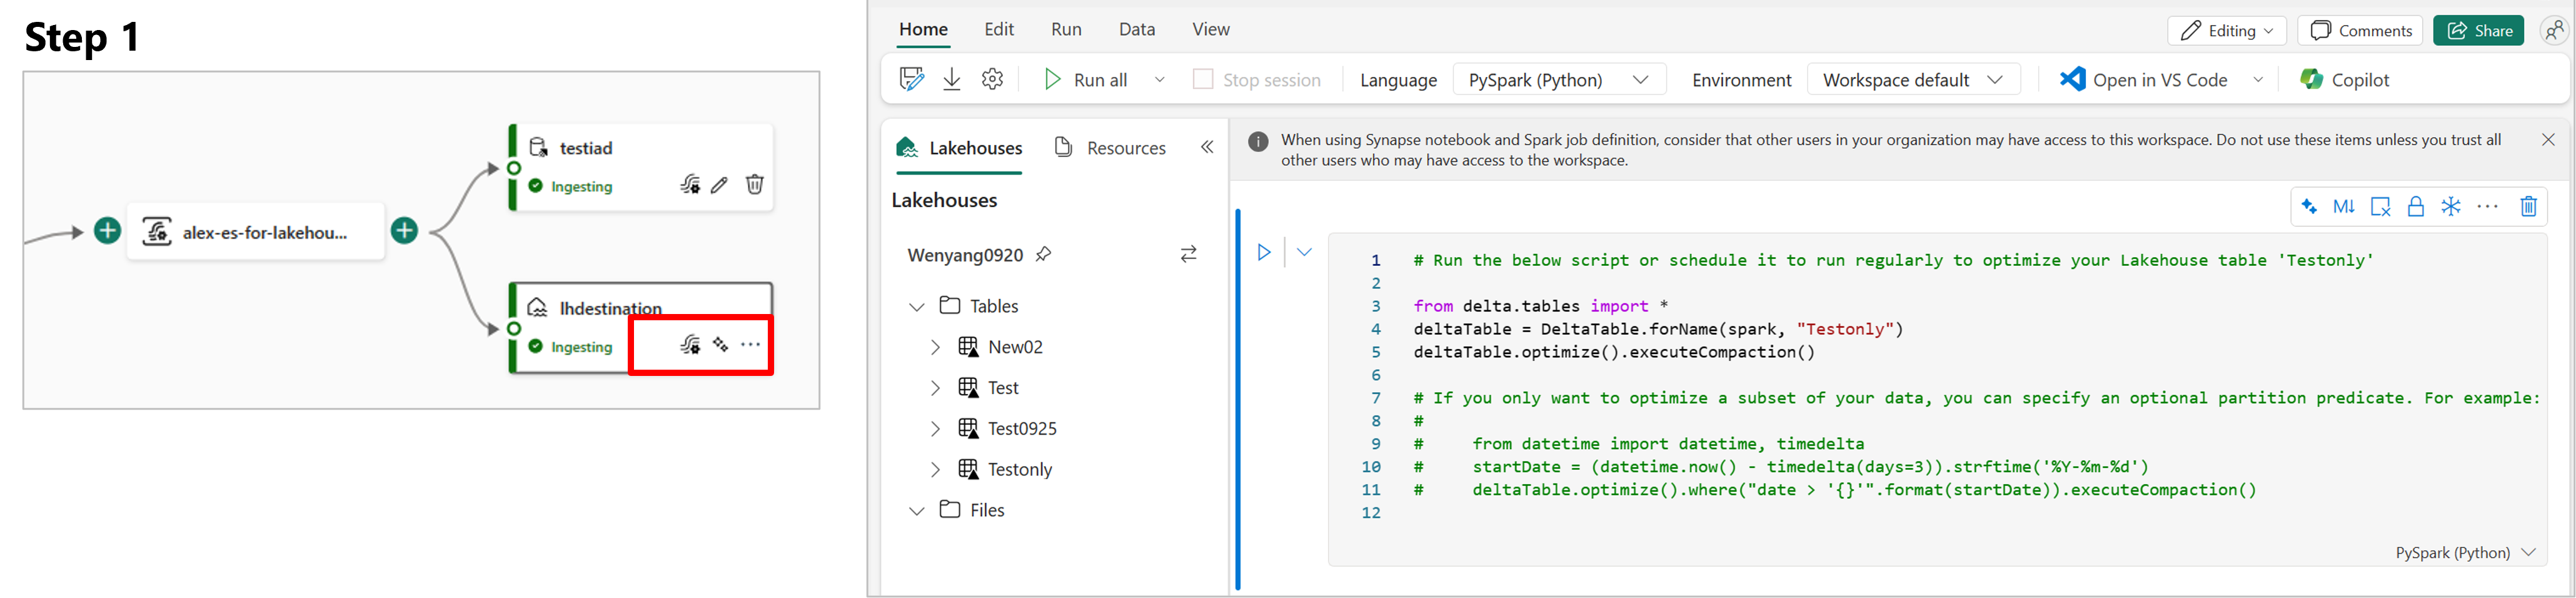
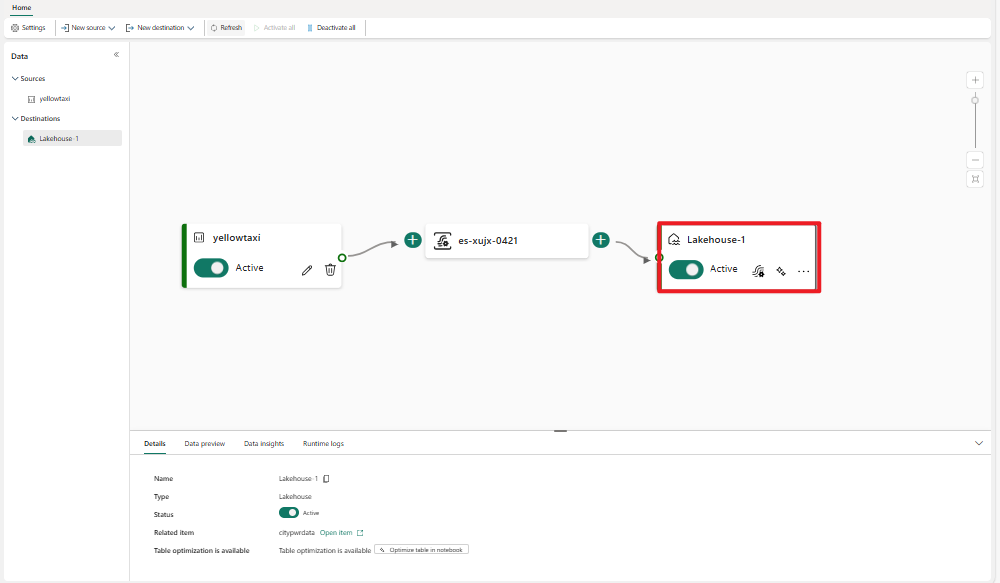
Once you complete these steps, the lakehouse destination is available for visualization in Live view. In the Details pane, you can select the Optimize table in notebook shortcut to launch an Apache Spark job within a Notebook, which consolidates the small streaming files within the target lakehouse table.

Related content
To learn how to add other destinations to an eventstream, see the following articles:
Prerequisites
Before you start, you must complete the following prerequisites:
- Get access to a premium workspace with Contributor or above permissions where your eventstream is located.
- Get access to a premium workspace with Contributor or above permissions where your lakehouse is located.
Note
The maximum number of sources and destinations for one eventstream is 11.
Add a lakehouse as a destination
If you have a lakehouse created in your workspace, follow these steps to add the lakehouse to your eventstream as a destination:
Select New destination on the ribbon or "+" in the main editor canvas and then select Lakehouse. The Lakehouse destination configuration screen appears.
Enter a name for the eventstream destination and complete the information about your lakehouse.

Lakehouse: Select an existing lakehouse from the workspace you specified.
Delta table: Select an existing delta table or create a new one to receive data.
Note
When writing data into the lakehouse table, there is Schema enforcement. This means all new writes to a table must be compatible with the target table's schema at write time, ensuring data quality.
All records of the output data are projected onto the schema of the existing table. When writing the output to a new delta table, the table schema is created based on the first record. If the incoming data has an additional column compared to the existing table schema, it writes to the table without including the extra column. Conversely, if the incoming data is missing a column compared to the existing table schema, it writes to the table with the column's value set to null.
Input data format: Select the format for the data (input data) that is sent to your lakehouse.
Note
The supported input event data formats are JSON, Avro, and CSV (with header).
Event processing: You can use the event processing editor to specify how the data should be processed before sending it to your lakehouse. Select Open event processor to open the event processing editor. To learn more about real-time processing using the event processor, see Process event data with event processor editor. When you're done with the editor, select Done to return to the Lakehouse destination configuration screen.

Two ingestion modes are available for a lakehouse destination. Select one of these modes to optimize how the Fabric event streams feature writes to the lakehouse based on your scenario.
Rows per file – The minimum number of rows that Lakehouse ingests in a single file. The smaller the minimum number of rows, the more files Lakehouse creates during ingestion. Minimum is 1 row. Maximum is 2M rows per file.
Duration – The maximum duration that Lakehouse would take to ingest a single file. The longer the duration, more rows are ingested in a file. Minimum is 1 minute and maximum is 2 hours.

Select Add to add the lakehouse destination.
Table optimization shortcut available inside the lakehouse destination. This solution facilitates you by launching a Spark job within a Notebook, which consolidates these small streaming files within the target Lakehouse table.
A lakehouse destination appears on the canvas, with a spinning status indicator. The system takes a few minutes to change the status to Active.


Manage a destination
Edit/remove: You can edit or remove an eventstream destination either through the navigation pane or canvas.
When you select Edit, the edit pane opens in the right side of the main editor. You can modify the configuration as you wish, including the event transformation logic through the event processor editor.

Related content
To learn how to add other destinations to an eventstream, see the following articles: