クイック スタート: 検証済みカスタム メール ドメインを追加する方法
このクイック スタートでは、Azure Communication Services で検証済みカスタム メール ドメインをプロビジョニングする方法について説明します。
前提条件
- アクティブなサブスクリプションが含まれる Azure アカウント。 「アカウントの無料作成」をご覧ください。
- Azure Communication Services Email リソースが作成され、ドメインを追加する準備が整いました。 「Email 通信リソースを作成して開始する」をご覧ください。
カスタム ドメインのプロビジョニング
カスタム ドメインをプロビジョニングするには、次の手順を実行する必要があります。
- ドメイン ネーム システム (DNS) に TXT レコードを追加して、カスタム ドメインの所有権を確認します。
- Sender Policy Framework (SPF) レコードと DomainKeys Identified Mail (DKIM) レコードを追加して、センダー認証を構成します。
カスタム ドメインを検証する
このセクションでは、DNS に TXT レコードを追加することで、カスタム ドメインの所有権を確認します。
「Email 通信リソースを作成して開始する」で作成したメール通信サービス リソースの [概要] ページを開きます。
次のいずれかのオプションを使用してカスタム ドメインを作成します。
(オプション 1) [カスタム ドメインのセットアップ] の下にある [設定] ボタンをクリックします。 ステップ 3 に進みます。
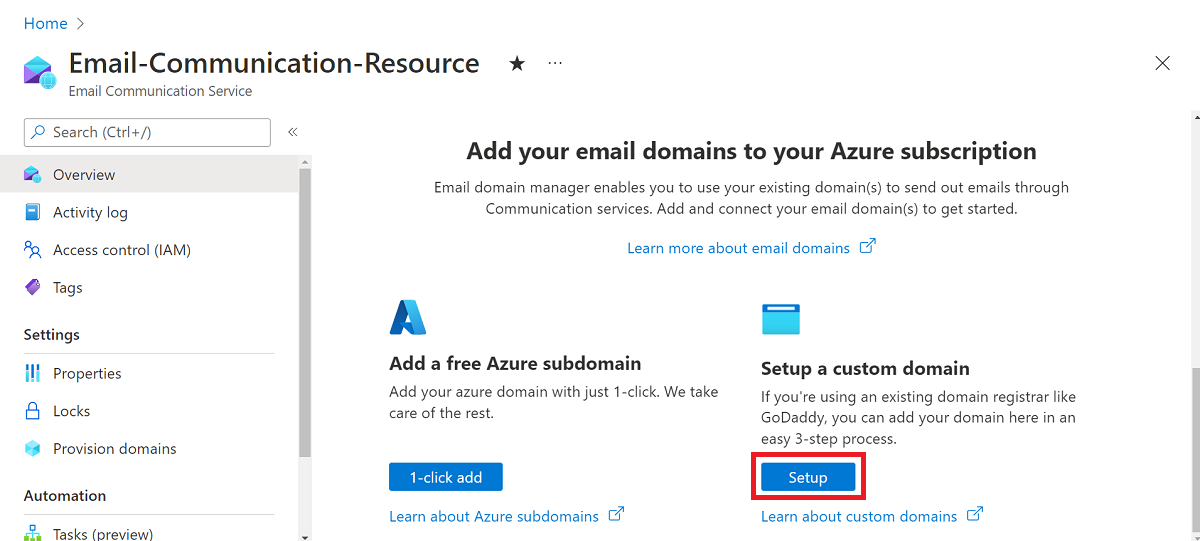
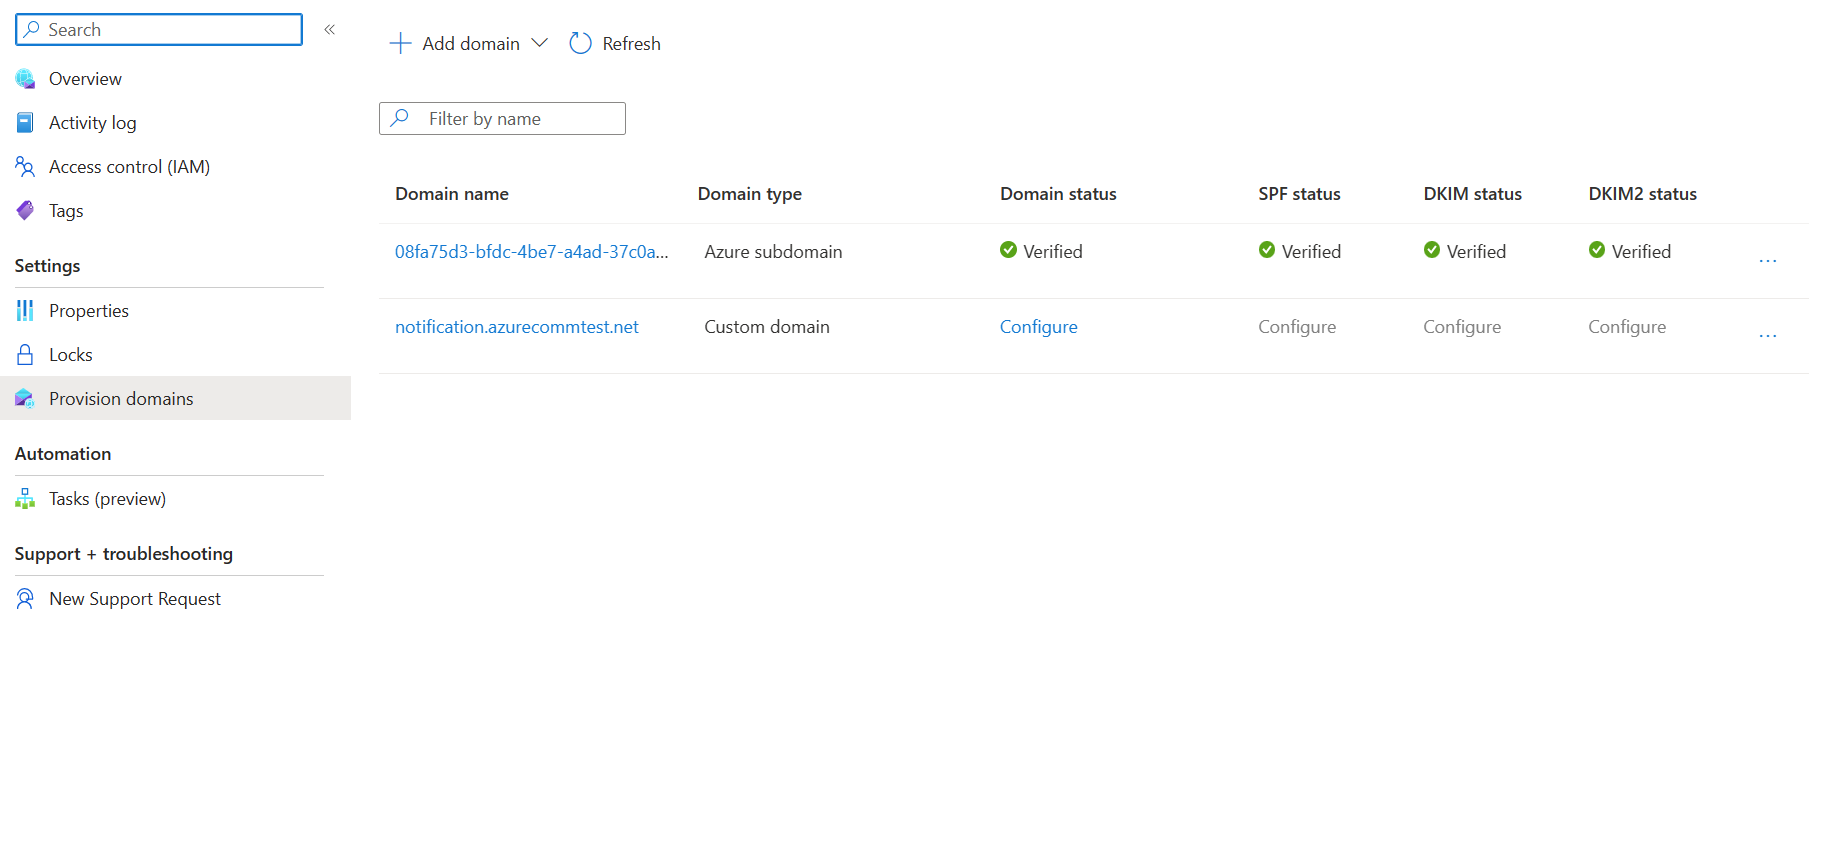
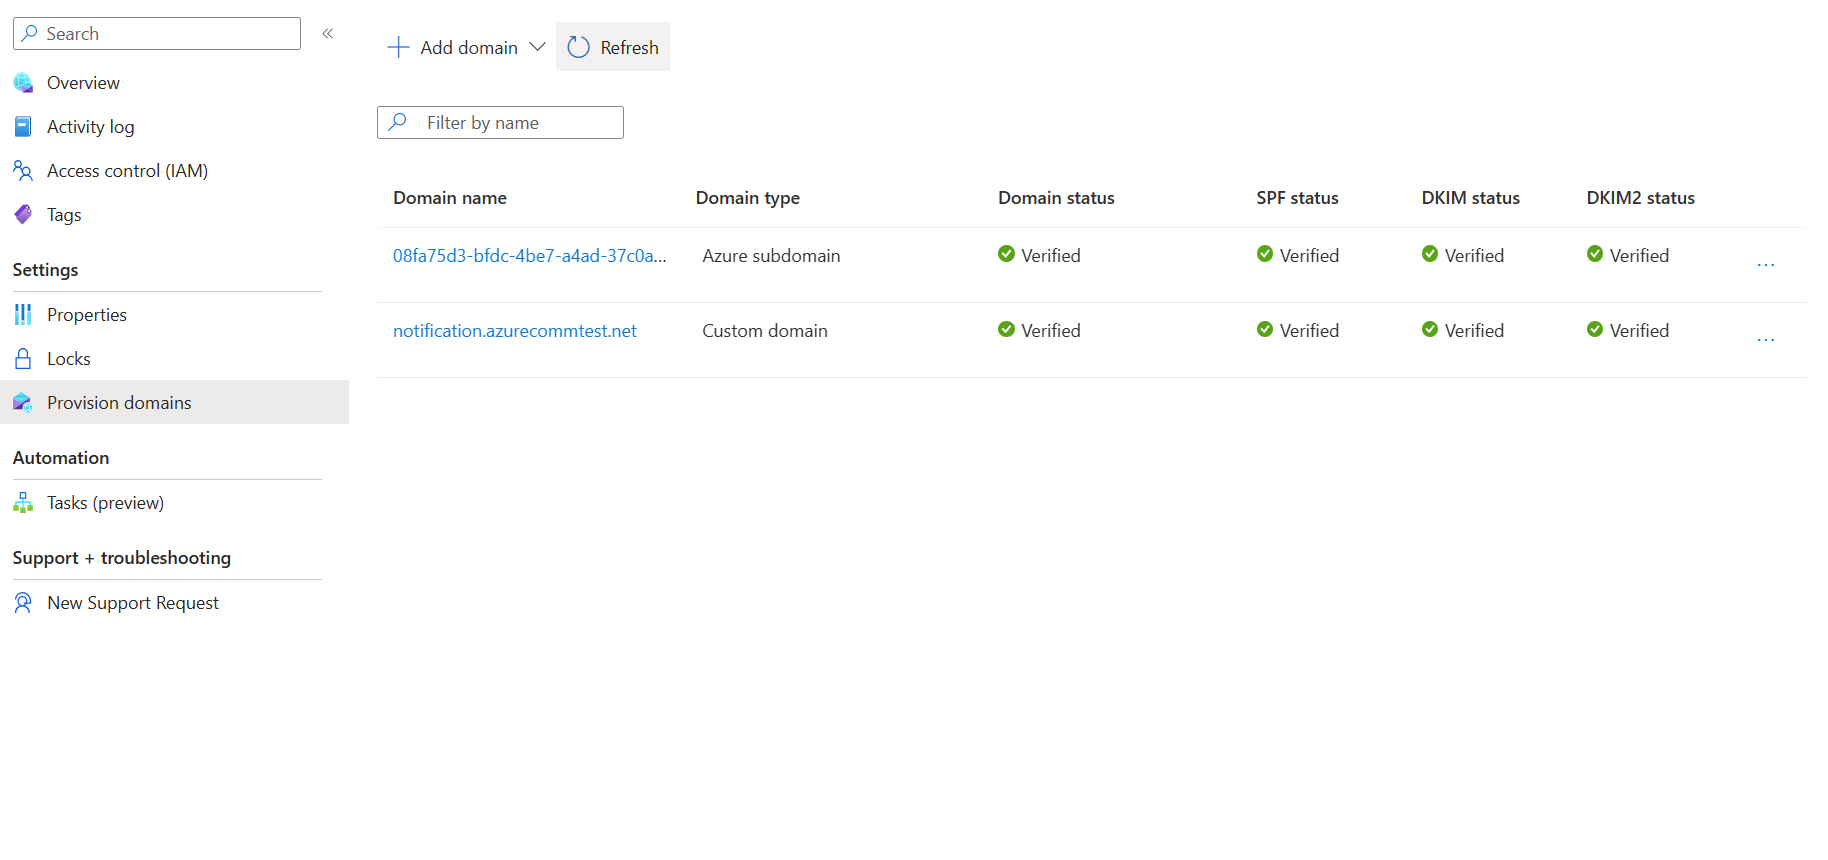
(オプション 2) 左側のナビゲーション パネルで [Provision Domains] (ドメインのプロビジョニング) をクリックします。
![[Provision Domains] (ドメインのプロビジョニング) ページへのナビゲーション リンクを示すスクリーンショット。](media/email-domains-custom-navigation.png)
上部のナビゲーション バーの [ドメインの追加] をクリックします。
ドロップダウンから [カスタム ドメイン] を選択します。
[カスタム ドメインの追加] をクリックします。
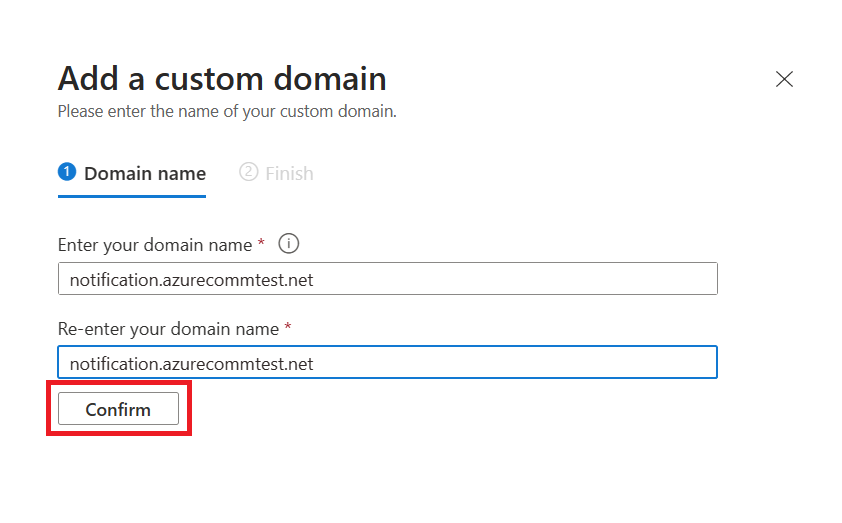
テキスト ボックスにドメイン名を入力します。
次のテキスト ボックスにドメイン名を再入力します。
[Confirm](確認) をクリックします。
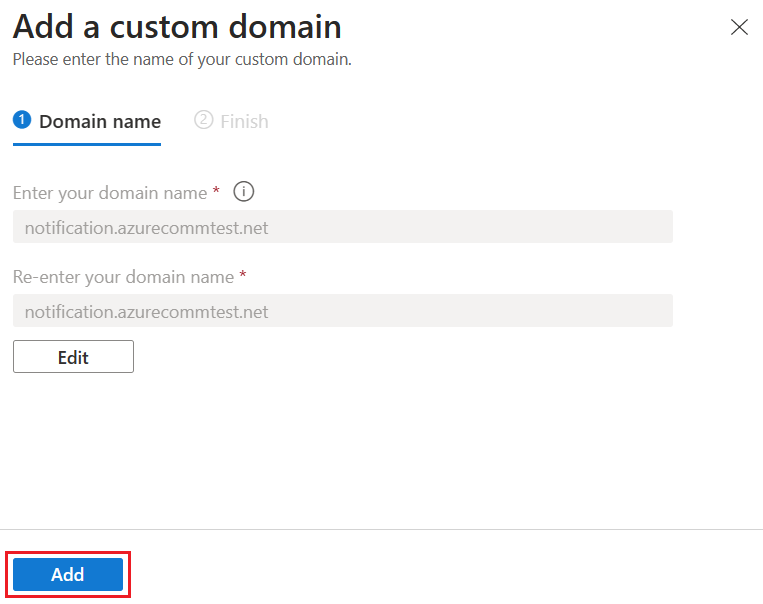
入力したドメイン名が正しく、両方のテキスト ボックスが同じであることを確認します。 必要に応じて、[編集] をクリックして、確定する前にドメイン名を修正します。
追加をクリックします。
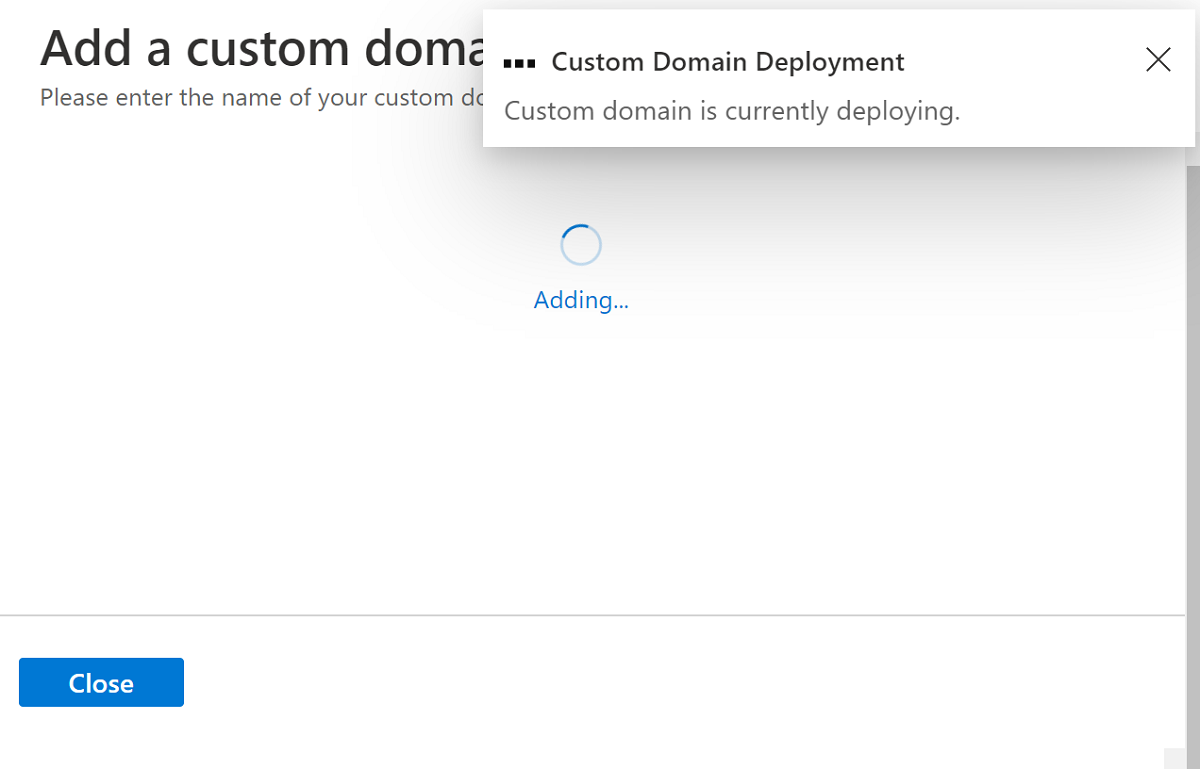
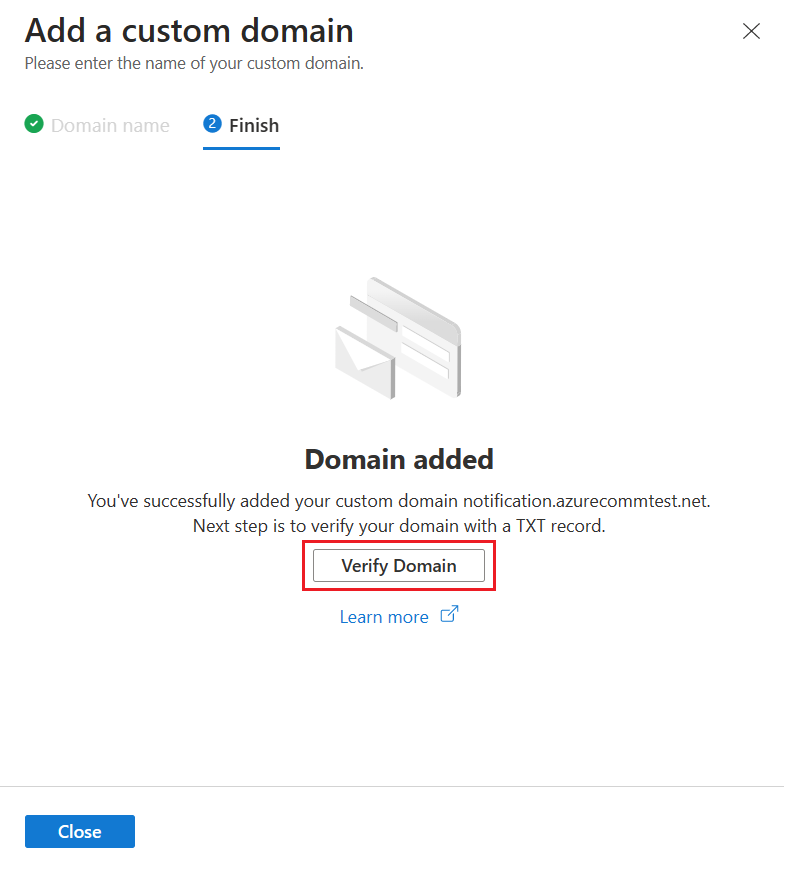
Azure Communication Services では、ドメインのカスタム ドメイン構成が作成されます。
ドメインの所有権を確認するには、[ドメインの検証] をクリックします。
 。
。検証を後で再開するには、[閉じる] をクリックして再開します。 次に、[ドメインのプロビジョニング] から検証を続行するには、[構成] をクリックします。
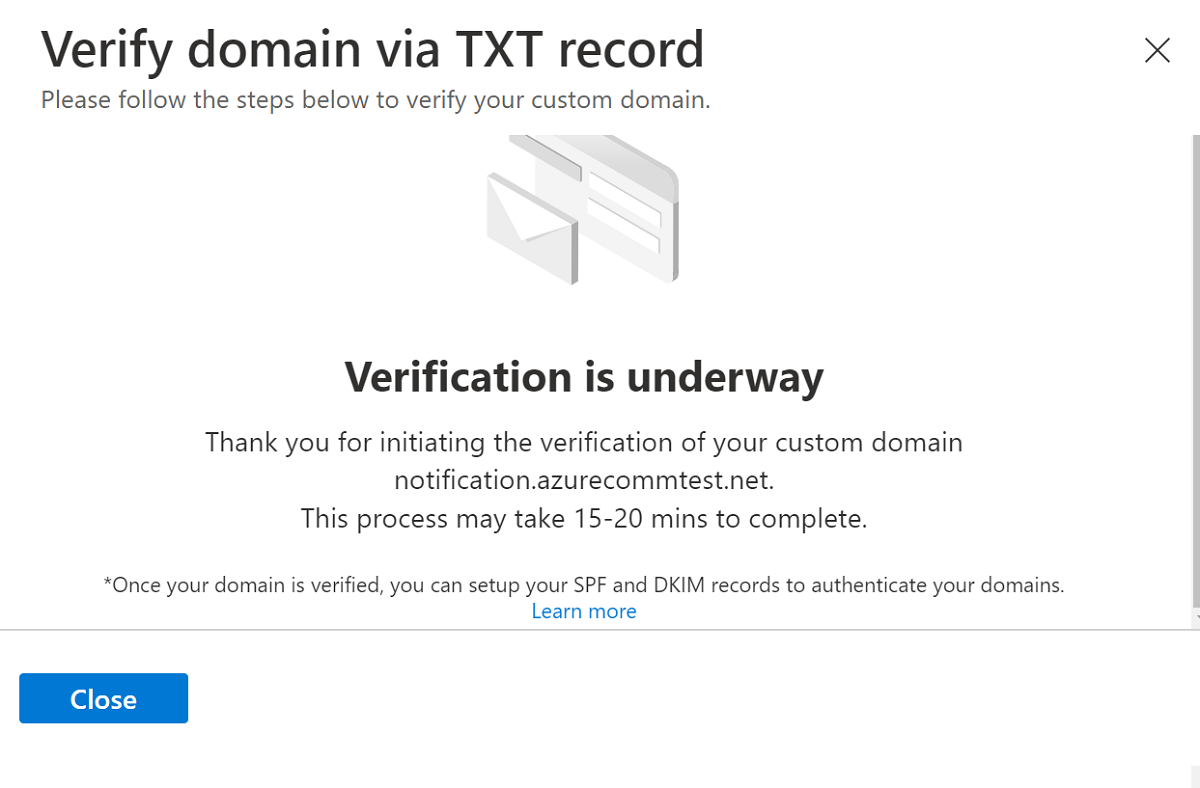
[ドメインの検証] または [構成] を選択すると、[TXT レコードを使用したドメインの検証] ダイアログ ボックスが開きます。
![ドメインの所有権を検証するためにクリックする必要がある [構成] リンクを示すスクリーンショット。](media/email-domains-custom-verify.png)
ドメインのレジストラーまたは DNS ホスティング プロバイダーに、上記の TXT レコードを追加します。 DNS プロバイダーの TXT レコードの追加については、 [TXT レコード] セクションを参照してください。
このステップが完了したら、[次へ] をクリックします。
TXT レコードが DNS で正常に作成されたことを確認し、[完了] をクリックします。
DNS の変更が有効になるまでに15 ~ 30分かかる場合があります。 [閉じる] をクリックします。
ドメインを検証したら、SPF レコードと DKIM レコードを追加してドメインを認証できます。


![ドメインの所有権を検証するためにクリックする必要がある [構成] リンクを示すスクリーンショット。](media/email-domains-custom-verify-expanded.png#lightbox)

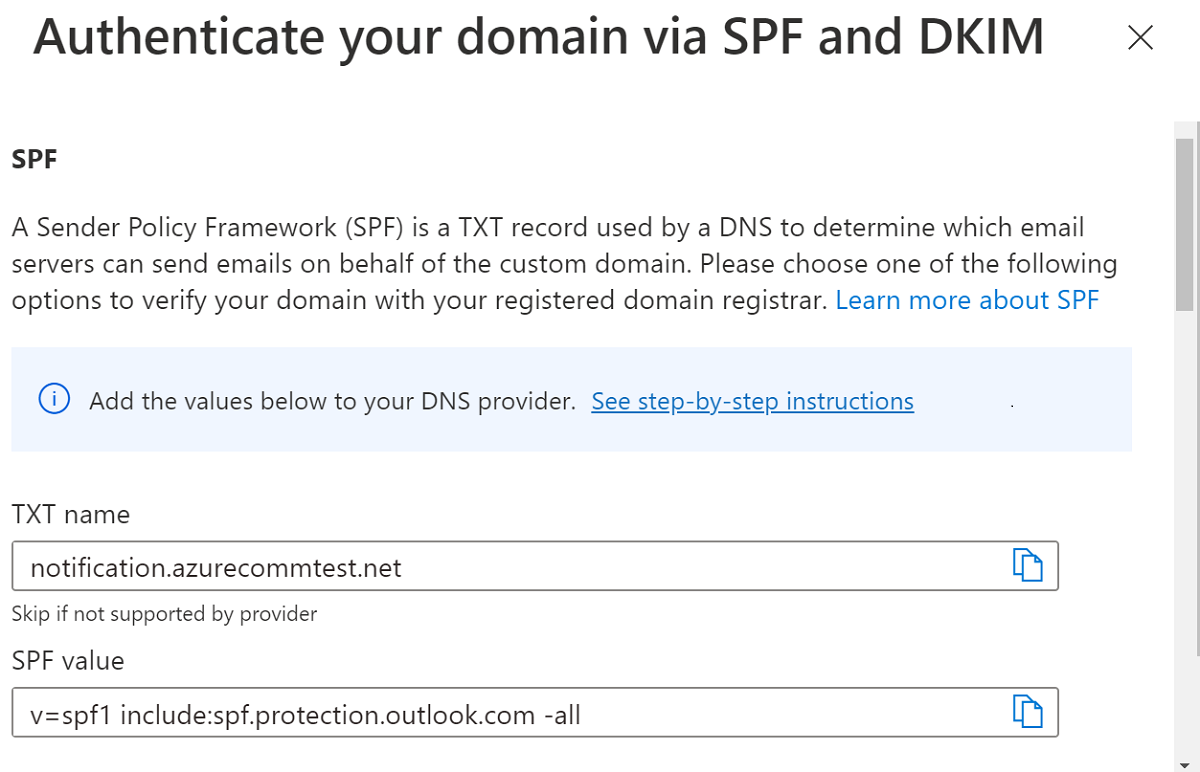
カスタム ドメインの送信者認証を構成する
ドメインのセンダー認証を構成するには、さらにDomain Name Service (DNS) レコードを追加する必要があります。 このセクションでは、Azure Communication Services により DNS に追加するためのレコードが提供される方法について説明します。 ただし、登録するドメインがルート ドメインかサブドメインかに応じて、レコードをそれぞれのゾーンに追加するか、自動的に生成されたレコードを変更する必要があります。
このセクションでは、カスタム ドメイン sales.us.notification.azurecommtest.net の SPF レコードと DKIM レコードを追加する方法について説明します。 次の例では、レコードを追加するゾーンのレベルに応じて、これらのレコードを DNS に追加する 4 つの異なる方法について説明します。
- ゾーン: sales.us.notification.azurecommtest.net
| レコード | Type | 名前 | 値 |
|---|---|---|---|
| SPF | TXT | sales.us.notification.azurecommtest.net | v=spf1 include:spf.protection.outlook.com -all |
| DKIM | CNAME | selector1-azurecomm-prod-net._domainkey | selector1-azurecomm-prod-net._domainkey.azurecomm.net |
| DKIM2 | CNAME | selector2-azurecomm-prod-net._domainkey | selector2-azurecomm-prod-net._domainkey.azurecomm.net |
ポータルによって生成されたレコードは、このゾーンの DNS sales.us.notification.azurecommtest.netにこれらのレコードを追加することを前提としています。
- ゾーン: us.notification.azurecommtest.net
| レコード | Type | 名前 | 値 |
|---|---|---|---|
| SPF | TXT | 営業 | v=spf1 include:spf.protection.outlook.com -all |
| DKIM | CNAME | selector1-azurecomm-prod-net._domainkey.sales | selector1-azurecomm-prod-net._domainkey.azurecomm.net |
| DKIM2 | CNAME | selector2-azurecomm-prod-net._domainkey.sales | selector2-azurecomm-prod-net._domainkey.azurecomm.net |
- ゾーン: notification.azurecommtest.net
| レコード | Type | 名前 | 値 |
|---|---|---|---|
| SPF | TXT | sales.us | v=spf1 include:spf.protection.outlook.com -all |
| DKIM | CNAME | selector1-azurecomm-prod-net._domainkey.sales.us | selector1-azurecomm-prod-net._domainkey.azurecomm.net |
| DKIM2 | CNAME | selector2-azurecomm-prod-net._domainkey.sales.us | selector2-azurecomm-prod-net._domainkey.azurecomm.net |
- ゾーン: azurecommtest.net
| レコード | Type | 名前 | 値 |
|---|---|---|---|
| SPF | TXT | sales.us.notification | v=spf1 include:spf.protection.outlook.com -all |
| DKIM | CNAME | selector1-azurecomm-prod-net._domainkey.sales.us.notification | selector1-azurecomm-prod-net._domainkey.azurecomm.net |
| DKIM2 | CNAME | selector2-azurecomm-prod-net._domainkey.sales.us.notification | selector2-azurecomm-prod-net._domainkey.azurecomm.net |
SPF および DKIM レコードの追加
このセクションでは、Sender Policy Framework (SPF) レコードと DomainKeys Identified Mail (DKIM) レコードを追加して、センダー認証を構成します。
[ドメインのプロビジョニング] を開き、 [ドメインの状態] が
Verified状態であることを確認します。SPF と DKIM の情報を追加するには、[構成] をクリックします。
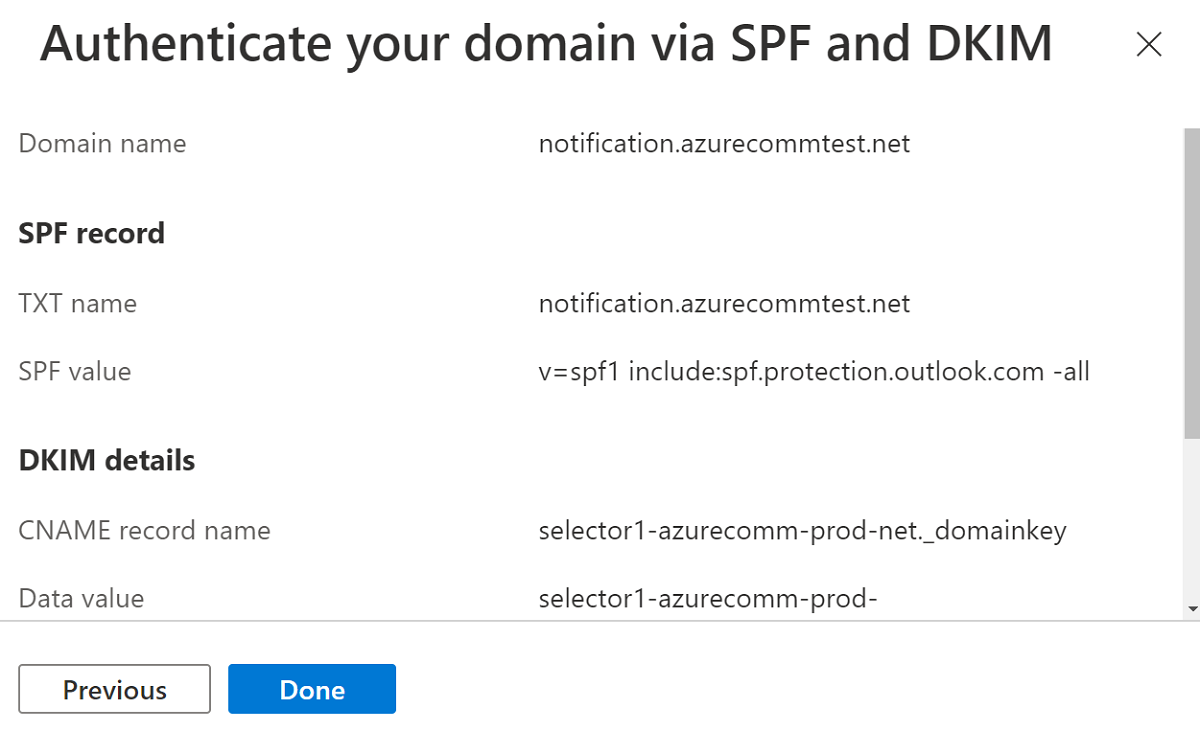
ドメインのレジストラーまたは DNS ホスティング プロバイダーに、次の TXT レコードと CNAME レコードを追加します。 DNS プロバイダーの TXT レコードと CNAME レコードの追加については、「一般的なドメイン レジストラー テーブルでの DNS レコードの追加」を参照してください。
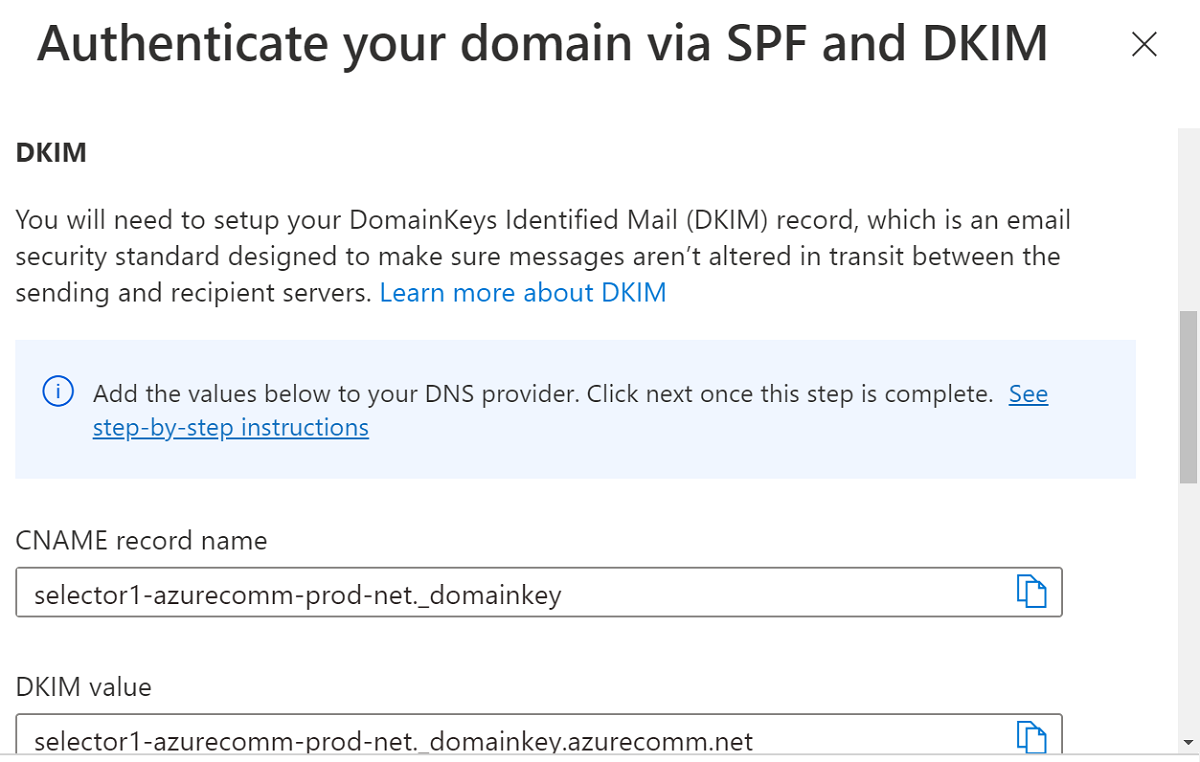
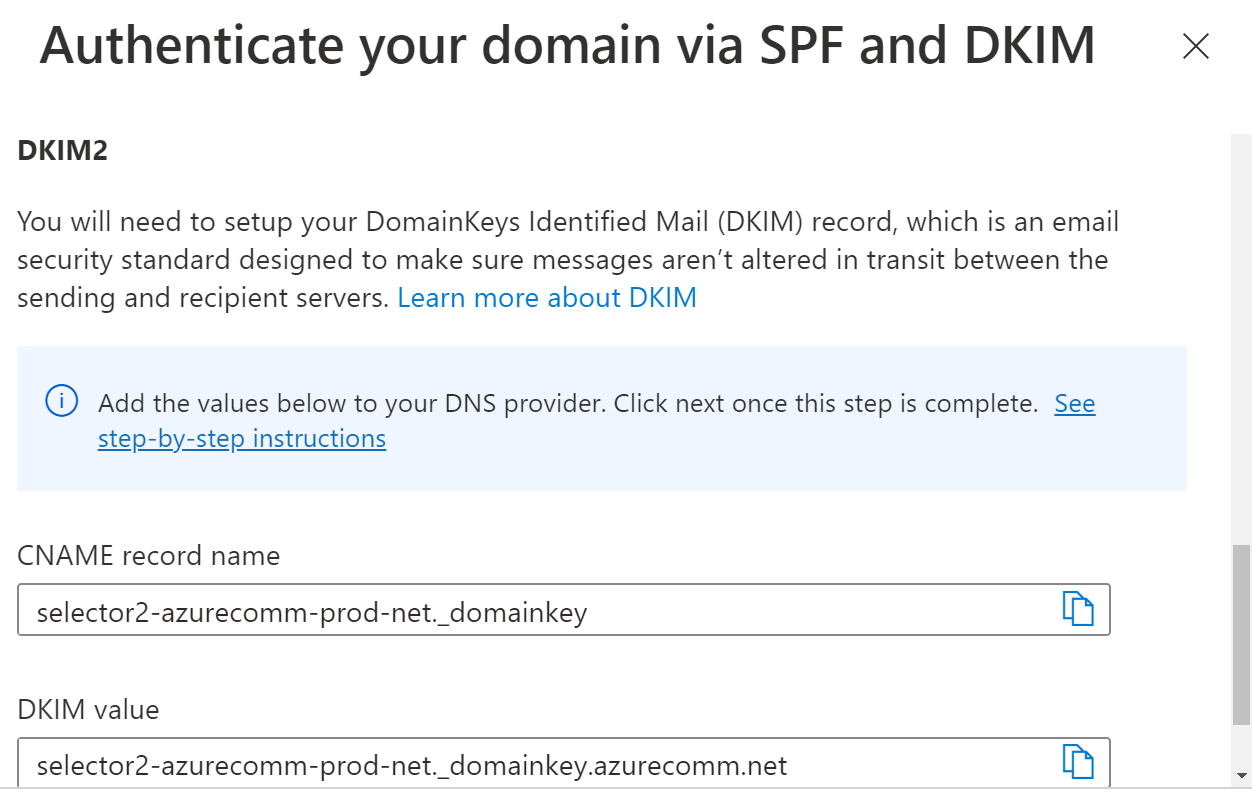
TXT と CNAME 情報の追加が完了したら、[次へ] をクリックして次に進みます。
DNS に TXT レコードと CNAME レコードが正常に作成されていることを確認します。 次に、 [Done] をクリックします。
DNS の変更は 15 分から 30 分で有効になります。 [閉じる] をクリックし、検証が完了するまで待ちます。
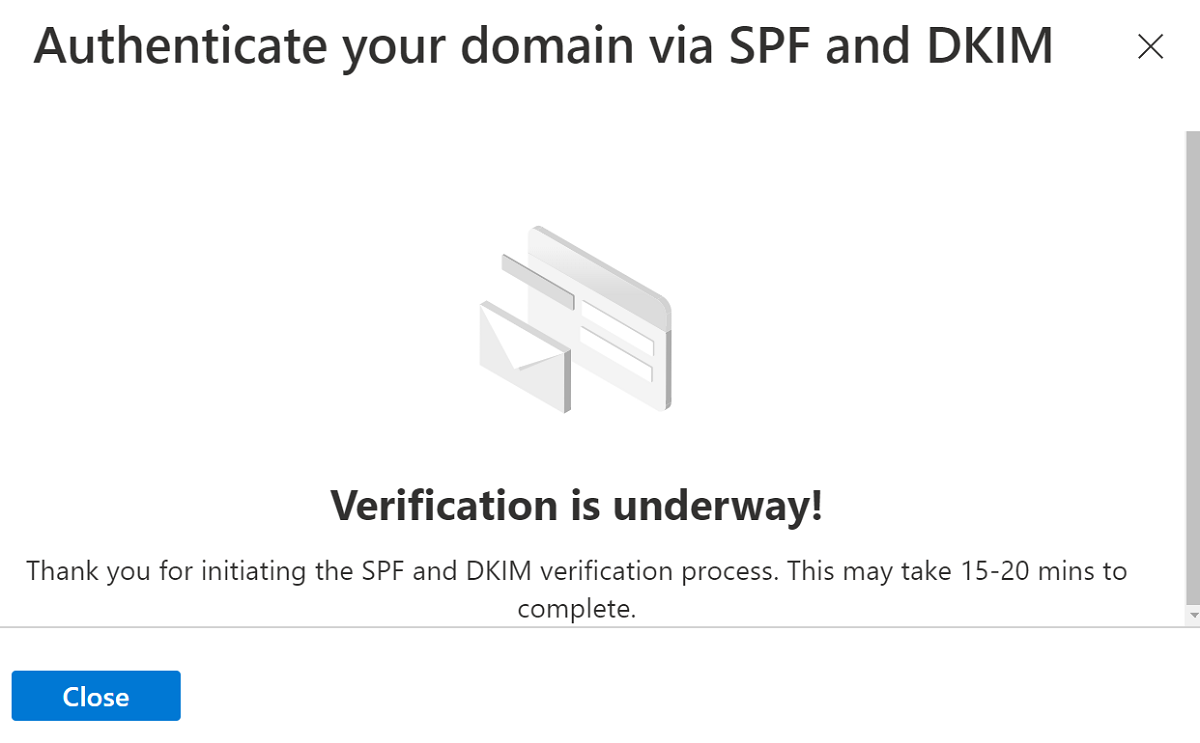
[ドメインのプロビジョニング] ページで検証の状態を確認できます。

センダー認証の構成を確認すると、メール ドメインではカスタム ドメインを使用してメールを送信する準備が整います。


前提条件
- アクティブなサブスクリプションが含まれる Azure アカウント。 無料でアカウントを作成できます。
- Azure CLI
- Email Communication Service を作成します。
カスタム ドメインのプロビジョニング
カスタム ドメインをプロビジョニングするには、次の手順を実行する必要があります。
- ドメイン ネーム システム (DNS) に TXT レコードを追加して、カスタム ドメインの所有権を確認します。
- Sender Policy Framework (SPF) レコードと DomainKeys Identified Mail (DKIM) レコードを追加して、センダー認証を構成します。
ドメイン リソースを作成する
ドメイン リソースを作成するには、Azure CLI にサインインします。 ターミナルから az login コマンドを実行し、資格情報を入力してサインインできます。 リソースを作成するには、次のコマンドを実行します。
az communication email domain create --domain-name "contoso.com" --email-service-name "<EmailServiceName>" --location "Global" --resource-group "<resourceGroup>" --domain-management CustomerManaged
特定のサブスクリプションを選択したい場合は、--subscription フラグを指定してサブスクリプション ID を指定することもできます。
az communication email domain create --domain-name "contoso.com" --email-service-name "<EmailServiceName>" --location "Global" --resource-group "<resourceGroup>" --domain-management CustomerManaged --subscription "<subscriptionId>"
ドメイン リソースは、以下のオプションを使用して構成できます。
- リソース グループ
- メール通信サービス リソースの名前。
- リソースが関連付けられることになる地理的な場所。
- ドメイン リソースの名前。
- ドメイン管理プロパティの値。
- カスタム ドメインの場合、値は CustomerManaged にする必要があります。
次の手順では、ドメイン リソースにタグを割り当て、ユーザー エンゲージメントの追跡を更新できます。 タグは、ドメイン リソースを整理するために使用できます。 タグの詳細については、リソースのタグ付けに関するドキュメントを参照してください。
ドメイン リソースを管理する
ドメイン リソースにタグを追加したり、ユーザー エンゲージメントの追跡を更新するには、次のコマンドを実行します。 また、特定のサブスクリプションを対象にすることもできます。
az communication email domain update --domain-name "contoso.com" --email-service-name "<EmailServiceName>" --resource-group "<resourceGroup>" --tags newTag="newVal1" --user-engmnt-tracking Enabled

az communication email domain update --domain-name "contoso.com" --email-service-name "<EmailServiceName>" --resource-group "<resourceGroup>" --tags newTag="newVal1" --user-engmnt-tracking Disabled --subscription "<subscriptionId>"
特定の Email Communication Service 内のすべてのドメイン リソースを一覧表示するには、次のコマンドを使用します。
az communication email domain list --email-service-name "<EmailServiceName>" --resource-group "<resourceGroup>"
特定のドメイン リソースに関するすべての情報を表示するには、次のコマンドを使用します。
az communication email domain show --domain-name "contoso.com" --email-service-name "<EmailServiceName>" --resource-group "<resourceGroup>"
ドメイン リソースの検証操作
ドメインの送信者認証を構成するには、Azure portal タブから [カスタム ドメインの送信者認証を構成する] セクションを参照してください。
検証の開始
ドメイン検証を開始するには、以下のコマンドを実行します。
az communication email domain initiate-verification --domain-name "contoso.com" --email-service-name "<EmailServiceName>" --resource-group "<resourceGroup>" --verification-type Domain
検証の取り消し
ドメイン検証を取り消すには、以下のコマンドを実行します。
az communication email domain cancel-verification --domain-name "contoso.com" --email-service-name "<EmailServiceName>" --resource-group "<resourceGroup>" --verification-type Domain
ドメイン リソースをクリーンアップする
ドメイン リソースをクリーンアップして削除する場合は、次のコマンドを実行して削除できます。
az communication email domain delete --domain-name "contoso.com" --email-service-name "<EmailServiceName>" --resource-group "<resourceGroup>"
Note
リソースの削除は永続的であり、リソースを削除すると、イベント グリッド フィルター、電話番号など、リソースに関連付けられたデータを含むデータを復元できなくなります。
その他のコマンドについては、ドメイン CLI に関するページを参照してください。
前提条件
- アクティブなサブスクリプションが含まれる Azure アカウント。 無料でアカウントを作成できます。
- お使いのオペレーティング システムに対応した最新バージョンの .NET Core SDK。
- .NET Identity SDK の最新バージョンを取得します。
- .NET Management SDK の最新バージョンを取得します。
カスタム ドメインのプロビジョニング
カスタム ドメインをプロビジョニングするには、次の手順を実行する必要があります。
- ドメイン ネーム システム (DNS) に TXT レコードを追加して、カスタム ドメインの所有権を確認します。
- Sender Policy Framework (SPF) レコードと DomainKeys Identified Mail (DKIM) レコードを追加して、センダー認証を構成します。
SDK のインストール
まず、Communication Services Management SDK を C# プロジェクトにインクルードします。
using Azure.ResourceManager.Communication;
サブスクリプション ID
Azure サブスクリプションの ID を把握しておく必要があります。 これは、ポータルから取得できます。
- Azure アカウントにログインします
- 左側のサイドバーで サブスクリプション を選択します
- 必要なサブスクリプションを選択します
- [概要] をクリックします
- サブスクリプション ID を選択します
このクイックスタートでは、 AZURE_SUBSCRIPTION_ID という名前の環境変数にサブスクリプション ID を格納していることを前提としています。
認証
ドメイン リソースと通信するには、まず自分自身を Azure に対して認証する必要があります。
クライアントを認証する
認証されたクライアントを作成する既定のオプションは、DefaultAzureCredential を使用することです。 すべての管理 API は同じエンドポイントを経由するため、リソースを操作するために、最上位レベルの ArmClient を 1 つだけ作成する必要があります。
Azure に対して認証を行い、ArmClient を作成するには、次のコードを実行します。
using System;
using System.Threading.Tasks;
using Azure;
using Azure.Core;
using Azure.Identity;
using Azure.ResourceManager;
using Azure.ResourceManager.Communication;
using Azure.ResourceManager.Resources;
...
// get your azure access token, for more details of how Azure SDK get your access token, please refer to https://video2.skills-academy.com/dotnet/azure/sdk/authentication?tabs=command-line
TokenCredential cred = new DefaultAzureCredential();
// authenticate your client
ArmClient client = new ArmClient(cred);
Azure リソースの操作
これで認証されました。
次の各例では、ドメイン リソースを既存の Email Communication Service.に割り当てます。
Email Communication Service を作成する必要がある場合は、Azure portal を使用してそのようにすることができます。
ドメイン リソースを作成する
ドメイン リソースを作成するときは、リソース グループ名、Email Communication Service 名、リソース名、DomainManagement を指定します。
Note
Location プロパティは常に globalです。
// this example assumes you already have this EmailServiceResource created on azure
// for more information of creating EmailServiceResource, please refer to the document of EmailServiceResource
string subscriptionId = "11112222-3333-4444-5555-666677778888";
string resourceGroupName = "MyResourceGroup";
string emailServiceName = "MyEmailServiceResource";
ResourceIdentifier emailServiceResourceId = EmailServiceResource.CreateResourceIdentifier(subscriptionId, resourceGroupName, emailServiceName);
EmailServiceResource emailServiceResource = client.GetEmailServiceResource(emailServiceResourceId);

// get the collection of this CommunicationDomainResource
CommunicationDomainResourceCollection collection = emailServiceResource.GetCommunicationDomainResources();

// invoke the operation
string domainName = "contoso.com";
CommunicationDomainResourceData data = new CommunicationDomainResourceData(new AzureLocation("Global"))
{
    DomainManagement = DomainManagement.CustomerManaged,
};
ArmOperation<CommunicationDomainResource> lro = await collection.CreateOrUpdateAsync(WaitUntil.Completed, domainName, data);
CommunicationDomainResource result = lro.Value;

// the variable result is a resource, you could call other operations on this instance as well
// but just for demo, we get its data from this resource instance
CommunicationDomainResourceData resourceData = result.Data;
// for demo we just print out the id
Console.WriteLine($"Succeeded on id: {resourceData.Id}");
ドメイン リソースを管理する
ドメイン リソースを更新する
...
// this example assumes you already have this CommunicationDomainResource created on azure
// for more information of creating CommunicationDomainResource, please refer to the document of CommunicationDomainResource
string subscriptionId = "11112222-3333-4444-5555-666677778888";
string resourceGroupName = "MyResourceGroup";
string emailServiceName = "MyEmailServiceResource";
string domainName = "contoso.com";
ResourceIdentifier communicationDomainResourceId = CommunicationDomainResource.CreateResourceIdentifier(subscriptionId, resourceGroupName, emailServiceName, domainName);
CommunicationDomainResource communicationDomainResource = client.GetCommunicationDomainResource(communicationDomainResourceId);

// invoke the operation
CommunicationDomainResourcePatch patch = new CommunicationDomainResourcePatch()
{
    UserEngagementTracking = UserEngagementTracking.Enabled,
};
ArmOperation<CommunicationDomainResource> lro = await communicationDomainResource.UpdateAsync(WaitUntil.Completed, patch);
CommunicationDomainResource result = lro.Value;

// the variable result is a resource, you could call other operations on this instance as well
// but just for demo, we get its data from this resource instance
CommunicationDomainResourceData resourceData = result.Data;
// for demo we just print out the id
Console.WriteLine($"Succeeded on id: {resourceData.Id}");
メール サービス別に一覧表示する
// this example assumes you already have this EmailServiceResource created on azure
// for more information of creating EmailServiceResource, please refer to the document of EmailServiceResource
string subscriptionId = "11112222-3333-4444-5555-666677778888";
string resourceGroupName = "MyResourceGroup";
string emailServiceName = "MyEmailServiceResource";
ResourceIdentifier emailServiceResourceId = EmailServiceResource.CreateResourceIdentifier(subscriptionId, resourceGroupName, emailServiceName);
EmailServiceResource emailServiceResource = client.GetEmailServiceResource(emailServiceResourceId);

// get the collection of this CommunicationDomainResource
CommunicationDomainResourceCollection collection = emailServiceResource.GetCommunicationDomainResources();

// invoke the operation and iterate over the result
await foreach (CommunicationDomainResource item in collection.GetAllAsync())
{
    // the variable item is a resource, you could call other operations on this instance as well
    // but just for demo, we get its data from this resource instance
    CommunicationDomainResourceData resourceData = item.Data;
    // for demo we just print out the id
    Console.WriteLine($"Succeeded on id: {resourceData.Id}");
}

Console.WriteLine($"Succeeded");
ドメイン リソースを取得する
// this example assumes you already have this EmailServiceResource created on azure
// for more information of creating EmailServiceResource, please refer to the document of EmailServiceResource
string subscriptionId = "11112222-3333-4444-5555-666677778888";
string resourceGroupName = "MyResourceGroup";
string emailServiceName = "MyEmailServiceResource";
ResourceIdentifier emailServiceResourceId = EmailServiceResource.CreateResourceIdentifier(subscriptionId, resourceGroupName, emailServiceName);
EmailServiceResource emailServiceResource = client.GetEmailServiceResource(emailServiceResourceId);

// get the collection of this CommunicationDomainResource
CommunicationDomainResourceCollection collection = emailServiceResource.GetCommunicationDomainResources();

// invoke the operation
string domainName = "contoso.com";
bool result = await collection.ExistsAsync(domainName);

Console.WriteLine($"Succeeded: {result}");
ドメイン リソースの検証操作
ドメインの送信者認証を構成するには、Azure portal タブから [カスタム ドメインの送信者認証を構成する] セクションを参照してください。
検証の開始
// this example assumes you already have this CommunicationDomainResource created on azure
// for more information of creating CommunicationDomainResource, please refer to the document of CommunicationDomainResource
string subscriptionId = "11112222-3333-4444-5555-666677778888";
string resourceGroupName = "MyResourceGroup";
string emailServiceName = "MyEmailServiceResource";
string domainName = "contoso.com";
ResourceIdentifier communicationDomainResourceId = CommunicationDomainResource.CreateResourceIdentifier(subscriptionId, resourceGroupName, emailServiceName, domainName);
CommunicationDomainResource communicationDomainResource = client.GetCommunicationDomainResource(communicationDomainResourceId);

// invoke the operation
DomainsRecordVerificationContent content = new DomainsRecordVerificationContent(DomainRecordVerificationType.Spf);
await communicationDomainResource.InitiateVerificationAsync(WaitUntil.Completed, content);

Console.WriteLine($"Succeeded");
検証の取り消し
// this example assumes you already have this CommunicationDomainResource created on azure
// for more information of creating CommunicationDomainResource, please refer to the document of CommunicationDomainResource
string subscriptionId = "11112222-3333-4444-5555-666677778888";
string resourceGroupName = "MyResourceGroup";
string emailServiceName = "MyEmailServiceResource";
string domainName = "contoso.com";
ResourceIdentifier communicationDomainResourceId = CommunicationDomainResource.CreateResourceIdentifier(subscriptionId, resourceGroupName, emailServiceName, domainName);
CommunicationDomainResource communicationDomainResource = client.GetCommunicationDomainResource(communicationDomainResourceId);

// invoke the operation
DomainsRecordVerificationContent content = new DomainsRecordVerificationContent(DomainRecordVerificationType.Spf);
await communicationDomainResource.CancelVerificationAsync(WaitUntil.Completed, content);

Console.WriteLine($"Succeeded");
ドメイン リソースをクリーンアップする
// this example assumes you already have this CommunicationDomainResource created on azure
// for more information of creating CommunicationDomainResource, please refer to the document of CommunicationDomainResource
string subscriptionId = "11112222-3333-4444-5555-666677778888";
string resourceGroupName = "MyResourceGroup";
string emailServiceName = "MyEmailServiceResource";
string domainName = "contoso.com";
ResourceIdentifier communicationDomainResourceId = CommunicationDomainResource.CreateResourceIdentifier(subscriptionId, resourceGroupName, emailServiceName, domainName);
CommunicationDomainResource communicationDomainResource = client.GetCommunicationDomainResource(communicationDomainResourceId);

// invoke the operation
await communicationDomainResource.DeleteAsync(WaitUntil.Completed);

Console.WriteLine($"Succeeded");
Note
リソースの削除は永続的であり、リソースを削除すると、イベント グリッド フィルター、電話番号など、リソースに関連付けられたデータを含むデータを復元できなくなります。
前提条件
- アクティブなサブスクリプションが含まれる Azure アカウント。 無料でアカウントを作成できます。
- Azure Az PowerShell モジュールをインストールする
- Email Communication Service を作成します。
カスタム ドメインのプロビジョニング
カスタム ドメインをプロビジョニングするには、次の手順を実行する必要があります。
- ドメイン ネーム システム (DNS) に TXT レコードを追加して、カスタム ドメインの所有権を確認します。
- Sender Policy Framework (SPF) レコードと DomainKeys Identified Mail (DKIM) レコードを追加して、センダー認証を構成します。
ドメイン リソースを作成する
ドメイン リソースを作成するには、次のコマンドを使用し、Connect-AzAccount を使って Azure アカウントにサインインし、資格情報を入力します。
PS C:\> Connect-AzAccount
まず、次のコマンドを使用して、Azure Communication Services モジュール Az.Communication をインストールします。
PS C:\> Install-Module Az.Communication
次のコマンドを実行して、カスタム マネージド ドメイン リソースを作成します。
PS C:\> New-AzEmailServiceDomain -ResourceGroupName ContosoResourceProvider1 -EmailServiceName ContosoEmailServiceResource1 -Name contoso.com -DomainManagement CustomerManaged
ドメイン リソースは、以下のオプションを使用して構成できます。
- リソース グループ
- メール通信サービス リソースの名前。
- ドメイン リソースの名前。
- ドメイン管理プロパティの値。
- カスタム ドメインの場合、値は 'CustomerManaged' にする必要があります。
次の手順では、ドメイン リソースにタグを割り当て、ユーザー エンゲージメントの追跡を更新できます。 タグは、ドメイン リソースを整理するために使用できます。 タグの詳細については、リソースのタグ付けに関するドキュメントを参照してください。
ドメイン リソースを管理する
ドメイン リソースにタグを追加したり、ユーザー エンゲージメントの追跡を更新するには、次のコマンドを実行します。 また、特定のサブスクリプションを対象にすることもできます。
PS C:\> Update-AzEmailServiceDomain -Name contoso.com -EmailServiceName ContosoEmailServiceResource1 -ResourceGroupName ContosoResourceProvider1 -Tag @{ExampleKey1="ExampleValue1"} -UserEngagementTracking 1

PS C:\> Update-AzEmailServiceDomain -Name contoso.com -EmailServiceName ContosoEmailServiceResource1 -ResourceGroupName ContosoResourceProvider1 -Tag @{ExampleKey1="ExampleValue1"} -UserEngagementTracking 0 -SubscriptionId SubscriptionID
特定の Email Communication Service 内のすべてのドメイン リソースを一覧表示するには、次のコマンドを使用します。
PS C:\> Get-AzEmailServiceDomain -EmailServiceName ContosoEmailServiceResource1 -ResourceGroupName ContosoResourceProvider1
特定のドメイン リソースに関するすべての情報を一覧表示するには、次のコマンドを使用します。
PS C:\> Get-AzEmailServiceDomain -Name contoso.com -EmailServiceName ContosoEmailServiceResource1 -ResourceGroupName ContosoResourceProvider1
ドメイン リソースの検証操作
ドメインの送信者認証を構成するには、Azure portal タブから [カスタム ドメインの送信者認証を構成する] セクションを参照してください。
検証の開始
ドメイン検証を呼び出すには、以下のコマンドを実行します。
PS C:\> Invoke-AzEmailServiceInitiateDomainVerification -DomainName contoso.com -EmailServiceName ContosoEmailServiceResource1 -ResourceGroupName ContosoResourceProvider1 -VerificationType Domain
検証の取り消し
ドメイン検証を停止するには、以下のコマンドを実行します。
PS C:\> Stop-AzEmailServiceDomainVerification -DomainName contoso.com -EmailServiceName ContosoEmailServiceResource1 -ResourceGroupName ContosoResourceProvider1 -VerificationType Domain
ドメイン リソースをクリーンアップする
ドメイン リソースをクリーンアップして削除する場合は、次のコマンドを実行してドメイン リソースを削除できます。
PS C:\> Remove-AzEmailServiceDomain -Name contoso.com -EmailServiceName ContosoEmailServiceResource1 -ResourceGroupName ContosoResourceProvider1
Note
リソースの削除は永続的であり、リソースを削除すると、イベント グリッド フィルター、電話番号など、リソースに関連付けられたデータを含むデータを復元できなくなります。
Azure マネージド ドメインとカスタム ドメインの比較
カスタム メール ドメインをプロビジョニングする前に、次の表を確認して、ニーズに最も適したドメインの種類を決定します。
| Azure マネージド ドメイン | カスタム ドメイン | |
|---|---|---|
| 長所: | - 設定がすばやく簡単 - ドメインの検証が不要 |
- 独自のドメインからメールを送信 |
| 短所: | - センダー ドメインはカスタマイズされず、変更不可 - センダーのユーザー名はカスタマイズ不可 - 限られた送信ボリューム - ユーザー エンゲージメント追跡を有効化できない |
- ドメイン レコードの検証が必要 - 検証の設定時間が長い |
カスタム ドメインの MailFrom と [差出人表示名] の変更
必要に応じて、 MailFrom アドレスを既定の DoNotReply 以外のアドレスに構成し、複数のセンダー ユーザー名をドメインに追加できます。 送信者アドレスを構成する方法の詳細については、「クイック スタート: 複数のセンダー アドレスを追加する方法」をご覧ください。
これで、メール ドメインでメールを送信する準備ができました。
一般的なドメイン レジストラーに DNS レコードを追加する
TXT レコード
次のリンクでは、一般的なドメイン レジストラーを使用して TXT レコードを追加する方法について説明します。
| レジストラー名 | ドキュメント リンク |
|---|---|
| IONOS by 1 & 1 | 手順 1 から 7 |
| 123-reg.co.uk | 手順 1 から 6 |
| アマゾン ウェブ サービス (AWS) | 手順 1 から 8 |
| Cloudflare | 手順 1 から 6 |
| GoDaddy | 手順 1 から 6 |
| Namecheap | 手順 1 から 9 |
| Network Solutions | 手順 1 から 9 |
| OVH | 手順 1 から 9 |
| web.com | 手順 1 から 8 |
| Wix | 手順 1 から 5 |
| その他 (全般) | 手順 1 から 4 |
CNAME レコード
次のリンクでは、一般的なドメイン レジストラーを使用して CNAME レコードを追加する方法について詳しく説明します。 ドキュメント リンクの例ではなく、構成ウィンドウの値を必ず使用してください。
| レジストラー名 | ドキュメント リンク |
|---|---|
| IONOS by 1 & 1 | 手順 1 から 10 |
| 123-reg.co.uk | 手順 1 から 6 |
| アマゾン ウェブ サービス (AWS) | 手順 1 から 8 |
| Cloudflare | 手順 1 から 6 |
| GoDaddy | 手順 1 から 6 |
| Namecheap | 手順 1 から 8 |
| Network Solutions | 手順 1 から 9 |
| OVH | 手順 1 から 8 |
| web.com | 手順 1 から 8 |
| Wix | 手順 1 から 5 |
| その他 (全般) | ガイド |
次のステップ
関連記事
- メール クライアント ライブラリについて理解する
フィードバック
以下は間もなく提供いたします。2024 年を通じて、コンテンツのフィードバック メカニズムとして GitHub の issue を段階的に廃止し、新しいフィードバック システムに置き換えます。 詳細については、「https://aka.ms/ContentUserFeedback」を参照してください。
フィードバックの送信と表示